Knife Tool
The Knife tool can be used to interactively subdivide (cut up) geometry by drawing lines or closed loops to create holes.
Usage
When you press K (or Shift-K ), the Knife tool becomes active.
Drawing the Cut Line
When using Knife, the cursor changes to an icon of a scalpel and the header changes to display options for the tool. You can draw connected straight lines by clicking LMB , marked with small green squares. Red squares are already defined cuts. Surrounding red squares mean that there is a cut already in that very position, so no additional vertex will be created (besides the first one).
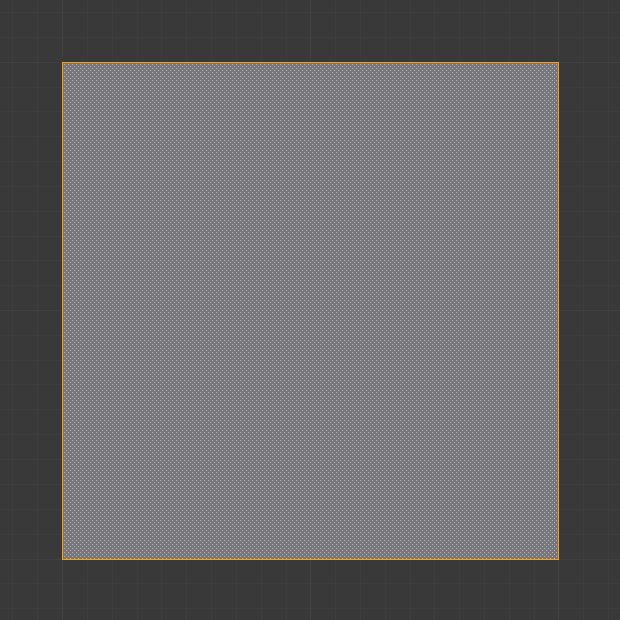
Mesh before knife cut.
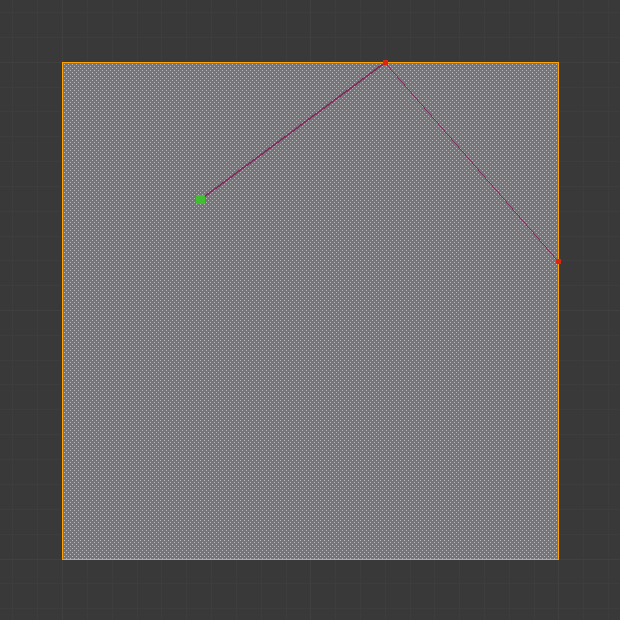
Knife cut active.

After confirming knife cut.
Options
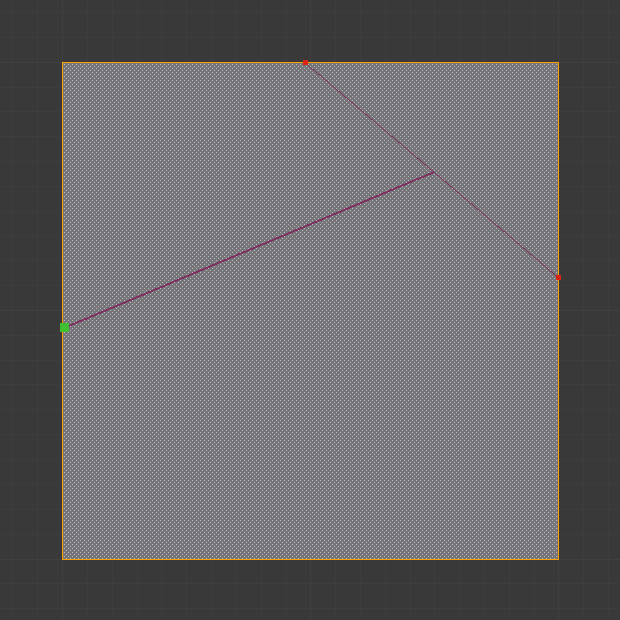
Creating multiple cuts.
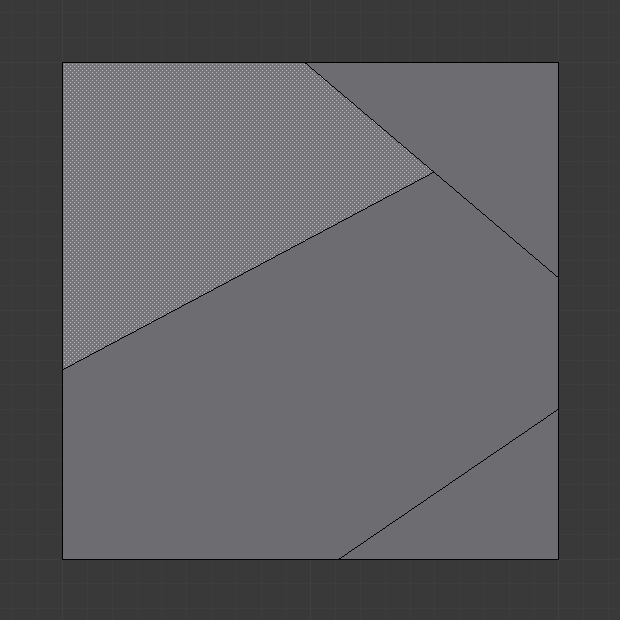
Result of starting new cuts while in the tool.

Constraining cut angle.
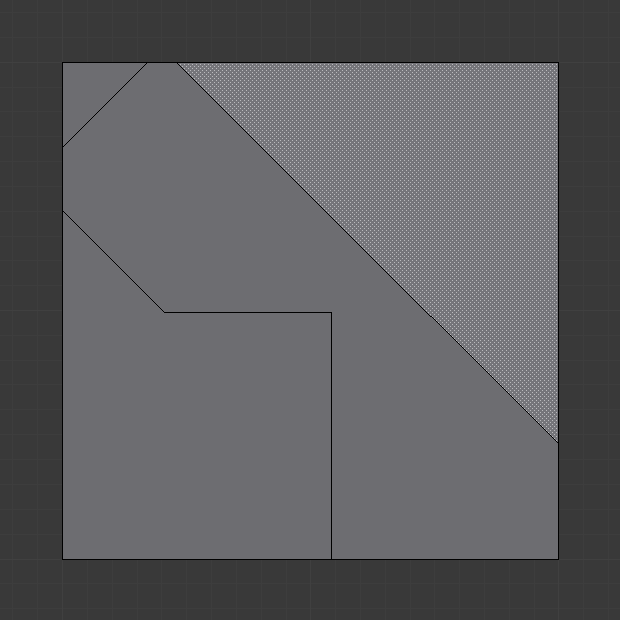
Result of constraining cut angle.
Confirming and Selection
Pressing Esc or RMB at any time cancels the tool, and pressing LMB or Return confirms the cut, with the following options:
Return will leave selected every edge except the new edges created from the cut.
Knife Project
| Mode: | Edit Mode |
|---|---|
| Panel: | Toolbar ‣ Tools ‣ Mesh Tools ‣ Add: Knife Project |
Knife projection is a non-interactive tool where you can use objects to cookie-cut into the mesh rather than hand drawing the line.
This works by using the outlines of other selected objects in Edit Mode to cut into the mesh along the view axis, resulting geometry inside the cutters outline will be selected.
Outlines can be wire or boundary edges.
To use Knife Project, first while in Object Mode, select the «cutting object» then add to that selection with Shift-RMB the «object to be cut». Now, enter Edit Mode and press Knife Project (found in the Toolbar).
3D View Alignment to adjust the projection axis.
Examples
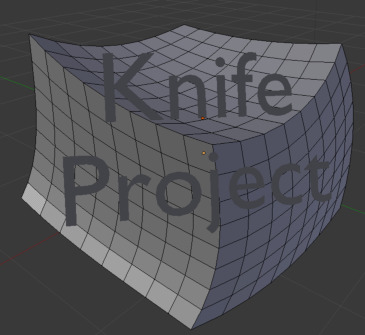
Before projecting from a text object.
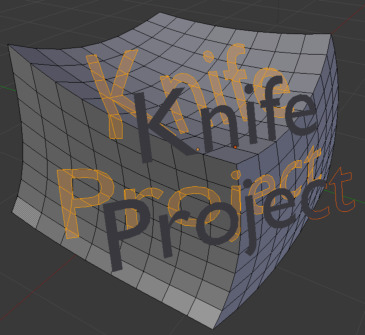
Resulting knife projection.
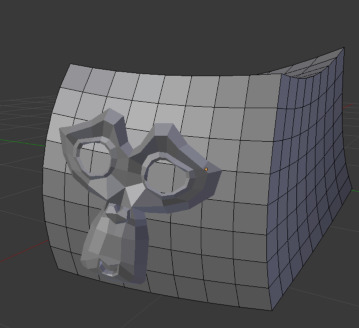
Before projecting from a mesh object.
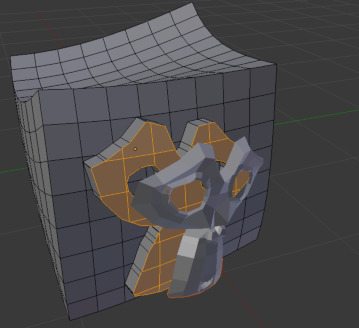
Resulting knife projection (extruded after).
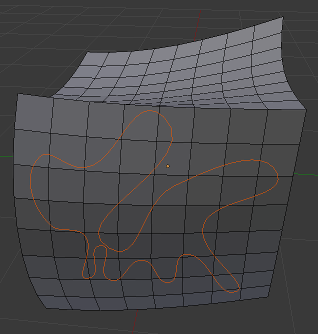
Before projecting from a 3D curve object.
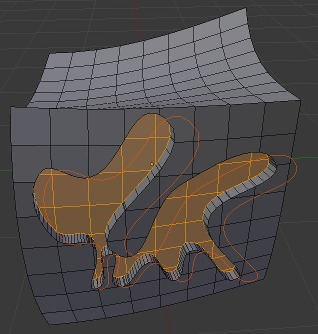
Resulting knife projection (extruded after).
Known Limitations
Duplicate Vertices
If you experience problems where duplicate vertices are being created by cuts, this is often caused by too large a near/far clipping range.
Try increasing the Clip Start to avoid this problem, see Depth Troubleshooting for details.
Unconnected Cuts
Cuts that begin or end in the middle of a face, will be ignored.
This is constrained by the kinds of geometry Blender can represent.
© Copyright : This page is licensed under a CC-BY-SA 4.0 Int. License
How to effectively deal with bots on your site? The best protection against click fraud.
Инструмент «нож» используется для разделения любой поверхности сетки путем рисования линий. Другими словами, нож — это инструмент моделирования для формирования новых контуров и вершин кромок. Инструмент нож довольно прост. Чтобы выбрать инструмент «нож», необходимо включить режим редактирования.
Доступ к ножевому инструменту можно получить различными способами:
- Использование меню быстрых инструментов
- Использование горячих клавиш
Использование меню быстрых инструментов
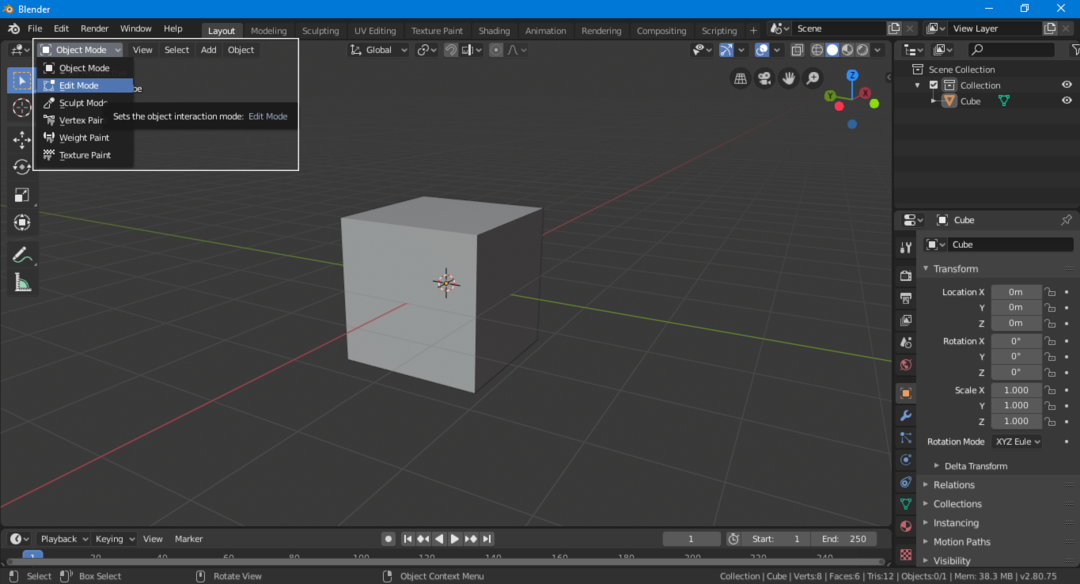
Доступ к инструменту «Нож» можно получить из меню быстрых инструментов. Вы увидите целый набор инструментов в режиме редактирования. Выберите один из способов включения режима редактирования. Выберите сетку и щелкните вкладку рабочего пространства моделирования или просто нажмите клавишу «Tab». Другой способ войти в режим редактирования — просто перейти на панель взаимодействия с объектом и выбрать «Режим редактирования» в раскрывающемся меню. Выбранная сетка будет выделена в режиме редактирования.
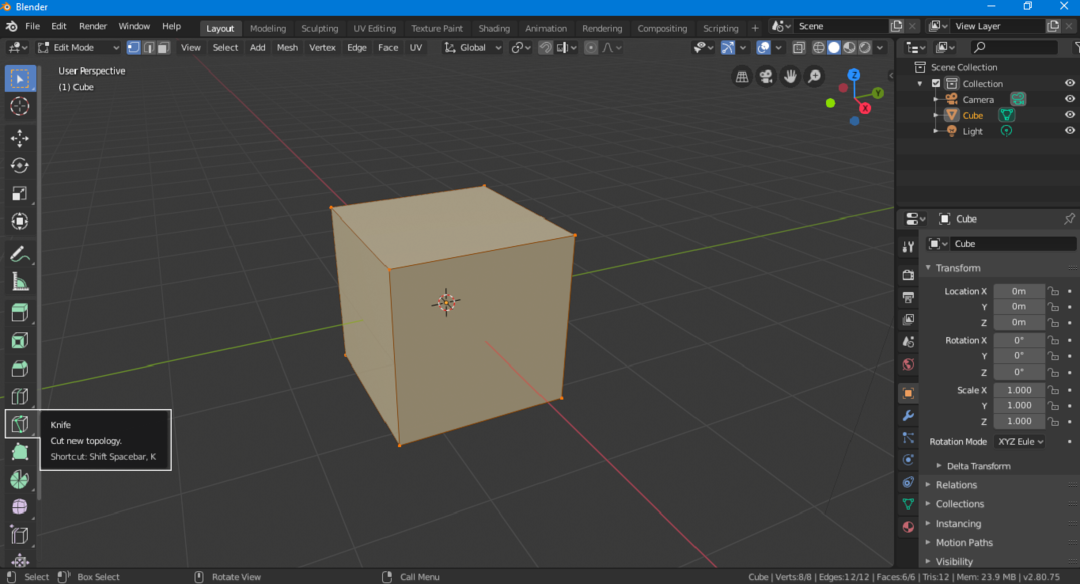
В меню слева от окна просмотра найдите инструмент «Нож». Если вы не можете его найти, нажмите клавишу «T». Курсор превратится в крошечный скальпель. Щелкните и перетащите мышь, чтобы сделать надрезы, или просто удерживайте курсор скальпеля над краем или вершиной сетки, чтобы сделать надрезы.
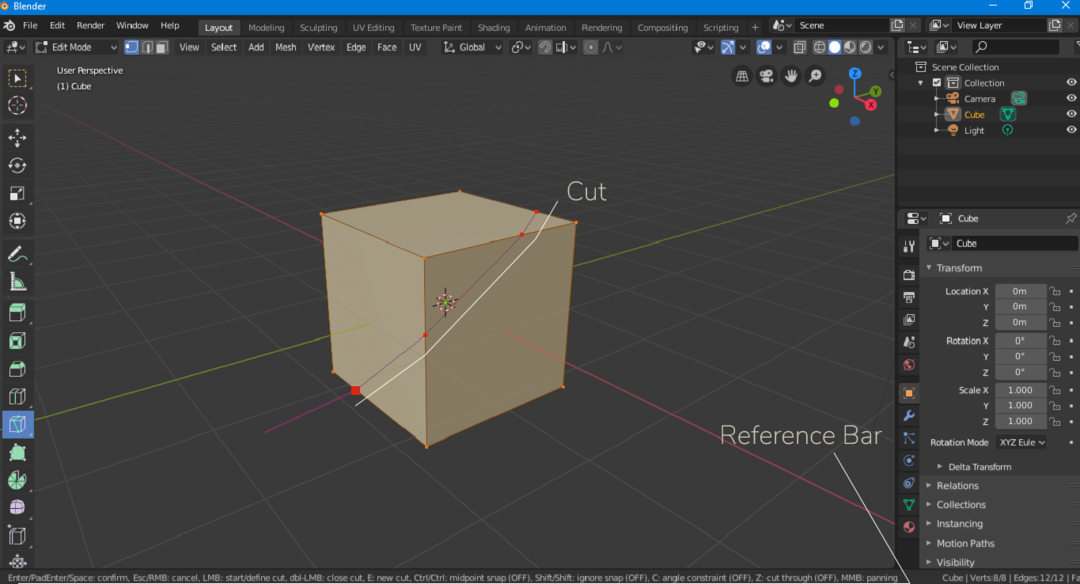
Вы заметите, что фиолетовая линия все еще прикреплена к курсору даже после надрезов. Чтобы отключить его, просто нажмите «E». Этот метод позволит вам продолжить процесс стрижки.
Если вы хотите отменить все кромочные петли и разрезы, которые вы сделали, просто щелкните правой кнопкой мыши или нажмите клавишу «Esc».
Теперь, чтобы подтвердить все разрезы, нажмите клавишу «Enter». Пурпурные линии будут соответствовать разрезу сетки. Таким образом вы сможете определить, что разрез был сделан и применен.
Для получения дополнительной информации см. Нижнюю панель окна Blender.
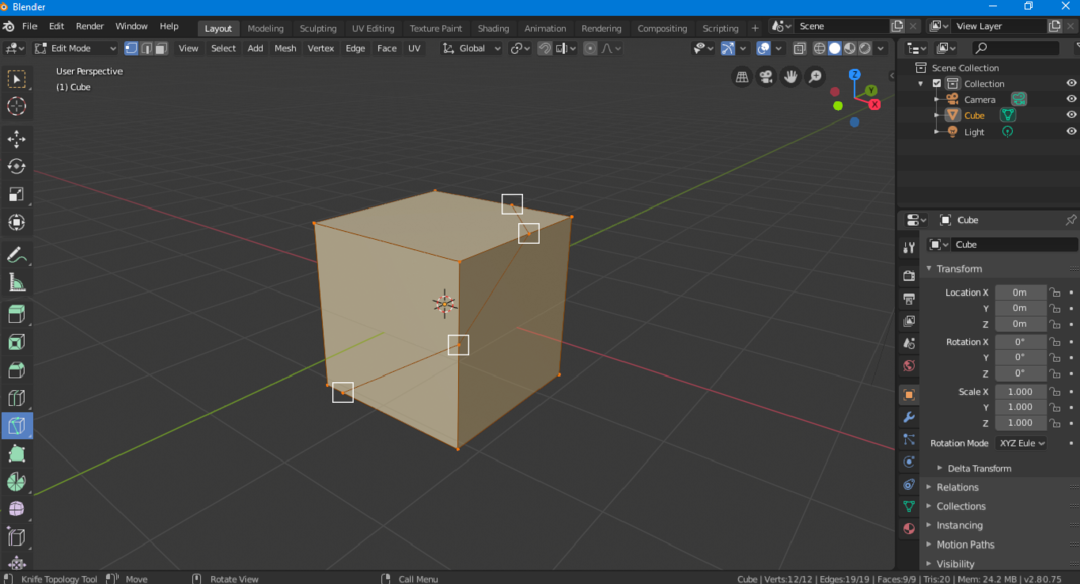
В ножевом инструменте есть еще один вспомогательный инструмент, называемый «Инструмент пополам». Этот инструмент используется для разрезания сетки пополам.
Чтобы выбрать этот инструмент, например, нож, вам необходимо находиться в рабочем пространстве моделирования. Нажмите и удерживайте значок ножа, появится значок с разделением пополам, наведите курсор на этот значок и отпустите, как показано на следующем изображении.

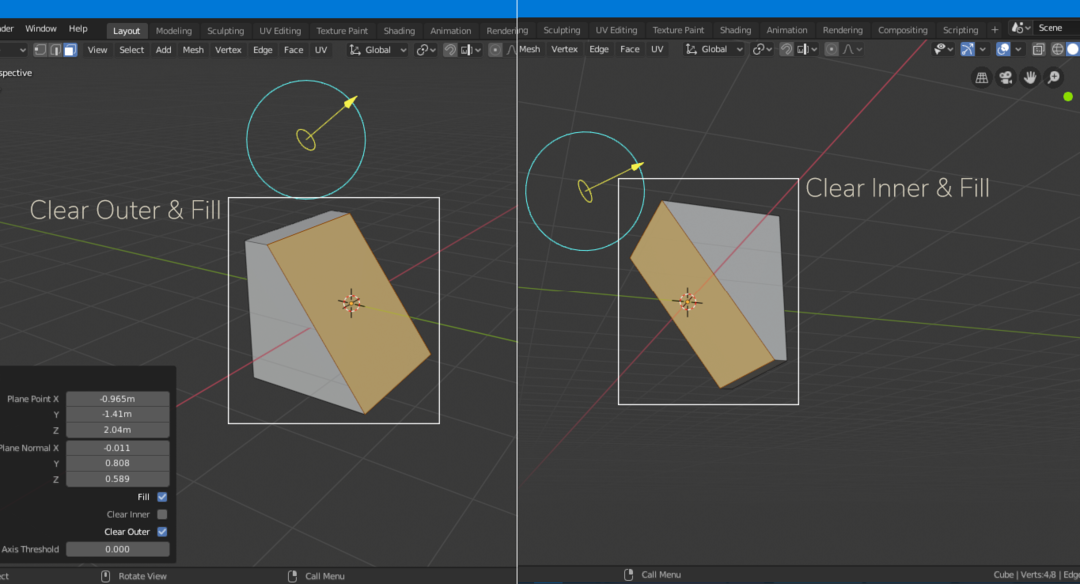
Теперь сделайте надрез, штуковина окажется нормальной. Самое главное — это панель оператора Bisect Tool. На этой панели есть несколько важных настроек.

СамолетТочка: Положение по осям x, y и z
Плоскость Нормальная: Вращение против нормального
Заполнить, очистить внутреннюю часть, очистить внешнюю часть: Установив флажок «Заполнить», вы сможете заполнить лицевую сторону выреза. Clear Inner и Clear Outer — две стороны разреза. Эти флажки позволяют сохранить любую сторону разреза.

Использование горячих клавиш
Горячие клавиши играют очень важную роль в 3D-моделировании. Увеличивает скорость работы. Вам не нужно тратить время на переход в режим редактирования, а затем выбор инструмента в меню быстрых инструментов.
Чтобы получить доступ к инструменту «Нож», сначала войдите в рабочее пространство моделирования или режим редактирования. Чтобы быстро войти в режим редактирования, нажмите клавишу «Tab», затем нажмите клавишу «K», чтобы включить ножевой инструмент. Для инструмента биссектрисы нужно зажать пару клавиш «Shift + пробел 2».
Некоторые другие горячие клавиши выполняют следующую функцию.
Удерживайте клавишу «Ctrl» для привязки к средней точке. Инструмент нож сломает центр края.
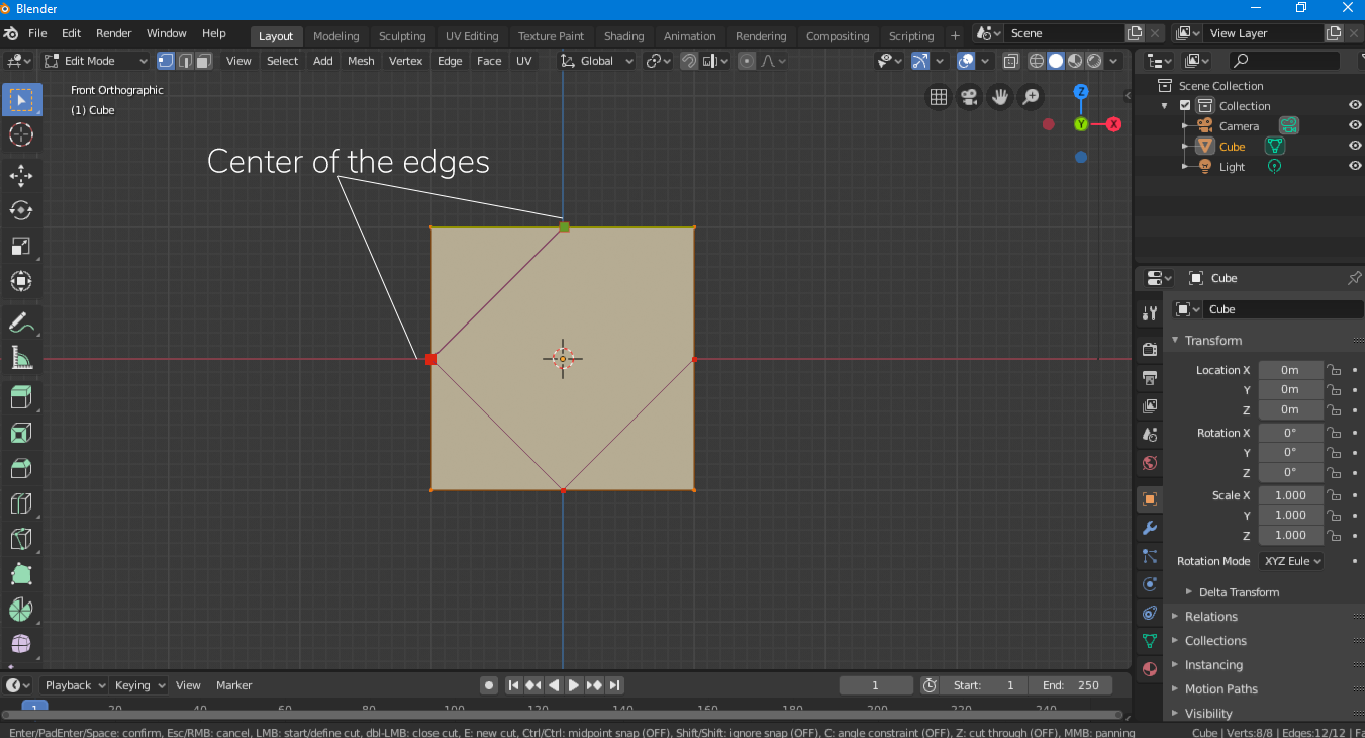
Чтобы добавить ограничение в 45 градусов, удерживайте клавишу «C» при выполнении разрезов.
Нажмите «E», чтобы начать новый разрез.
Если вам сложно найти конкретный инструмент, нажмите клавишу «F3», появится панель поиска, введите имя инструмента и просто выберите его, когда он появится.
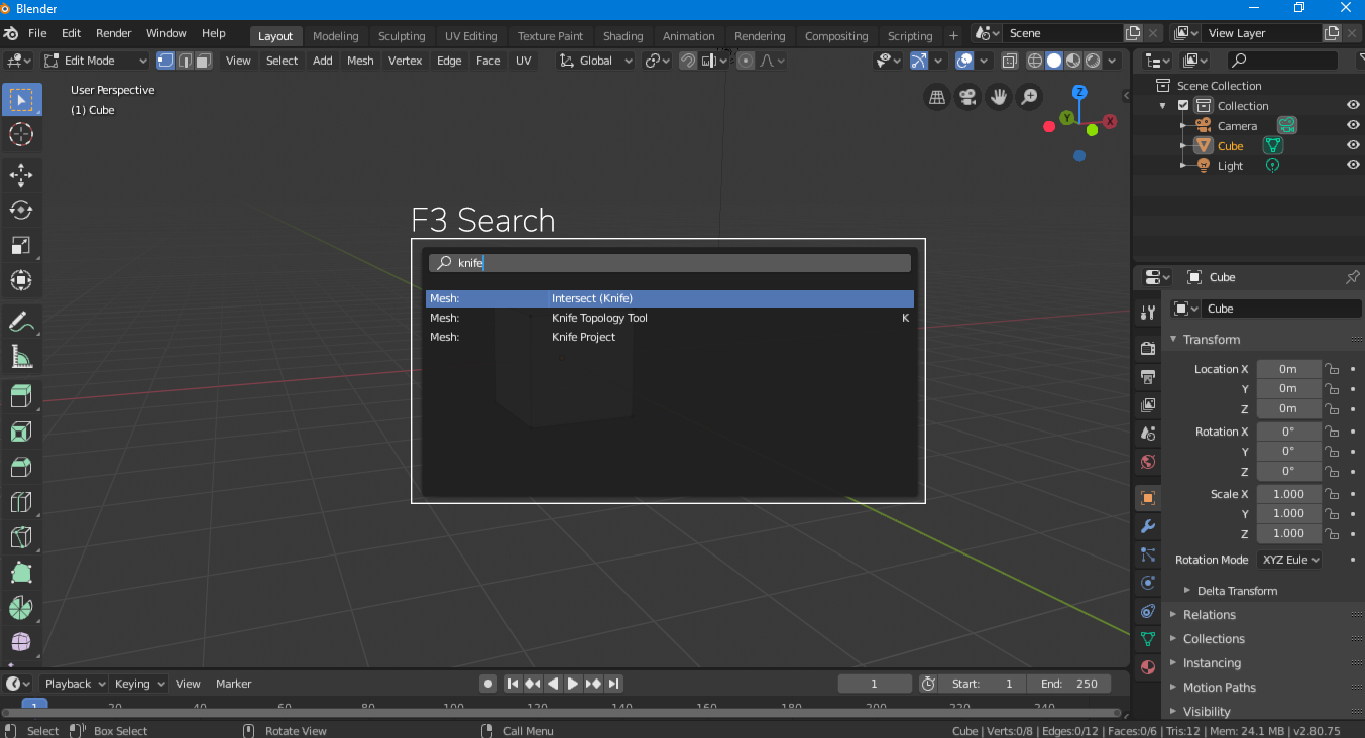
Нож — один из основных инструментов блендера, который позволяет разрезать и разделять сетку вручную. Выберите инструменты ножа в меню быстрых инструментов или просто нажмите клавишу «K» в режиме редактирования. Сделайте свои сокращения. Если вы хотите переделать свой монтаж, нажмите клавишу «Esc» или просто щелкните правой кнопкой мыши. Чтобы подтвердить разрез, нажмите «Enter Key».
Инструмент пополам — это вспомогательный инструмент ножевого инструмента. Удерживайте значок инструмента ножа, и появится значок инструмента Bisect. Инструмент Bisect используется, чтобы разрезать сетку на 2 половины. Каждую половину можно выбрать через панель оператора. Горячая клавиша для доступа к инструменту деления пополам — «Shift + пробел 2». Чтобы быстро найти инструменты, нажмите клавишу «F3» и введите нож.
Инструмент моделирования нож (knife)
В данном уроке я расскажу Вам обо всех функциях инструмента нож (knife), и покажу как ими пользоваться для создания необходимых разрезов меш-объектов. Также будет рассмотрена новая функция данного инструмента Knife Project, с помощью которой мы можем вырезать проекцию одного объекта из другого.
11 комментариев на «“Инструмент моделирования нож (knife)”»
Нужные уроки!Не прекращай!
Урок интересен, только заставку Артём, лучше поменять MARK V ATAC тем ещё барахлом оказался, а его выражаясь современным сленгом «брутальная» гарда объяснима по форме, её оказывается создавали ещё и как открывашку для бочек с хим реагентами используемыми армией сша, так что гораздо лучше поменять или на скальпель, или на нож для резьбы по дереву.
как сделать симметричный разрез? т.е. форму выбранную, вырезать не только на верхней поверхности, но заодно и на нижней?
Уже ответил в предыдущем вопросе: Используй режим Wireframe!
Есть ли какие-нибудь особенности при вырезании по проекции выпуклого объекта из другого выпуклого объекта? Я вот плоскость вырезаю хорошо, а куб уже не могу.
Здравствуйте,Артем.Спасибо за Ваши труды!Профессиональные видео уроки,такого уровня сложно найти.Все коротко и по существу.Про таких как вы говорят- мастер своего дела!(Извините если я Вас смутила,не могла не отдать Вам должное)
Артем,не могли бы Вы помочь разобраться в данной теме?Не могу понять в чем проблема,инструмент knife не создает отверстий,а лишь добавляет вершины,тоже касается Knife Project.Буду благодарна за ответ!
Так и должно быть. Этот инструмент не создает отверстия, а лишь добавляет ребра и вершины.
P.S. Спасибо на добром слове!
Спасибо за ответ.Я думала,что что-то не то делаю.Это не проблема,даже наоборот,просто ожидала результата соответствующего названию»нож».)))
Огромное спасибо за урок
Авторизация

Рубрики
О сайте
На данном сайте Вы сможете найти множество уроков и материалов по графическому
редактору Blender.
Контакты
Для связи с администрацией сайта Вы можете воспользоваться следующими контактами:
Следите за нами
Подписывайтесь на наши страницы в социальных сетях.
На сайте Blender3D собрано огромное количество уроков по программе трехмерного моделирования Blender. Обучающие материалы представлены как в формате видеоуроков, так и в текстовом виде. Здесь затронуты все аспекты, связанные с Blender, начиная от моделирования и заканчивая созданием игр с применением языка программирования Python.
Помимо уроков по Blender, Вы сможете найти готовые 3D-модели, материалы и архивы высококачественных текстур. Сайт регулярно пополняется новым контентом и следит за развитием Blender.
Blender knife tool tutorial
For the longest time I did not use the knife tool as part of my Blender modeling workflow. But it has become a more frequent tool since I have started to discover how versatile and easy it is to use.
To use the knife tool in Blender press tab to go into edit mode, then press K on your keyboard. You can also find the knife tool in the left side toolbar. Click on one or more points to create a new vertex at this location and Blender will automatically create edges between each of them. Press enter to confirm
This is the basics on how to use the knife tool but there is more. We will cover the different options and a few examples where this tool can be very handy.
How does the knife tool work in Blender?
The knife tool is only available in edit mode for mesh objects. Since Blender version 2.80 we can enter edit mode for multiple mesh objects at once, but the knife tool will only work on the mesh belonging to the active object.
The active object being the last selected object with a lighter orange outline before we enter edit mode.
We can access the knife tool through the tools panel on the left side of the 3D viewport. If this panel is hidden, we can toggle it with T. We can also press K on the keyboard to active the knife tool.
Like with most modeling tools when we have activated them, we get a shorthand reminder of the possible settings in the status bar at the bottom of Blenders interface.
If you have never used the tool before though, it can be hard to decipher exactly what it means. It is more of a reminder with status for the different settings.
When the knife tool operation is complete there is no operator panel to adjust any settings afterwards. The only option we have after the operation is complete is to use Ctrl+Z to undo and Ctrl+Shift+Z to redo an undo step.
How to use the knife tool in Blender?
When the knife tool is active, we can click on any kind of element, be it vertices, faces or edges to start creating a cut. Every click creates a new vertex along the cut, but if it starts on the middle of a face, we need to end it there as well so that we don’t create invalid topology. More on that later.
During the knife tool operation, your selection does not matter by default. We can cut through both selected and deselected mesh. In some cases though, you may want to limit the knife tool to only cutting in your selection. In that case, make a selection and activate the knife tool with Shift+K instead. In this case the knife tool will use the selection as a mask.
Hovering a vertex Hovering an edge
As you hover the mouse over a vertex or edge you can see either a green square with red border indicating that the existing vertex will be used if you cut here and above an edge you will see the edge highlighted in green. This menas that Blender creates a new vertex at the mouse cursor intersecting the edge and splitting it in two if you choose to cut. This behavior is a bit like snapping but not to be confused with the snapping control features you can read about in this article.
If we don’t want Blender to snap to these edges or vertices, we can hold shift to temporarily disable snapping.
If we hold Ctrl, we can extend the snapping to also include the middle of an edge as we hover the mouse over it.
To end a cut, we either press Enter to confirm the knife operation or press E to create a break in the cut without confirming. We can then continue to create multiple independent cuts without confirming the operation until we are done.
We can also double-click to create the end of a cut. If we do, Blender will cut and then make a straight cut back to where we started, finishing as a loop and release the cut without confirming, just like when we press E.
The last feature I want to cover is the cut through option. You activate it by pressing Z. When active the knife will cut through all mesh, not only the mesh that is visible from the camera. This is useful for instance when you want to cut a loop on a sphere in a certain angle and the loop cut and slide tool isn’t giving you the exact angle you want.
The cut through option will still respect your selection if you activated the knife tool with Shift+K. This can be useful when you want to cut through a mesh but you have several layers behind that you don’t want to cut.
How to cut a straight line with the knife tool in Blender?
An especially useful feature of the knife tool is to be able to cut a straight line. When the knife tool is active, press C to constrain the knife tool to 45- and 90-degree cuts.
This feature works from the cameras point of view but while the knife tool is active our camera options are limited. For instance, we can’t use the number pad to go into the top, bottom, left, etc., orthographic views.
So, make sure that you are at the correct view angle before you activate the knife tool.
What can we use the knife tool for?
There are primarily two instances where I use the knife tool. Most commonly I use it when I build the mesh. For instance, when I need to have an equal number of vertices on two sides that I intend to connect or if I need to change the edge flow.
In these cases, the knife tool is perfect because we get much control over where to put the cut.
Another example is towards the end of a modeling phase. We can use the knife tool to create damage or irregularities to an object by easily cutting and inserting mesh level detail.
We can create cracks, irregular bevels or cut an edge irregular.
When doing this though we need to be careful not to destroy our mesh in a way that creates shading artefacts.
What are some common problems with the knife tool?
A common beginner mistake is to assume that the knife tool is a «fix all» solution to geometry problems. But if you don’t use it properly and plan for how your topology will look after your cuts, you can end up with a mesh that is hard to work with.
For instance, it is easy to create n-gons and triangles in a quad based mesh, breaking the edge loop flow thanks to a cut that isn’t thought out properly.
While it is fine to break the edge flow, you must first be sure that you don’t create structural changes that make it unnecessarily hard to continue working on the mesh.
The knife tool also has some technical limitations. One example is if cuts end in the middle of a face the edge and vertex won’t be created. Faces need to have a closed perimeter of edges and vertices around it. One or more edges that cut through a face must divide it in two faces or the geometry can’t properly be represented.
Also, if you use the knife tool to cut a hole in a single face, Blender will automatically connect the hole with the face perimeter through a couple of edges to already existing vertices.
Final thoughts
The knife tool is powerful and can solve many topology problems where we would need multiple tools otherwise. Its settings and features make it useful in many situations, but it has a bit of a learning curve since it is easy to destroy the mesh and create shading artefacts.
The knife tool becomes more useful once you are past the beginner stage of learning how to model in Blender.