Network tools — Netcat
In this tutorial I will cover some of the uses of netcat, known as the “TCP/IP Swiss army knife”. Netcat is a very powerful and versatile tool that can be used in diagnosing network problems or in penetration testing.
There are many netcat variations, some are more recent and have been rewritten to include more features. Let’s look at the original netcat man page:
netcat is a simple unix utility which reads and writes data across net- work connections, using TCP or UDP protocol. It is designed to be a reliable “back-end” tool that can be used directly or easily driven by other programs and scripts. At the same time, it is a feature-rich network debugging and exploration tool, since it can create almost any kind of connection you would need and has several interesting built-in capabilities.
Ok, so let’s see some of the many ways we can use netcat.
Banner grabbing
First, let’s see what we can glean from using netcat to connect to an FTP server:
As you can see, there is some information available about the server, including the type of the FTP server, the number of logged in users and the maximum number allowed, the local time of the system, the fact that anonymous logins are disallowed, and that it’s possible to connect via IPv6. Depending on the configuration of a server, the information disclosed could be pretty detailed, or sparse and misleading, as to not give away too much info to a potential attacker.
Now let’s try banner grabbing from an HTTP server by sending a HEAD request:
This information can vary as well, this time the bit we’re interested in is the server version and the operating system. Sometimes there is more to be discovered, like the PHP version that powers the server etc.
Chat server
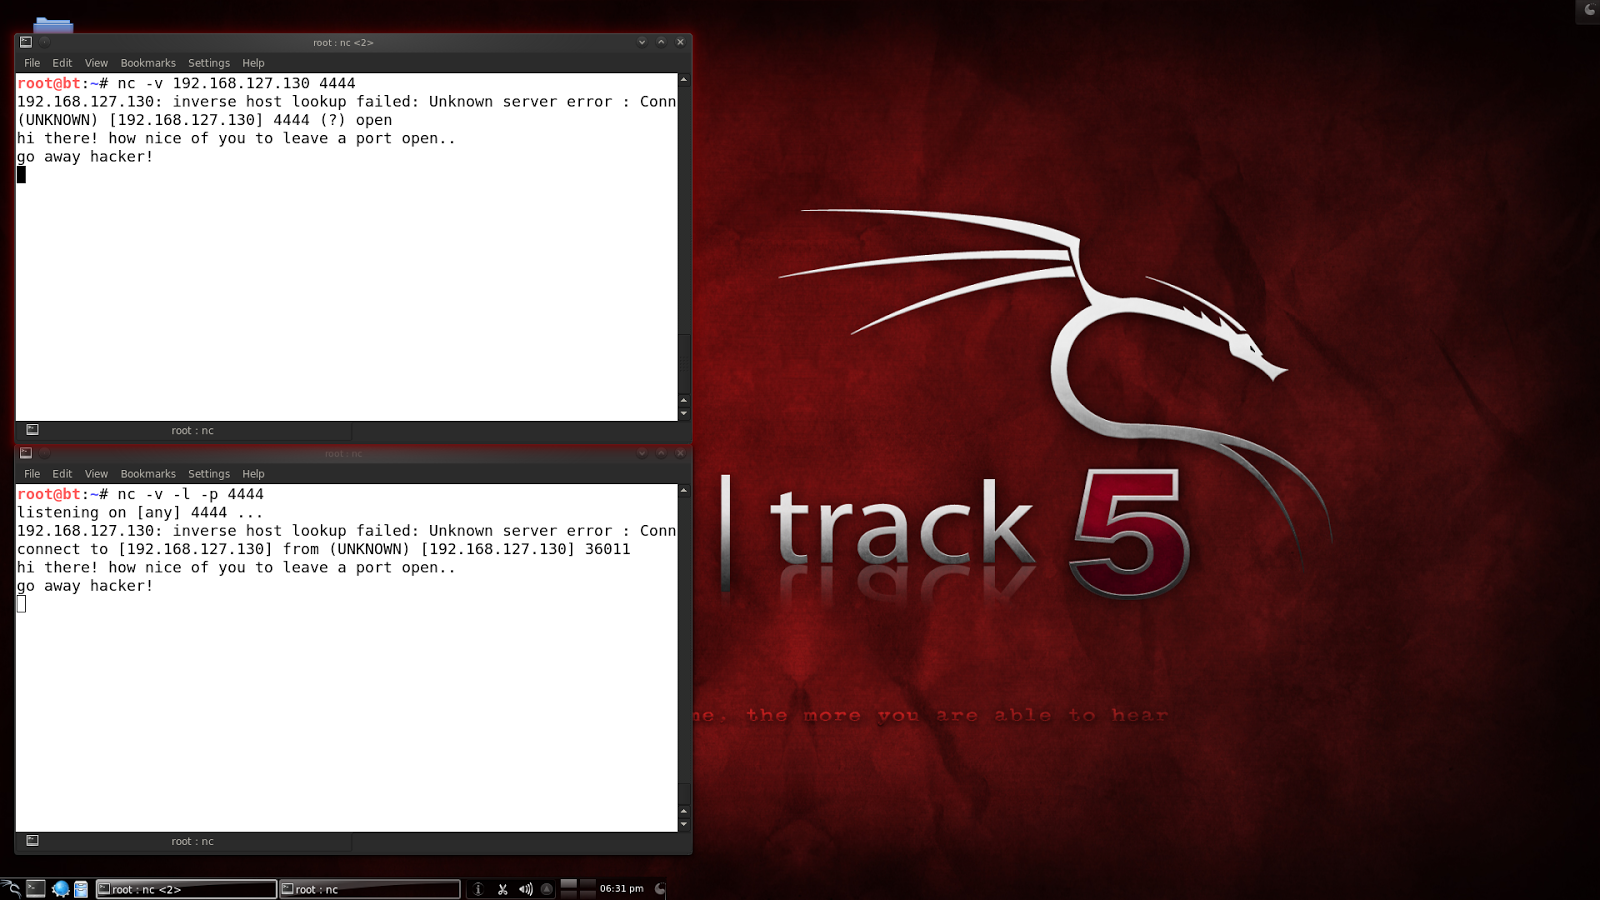
Let’s now look at how easy it is to use netcat for a very simple chat server.
In the above command I told netcat to listen on port 4444. The -v flag is for more verbose output.
Now, from a different terminal window (or machine), connect to that port with netcat and start typing stuff. You will see the output being echoed in the server window. If you type stuff back from the server window, you will see it printed in the client window:
File transfer
To transfer files between 2 machines, netcat can be used in the following way. On one computer, let’s tell netcat to listen on a port and push a file to the socket:
Bascially, this takes the file and pushes it on the listening socket, ready to be pulled by a client that connects to that port. Now, from another computer, connect to the listener and redirect whatever you receive to a file:
Now we can check that we have a new file named transfer.txt which has the same contents as the file that was offered by the server, confidential.txt. Note that netcat doesn’t give any indication of the transfer progress or its completion.
Port scanning
Netcat can also be used as a very basic port scanner:
Here we scanned the range of ports between 1 and 1000 and we determined that ports 21 and 80 are open. The -n switch disables DNS lookup, the -z is for not sending any data, thus reducing the time it requires to talk to the ports. And the -w1 tells netcat to wait 1 second before determining that a connection occurred. This is a TCP only scan. For UDP, add the -u flag.
Port forwarding
Netcat’s port forwarding ability could be useful in a variety of scenarios, from bypassing traffic restrictions in a secure environment to using a proxy (or more) to conduct a MITM attack.
For this example, I will be using the following:
On the relay, use the following command:
This sets up a listener on port 4444. The -c flag specifies a shell command to be executed by the /bin/sh shell (if the system doesn’t have such a shell, you can use the -e flag to execute a command or file instead. On a Windows machine, for instance, you could run cmd.exe or a batch file containing your desired commands). So, in the above, the proxy will forward connections it receives on port 4444 to the victim machine on port 22.
From the attacker machine, connect to the proxy:
Bingo! We can see that there is an SSH server waiting for someone to log in. On the victim machine, let’s confirm that we have a connection:
So the victim is unaware of the real source of the connection! It sees the connection as originating from the relay machine.
Remote backdoor – Bind shell
Once an attacker has exploited a victim machine, he may want to return afterwards and have a nice, cozy backdoor waiting for him. If there is a direct connection between the 2 machines, netcat can be used to bind a shell to a port and wait for the attacker to connect. The shell will have the privileges of the user who spawned it, so it’s best to have administrative privileges for full power over the system.
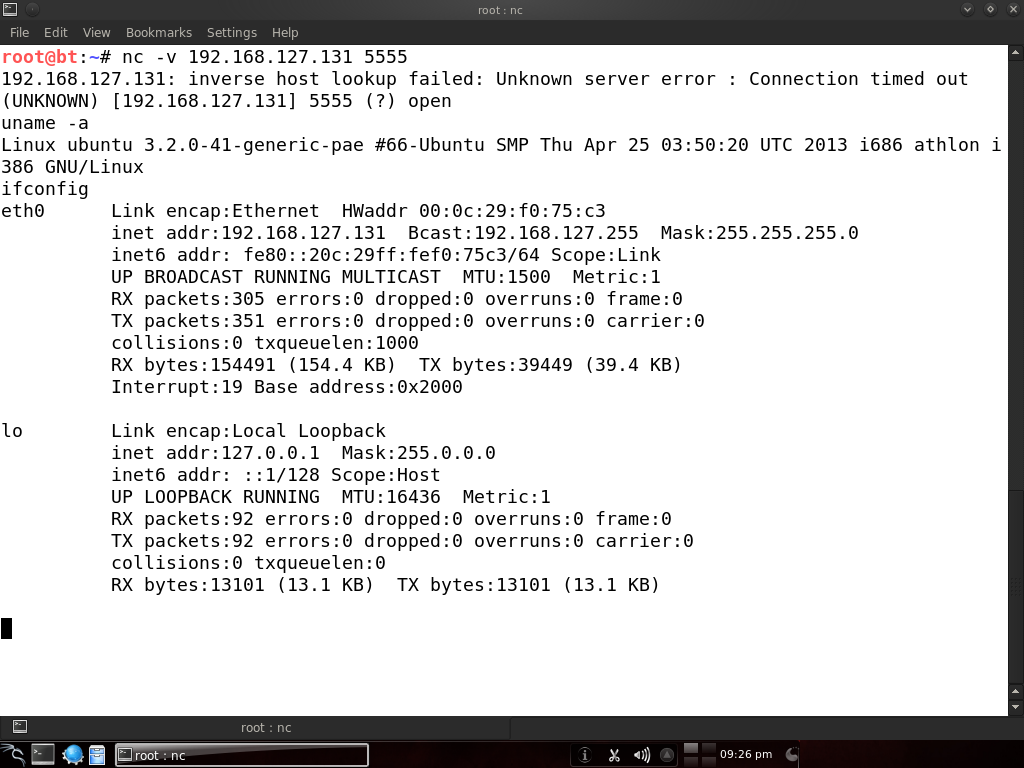
On the machine you want to backdoor, use netcat to bind the shell:
Now from another machine, use netcat to connect to it on that port and your shell will be waiting for you. Keep in mind there won’t be any prompt or anything like that. Just type commands in the terminal.
Reverse shell
The more common way to use netcat for backdooring is to spawn a reverse shell that connects back to the atacker. This is useful in case the victim is behind a NAT or in a protected internal network that can’t be directly accessed from the internet.
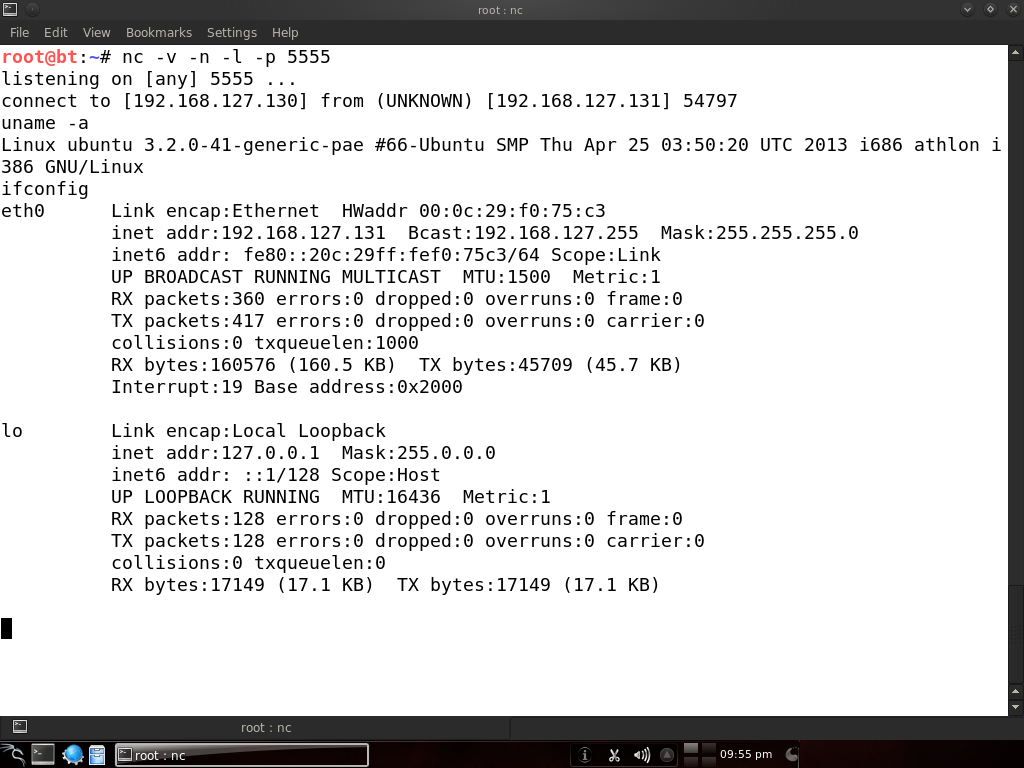
So, let’s get on with it and start a listener on the attacking machine:
Now let’s connect from the victim machine:
Basically, the victim machine sent the attacker a shell, and now we control the victim again. I used the -n switch as well to disable all those pesky inverse lookups.
Honeypot
It is possible to set up a very simple honeypot using netcat. I grabbed the banner for the Pure-FTPd server and copied it to a file called banner.txt. Now start listening on port 21 and serve that banner for visitors:
The additional -v flag is for extra verbosity and the data received is piped to a log file. Now, from another machine, let’s connect to port 21 and see what we get:
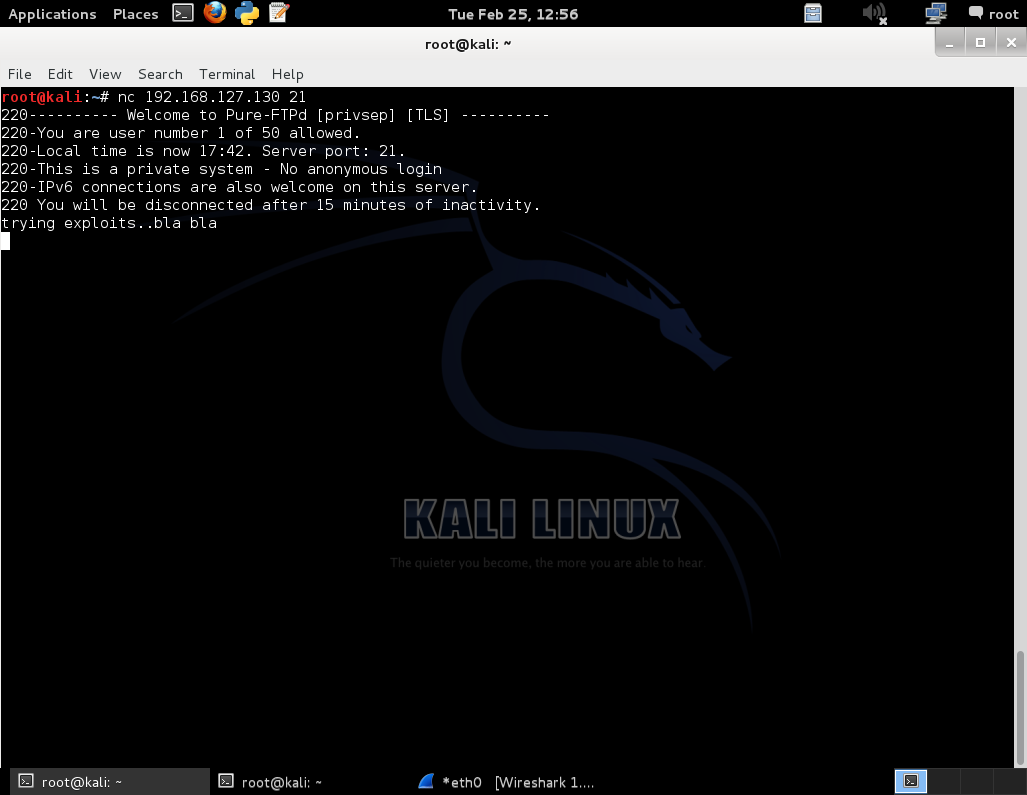
Here we’re seeing the familiar FTP banner even though there’s no real FTP server running. We send some random data and now let’s check on the other machine that this data has been logged:
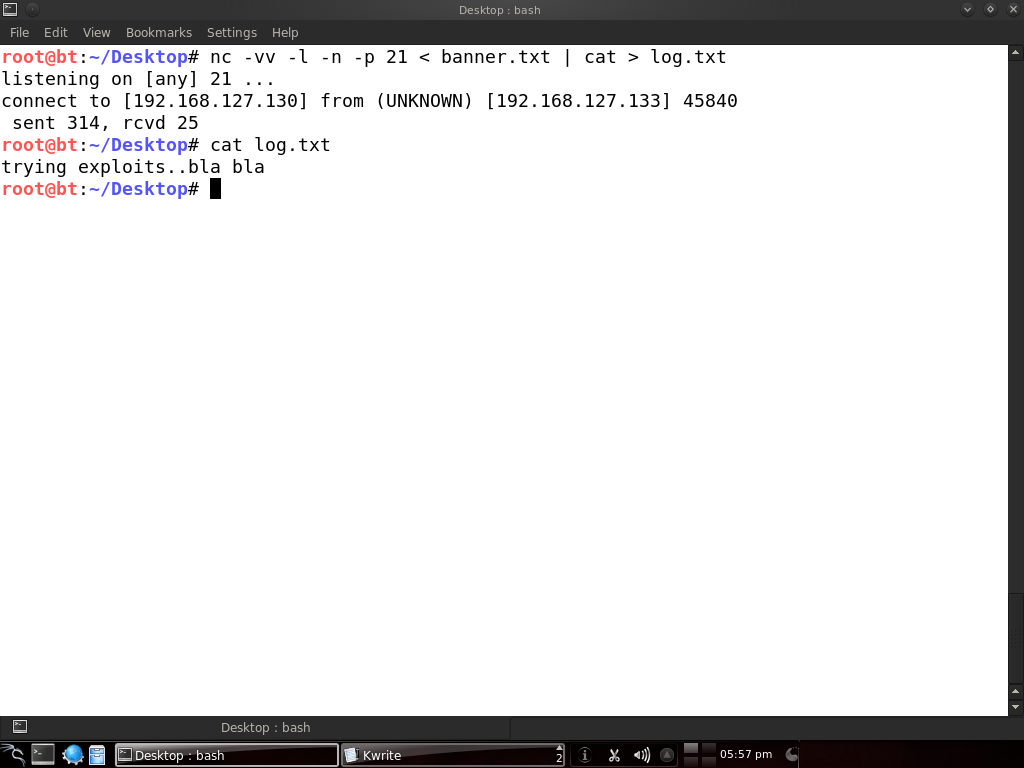
Of course, you might want netcat to keep on listening and not stop after every connection. Consider writing a script for that or look into versions that have continuous connection options.
Sniffer
Netcat can also be used to sniff traffic from a specific port. One machine has Pure-FTPd running on port 21. On the same machine, we’ll use netcat to listen on some other port and execute a script:
The script file contains the following:
The -o flag is for hex dumping the traffic. This script tells netcat to hex dump the traffic that comes to port 21 and write it to the /root/log file. And on the command line I used netcat to listen on port 4444 and call this script. Now let’s try connecting from another machine to the port that netcat listens on:
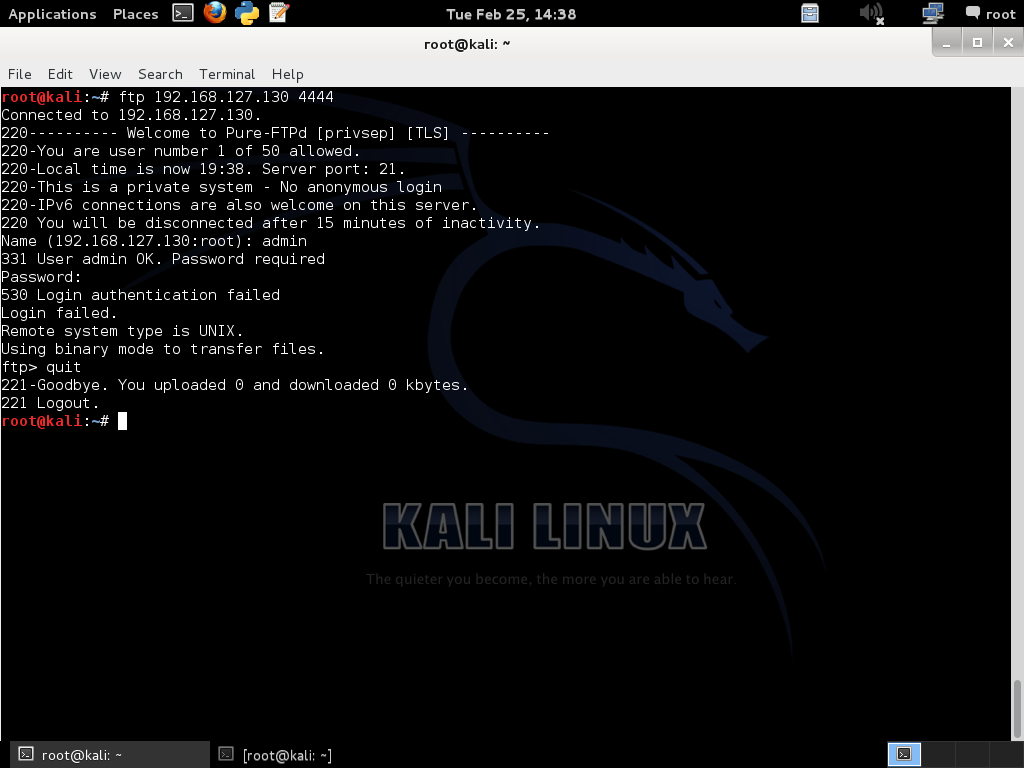
Since this is a test lab and I already knew about the FTP server being sniffed, I tried to log in directly.
Let’s check what got logged on the other machine:
cat /root/log | more
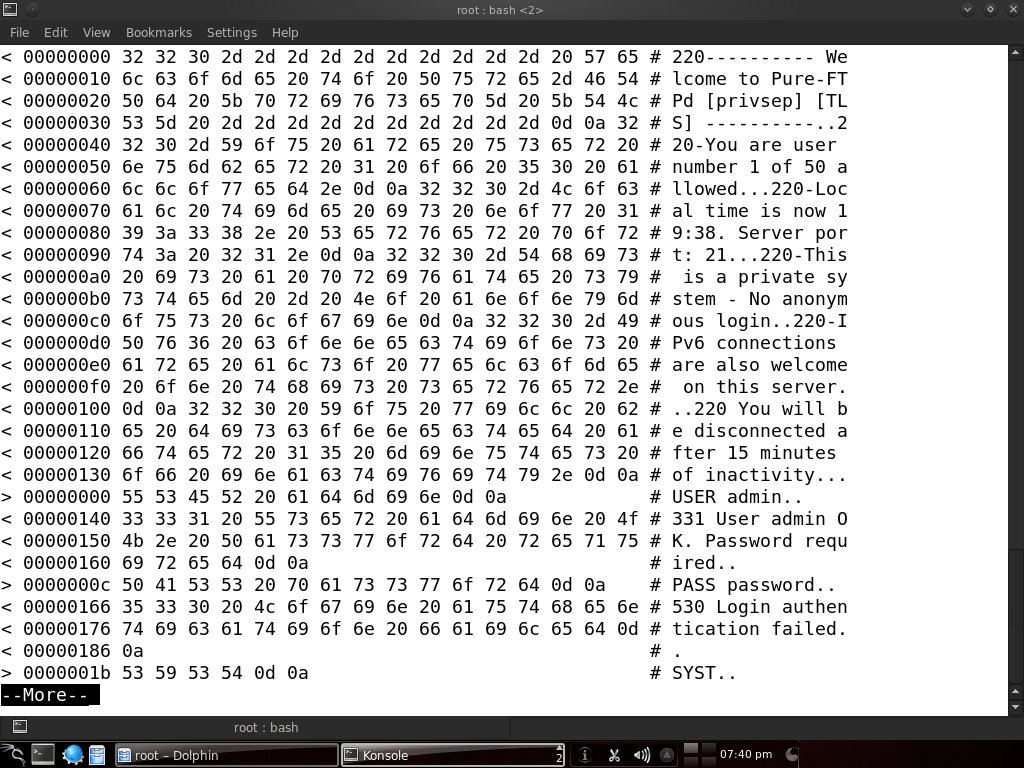
There we go! We have a file containing the traffic to port 21, and we can see the attempt to log in has failed with the given credentials. But when a legitimate user will log in, we will have the right username and password.
Disk cloning
Yes, you can even copy hard disks over the network with netcat, in conjunction with the dd program.
On the system that you want to copy from, run this:
And on the machine you’re copying to:
Be careful when performing operations on hard drives, best to test them on virtual machines first than realizing you just wiped your HDD.
I hope by now you realize how powerful netcat can be and its usefulness in a variety of scenarios. Of course, during a real penetration test or uhm, hack attempt, you will probably want to encrypt your traffic with cryptcat or something, since by now, all the IDS vendors are including signatures for netcat. Also, the examples were kept simple for ease of understanding, but in the real world netcat would be chained together with other tools to create complex and stealthy attacks.
If more of us valued food and cheer and song above hoarded gold, it would be a merrier world. — J.R.R. Tolkien
Posted by chousensha May 31 st , 2014 networking, penetration testing, tools
Comments
whoami
switch (interests) <
case INFORMATION SECURITY:
Mostly offensive security, but trying to be well-rounded in everything;
case PYTHON:
Mainly security and sysadmin related scripting;
case LINUX:
Greetings from /dev/null;
case JAPANESE:
Language, anime, samurai;
case MARTIAL ARTS:
If it’s fighting I like it;
case MILITARY SCIENCE:
Ancient, medieval, modern;
default: GAMING;>
Утилита netcat в Linux
Linux славится наличием множества полезных и функциональных утилит командной строки, штатно доступных в большинстве дистрибутивов. Опытный системный администратор может выполнить значительную часть своей работы при помощи встроенных инструментов без необходимости устанавливать дополнительные программы.
В данном руководстве мы разберем использование утилиты netcat. Ее часто называют «швейцарским армейским ножом» среди сетевых инструментов. Это действительно универсальная команда, которая может помочь вам в мониторинге и тестировании сетевых соединений, а также в отправке данных через них. В примерах рассматривается BSD-версия netcat, которая по умолчанию входит в дистрибутив Ubuntu. Работа других версий и их опции могут немного отличаться.
netcat синтаксис
По умолчанию netcat инициирует TCP-соединение с удаленным узлом.
Базовый синтаксис команды следующий:
Команда попытается установить TCP-соединение с указанным узлом и номером порта. В принципе, это работает аналогично старой команде telnet в Linux. Имейте в виду, что ваше соединение будет не зашифровано.
Если вместо установки TCP-соединения вам нужно отправить UDP-пакет, можно воспользоваться опцией –u:
Также можно задать диапазон портов, указав начальный и конечный порты через дефис:
Обычно в таких командах указываются дополнительные флаги, мы рассмотрим их ниже.
В большинстве систем команды netcat и nc взаимозаменяемы и означают одну и ту же утилиту.
netcat опции
Для команды существуют следующие ключи-опции
-h Справка;
-v Вывод информации о процессе работы (verbose)
-o <выходной_файл> Вывод данных в файл
-i <число> Задержка между отправляемыми данными (в секундах)
-z Не посылать данные (сканирование портов)
-u Использовать для подключения UDP протокол
-l Режим прослушивания
-p <число> Локальный номер порта для прослушивания. Используется с опцией -l
-s <host> Использовать заданный локальный («свой») IP-адрес
-n Отключить DNS и поиск номеров портов по /etc/services
-w <число> Задать тайм-аут (в секундах)
-q <число> Задать время ожидания после передачи данных, после истечение которого соединение закрывается
netcat примеры
Для лучшего понимания как работает netcat рассмотрим несколько примеров
Сканирование портов
Один из наиболее распространенных примеров использования netcat – сканирование портов. Может быть, это не самый продвинутый инструмент (в большинстве случаев лучше воспользоваться nmap), но он позволяет выполнить простое сканирование и легко выявить открытые порты. Для этого нужно указать диапазон портов и опцию –z, которая означает выполнение сканирования вместо попытки установить соединение. Например, следующая команда сканирует порты от 1 до 1000:
Помимо опции -z, мы указали опцию –v, чтобы команда выводила более подробную информацию. Результат будет выглядеть следующим образом:
Как мы видим, для каждого порта указано, успешно ли прошло сканирование. Единственный открытый порт на удаленном компьютере – 22, традиционно используемый для SSH.
Можно ускорить процесс сканирования, если вам известен IP-адрес узла. Он указывается с опцией –n, которая задает команде не определять адрес при помощи DNS.
Связь при помощи Netcat
Функции Netcat не ограничены отправкой TCP и UDP пакетов. Она также может прослушивать порты. Это позволяет создать соединение между программами netcat на различных компьютерах по принципу «клиент-сервер». Роли сервера и клиента важны только при первоначальной конфигурации. После установки соединения связь в обоих направлениях будет абсолютно одинаковой. На одной из машин нужно указать команде netcat прослушивать определенный порт. Это осуществляется при помощи опции –l:
Данная команда выполняет прослушивание порта 4444 в ожидании TCP-соединения. Если вы обычный пользователь без root-привилегий, то открывать порты до 1000 вам нельзя из соображений безопасности. Вторую машину можно подключить к первой точно так же, как мы устанавливали соединения ранее, указав тот же номер порта:
После выполнения этой команды на первый взгляд ничего не поменяется. Однако, теперь на любом конце соединения вы можете отправлять сообщения, и они будут видны на другом конце. Введите сообщение и нажмите Enter – оно появится как на локальном,
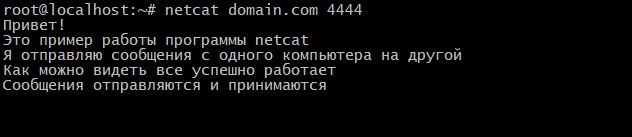
так и на удаленном экране.

Как уже говорилось, это работает в обоих направлениях. После завершения передачи сообщений для закрытия TCP-соединения можно нажать Ctrl+D.
Отправка файлов
Взяв за основу предыдущий пример, можно выполнять более сложные задачи.
Мы установили обычное TCP-соединение, поэтому можем отправлять по нему практически любые данные, не ограниченные вводимым пользователем текстом. Таким образом, можно использовать netcat в качестве средства передачи файлов.
Нам снова потребуется задать прослушивание порта на одном конце. Однако, вместо вывода информации на экран, как в предыдущем примере, мы будем направлять ее сразу в файл:
На втором компьютере создадим простой текстовый файл:
Теперь этот файл можно использовать в качестве источника входных данных netcat для соединения с прослушивающим компьютером. Файл будет передан точно так же, как будто мы его ввели сами:
В этом примере нет никакой магии, мы просто используем стандартный способ перенаправления потоков
На ожидавшем соединения компьютере появится новый файл с названием «received_file» и содержимым, введенным на другой машине. Это можно проверить при помощи команды cat:
При помощи конвейеров мы легко можем передать по этому соединению совершенно любые данные.
Например, можно передать содержимое всей директории: создать безымянный tar-архив прямо на ходу, передать его удаленной системе и распаковать в удаленную директорию. Следующей командой мы можем задать на приемном конце ожидание файла, которому потребуется распаковка и извлечение:
Дефис (-) в конце команды означает, что tar будет работать со стандартным потоком ввода, в который после установки соединения по сети будет направляться результат netcat.
На передающем конце мы можем упаковать директорию при помощи tar и воспользоваться netcat, чтобы отправить архив на удаленный компьютер:
В данном случае дефис в команде tar задает упаковку содержимого текущей директории (указано маской *) с выводом результатов в стандартный поток вывода. Затем он перенаправляется непосредственно на TCP-соединение, отправляется на другой конец, где распаковывается в текущую директорию на удаленном компьютере. Это всего лишь один из примеров передачи более сложных данных между компьютерами. Другой распространенный вариант – воспользоваться командой dd для создания образа диска на одном конце соединения и передать его на удаленный компьютер.
Использование Netcat в качестве простого веб-сервера
В предыдущих примерах мы настроили netcat для ожидания соединения, чтобы передавать сообщения и файлы. Этим же принципом можно воспользоваться, чтобы превратить netcat в простейший веб-сервер. Это полезно для тестирования создаваемых вами страниц.
Сначала создадим на одном из компьютеров HTML-файл с помощью nano:
Введем в него простой HTML-код:
Теперь нужно сохранить и закрыть файл.
Без root-привилегий этот файл нельзя передать через веб-порт по умолчанию, 80. Для примера воспользуемся другим номером порта, допустим, 8888. Если страницу нужно передать один раз для проверки ее вида, можно запустить следующую команду:
printf ‘HTTP/1.1 200 OK\n\n%s’ «$(cat index.html)» | netcat -l 8888
Теперь можно просмотреть эту страницу в браузере:

Сервер передаст страницу, а затем соединение netcat будет закрыто. Если вы обновите страницу, то получите сообщение об ошибке:

Но можно задать netcat бесконечную передачу страницы, заключив предыдущую команду в бесконечный цикл, например:
Это позволит продолжать ожидание соединения после закрытия. Остановить цикл можно комбинацией клавиш Ctrl+C.
Данный прием можно использовать для проверки представления страницы в браузере, но никаких других функций он не обеспечивает. Им нельзя пользоваться для отображения реальных веб-сайтов – это небезопасно, и будут некорректно работать даже такие простые элементы, как ссылки.
Заключение
Надеемся, вы получили достаточное представление о том, как и для чего можно использовать netcat. Это универсальный инструмент, полезный для диагностики проблем и проверки корректности работы базового уровня TCP/UDP соединений. Он позволяет легко и быстро устанавливать связь между компьютерами. Для более подробной информации можно ознакомиться с man-страницей команды.
Если вы нашли ошибку, пожалуйста, выделите фрагмент текста и нажмите Ctrl+Enter.
My Netcat Cheat Sheet
Netcat is a networking tool for reading and writing data across network connections using TCP or UDP. It has cool features useful for pentesting.
Netcat is a terminal application that is similar to the telnet program but has lot more features. Its a “power version” of the traditional telnet program. Apart from basic telnet functionas it can do various other things like creating socket servers to listen for incoming connections on ports, transfer files from the terminal etc. So it is a small tool that is packed with lots of features. Therefore its called the “Swiss-army knife for TCP/IP”.
Simple usage
Banner grabbing
Copy files between machines
Method 1:
$ nc -w 1 destination_ip 1234 < file_to_send
Method 2:
$ cat file_to_send | nc -lp 1234 (linux)
> type file_to_send | nc -lp 1234 (windows)
How to Use The Netcat (nc) Command: An In-Depth Tutorial
Netcat is one of the most versatile networking tools for system administrators – it is called the Swiss army knife of Networking.
This tool can be used for creating any connections over TCP or UDP protocol which makes it an excellent debugging tool. It helps the user investigate connections directly by connecting to them.
Netcat can also perform port scanning, file transfer, and sometimes it might be used by the hackers or penetration testers for creating a backdoor into a system.
In this tutorial, we’ll be covering the Netcat utility or nc command in detail.
Netcat was developed back in 1995. Despite its usefulness and popularity, it was not maintained. Many other versions of it have been developed since then. One of the most prominent among them is called Ncat , developed by the Nmap project.
Ncat expands on the features of the traditional Netcat package. We’ll also touch on some of the functionalities of this tool.
However Ncat lacks the port scanning feature that Netcat has. This is because Nmap can already be has much more advanced port scanning capabilities.
I have installed Ncat and will be using it this tutorial, but I’ll refer to the software by both Ncat or Netcat.
Table of Contents
Installing traditional Netcat & Ncat
Netcat is available for Linux, Windows, and macOS.
If you’re running a Linux machine, chances are Netcat is already installed. However, you do need to install Netcat in other operating systems.
Ncat is not available on any of the operating systems by default, so we’ll have to install it no matter what OS we’re using.
Installing Ncat on Linux
If you’re running Debian or Ubuntu-based systems, you can install it using the apt utility. To install ncat run:
On Redhat or CentOS-based distros, you can use yum . To install ncat run:
Notice: If you install Ncat then the nc or netcat command will use Ncat by default.
Installing Ncat will allow all the functionalities of the traditional Netcat and much more.
Installing Ncat on Windows
You can install Ncat on Windows by installing Nmap – and it will be installed alongside it.
To install Nmap you’ll use their self-installer, which you can find here https://nmap.org/download.html . Find and download the latest stable self-installer, which looks something like this nmap—setup.exe , and then run it after it’s downloaded.
Installing Ncat on MAC OS X
You should be able to get Ncat installed alongside Nmap. To install Nmap on Mac OS X you can check the installation instructions on Nmap.org .
You can also find a very short section with instructions on how to install Nmap on Mac OS X in our Nmap tutorial , should you have issues with the instructions on their site.
Installing Ncat on Android with Termux
Assuming that you already have Termux installed on your Android, you can install Ncat by installing Nmap.
To do this update your package index:
Then install Nmap by running:
Basics of connections with Netcat
Before we learn how to use the tool, let’s learn some basics of how it works.
Netcat can produce different types of connections based on how you use it. Traditional nc command will only work over the TCP and UDP protocol. However, the Ncat command supports SSL , IPv6 , etc.
You can think of Netcat to be performing the tasks of both the client and the server in a Client-Server based connection model. You can read more about this model in our tutorial, Basics of HTTP Requests with cURL , under the Basics of HTTP Requests & Responses section.
In short, you can create a server listening in any port and a client connecting to any port with Netcat.
Let’s see how to create a client and a server with Netcat.
Creating a client with Netcat
If you’re reading this tutorial, then most likely you’re using some browser. Your browser work as a client to get the page from our nooblinux.com server.
You can create a client by connecting to any host and port you like with Netcat.
Netcat has a basic syntax of:
You can use the -n flag to enter numeric-only or the IP address of the host; which will bypass the DNS name resolution:
Type in the hostname or IP address and Port with the nc command to create a client:
Note: I’m using Ncat throughout this article. If you’re using Netcat, your output for the above command may look like this:
Connection to example.com 80 port [tcp/http] succeeded!
Here, we created a client with Ncat connecting to the example.com server on port 80.
Once you run this command you’ll see nothing is happening after this.
This just means that you’ve connected with the server.
It might feel unusual because most of us are used to a prompt symbol that indicates the system’s readiness to perform the next command, but this is just how it works with Netcat/Ncat.
Now you can request the server and then get a response.
Let’s try to send something to the server.
Type in some text after the output texts shown above and hit Enter twice (this is because some requests require multiple lines, so the first Enter is a newline, and the second one it sends the request). It can be any text. I’ll just write hi .
Let’s see what response we get from the server:
We sent hi to the server and then the server sent us the response that you can see in the output. The server sent us the Status code 501 Not Implemented which means the server does not support the functionality to fulfill our request.
That’s a given. Let’s request something that a server understands.
HTTP Requests with Netcat
If you know anything about HTTP requests then you should know that your browser performs a GET request to show you a webpage. After you have connected to the server, your browser sends special messages to the server with the request and the server responds accordingly.
cURL is a very good utility that can perform any HTTP requests (we also have a tutorial on cURL if you’re interested Basics of HTTP Requests with cURL: An In-Depth Tutorial ).
Let’s find out what it sends to get a response back from the server.
Run the curl command in a verbose mode ( -v ) and set the -I flag or —head option to only see the Request and Response Headers:
As you can see in the output, lines 1 to 3 are the Connection part. The next section, lines 5 to 9, is the request that curl, which in this case is our client, sent to the server. The later section is the Response Header that the server sent back.
Now, when you’re running Netcat, the lines 1 to 3 portion is being performed at first. Then you can talk to the server. Let’s generate the same response using Netcat.
To get the response from the server, we have to craft the request message first. The head request portion of the output from the curl command is:
Now let’s connect Netcat to example.com again.
Now copy and paste the above portion (the GET Request), after the the Ncat: Connected to 93.184.216.34:80 . output, in the Netcat terminal and hit Enter twice.
This is great! You’ve just got the same Request and Response Headers that you got using cURL as your client.
Important: At first glance this response may not look the same as with cURL, because the cURL response has duplicate lines – if you look closely, the responses are near identical.
Let’s try OPTIONS request instead of HEAD request. This time we’ll just type the request in, since it’s shorter.
First we’ll connect to the example.com server.
We’ll get the usual output:
After which we’ll just write the OPTIONS request OPTIONS / HTTP/1.0 and press Enter twice:
Using Printf and Piping with Netcat
Important Note: Sometimes you might get some error while typing the requests inside Netcat. That is because HTTP requests require certain formatting with Line Endings.
There also may be other reasons that your requests don’t work, as such it’s good to know that you have an alternative method of making requests and sending them through Netcat.
You can also try any request piping the output of printf command into Netcat.
To do this, run the following command outside of Netcat:
In this command, \r create the new lines for the HTTP request.
These are called carriage return (cr) and line feed (lf). These names are derived from the age of typewriters.
You basically sent the same HEAD request as before, but wrote it on one line.
After that, we use the printf command (print formatted), which properly formats our the request, so then we pass it on to Netcat through piping (the | symbol) .
Creating a Server with Netcat
In previous sections, we showed you how to create a client with Netcat.
You essentially learned what a browser does to request a webpage from the server.
Now we’ll show you how the server responds with the help of Netcat.
Netcat can start listening on any port you specify. This is what gives it the ability to create a server on the fly.
Let’s learn how to listen on a port with netcat before we get started.
Listening on a port with Netcat
You can see the available options Netcat offers by simply typing in nc -h . By default, netcat creates TCP connections. You can create UDP connections using the -u flag. However, we’ll use the default TCP connection for now.
The -l flag can be used for listening and the -p flag is for specifying the port to listen on.
Let’s look at an example. We’ll make netcat listen on port 4000 by combining the two flags together:
This command will make netcat start listening on port 4000. But you’ll only see the cursor blinking.
You can use the keyboard interrupt CTRL + C to stop the command.
Let’s turn on the verbose output by combining the -v flag:
Now you will see netcat telling you that it’s listening on port 4000. This is how you start listening on any port.
Creating a simple web server with Netcat
Now that you know how to listen on ports with Netcat, let’s try to create a simple webserver with netcat. You’ll learn how a server responds to a client in this section.
First, let’s start a Netcat listening on port 5000 in verbose mode:
Now fire up your browser and try connecting on this port. Type localhost:5000/ in your browser. Hit enter and take a look at your terminal window running Netcat. You’ll see the browser request directly showing up in your Netcat terminal:
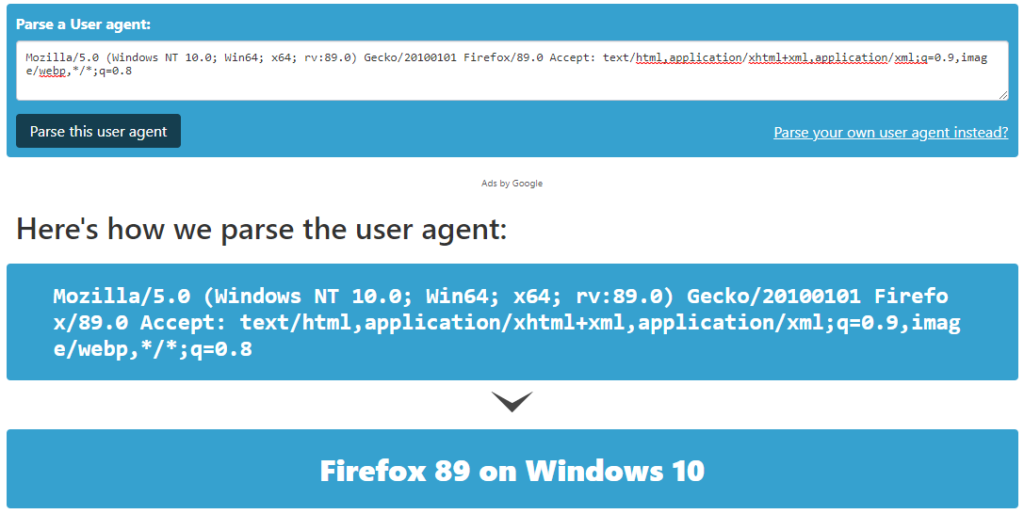
Side note: You can tell from the User-Agent value, which is Mozilla/5.0 (X11; Ubuntu; Linux x86_64; rv:89.0) Gecko/20100101 Firefox/89.0 Accept: text/html,application/xhtml+xml,application/xml;q=0.9,image/webp,*/*;q=0.8 . You can also use a tool that analyzes user agent strings such as this https://developers.whatismybrowser.com/useragents/parse/ , to find out. Just paste in the user agent string in the input field and click Parse this user agent .
Interesting, isn’t it? Can you guess which browser I’m using? It’s Firefox 89 on Ubuntu Linux.
Now that the client (Firefox) has requested the server (netcat) you can do more cool things.
You can start typing in the response Firefox will get.
However, you need to speak the language of the browser! Otherwise, you won’t see the output.
Remember the response Header we got from example.com in the previous section? Let’s take a look:
As always, the status code is the first line of the response. We do not require all of the responses, however.
We’ll just use the Status code, Content-Type and Server, which I’ve highlighted.
With that let’s try to construct our server message:
After typing this in hit enter twice and create a new empty line.
Next, you’ll type in the HTML page yourself and see it showing up on the browser in real-time! We’ll create a title for our page in real-time. If you know the HTML you can do it yourself. You can also copy this in your terminal.
The message should look something like this:
Hit enter and you’ll see the browser tab change from localhost:5000 to NoobLinux . Here’s a quick video of me doing that, in case this is a bit confusing:
Cool! Now let’s do more. Create a heading with <h1></h1> tags.
Hit enter and voila! You’ll see the heading appearing in the browser in real-time.
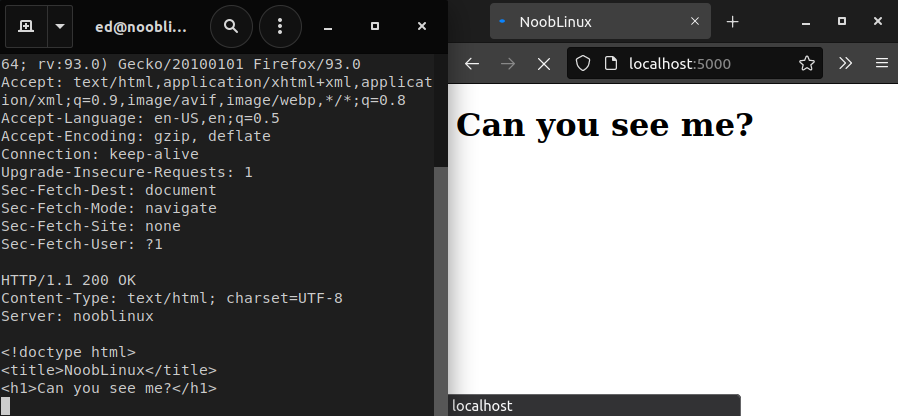 Added “<h1>Can you see me?</h1>”
You can keep playing like this and the browser will show output according to your messages.
Lastly, we’ll do a final example where we add a photo:
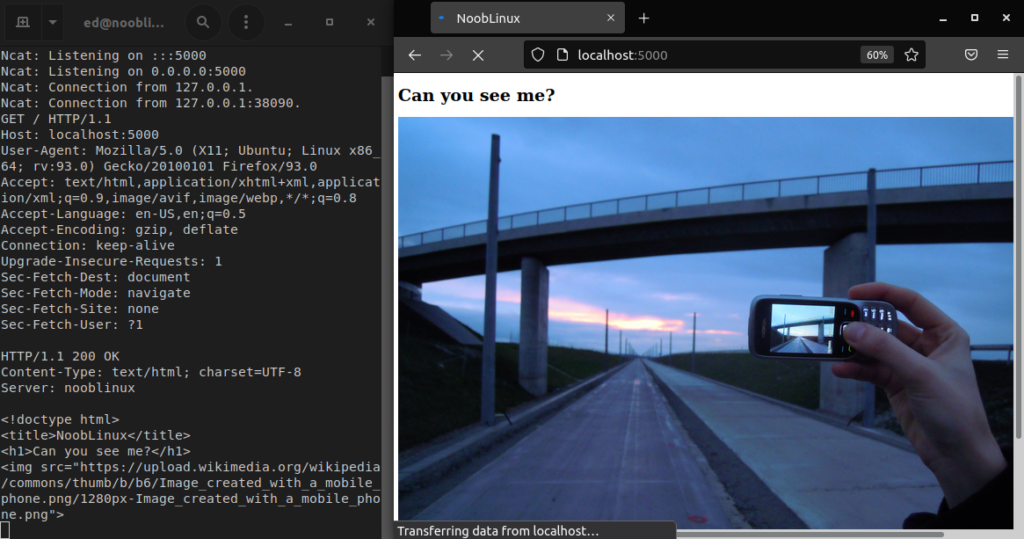 Added an image from Wikimedia Commons in the HTML.
Communicating over SSL with Ncat
You can receive as well as create any connections over TCP and UDP protocols with Netcat. The traditional Netcat does not support SSL encryption and HTTPS. Ncat, however, comes with SSL support.
We can activate it by using the —ssl flag. If you haven’t installed Ncat, now would be a good time.
Now we’ll play with sending a HEAD request to github.com and see how to activate SSL support, and what happens when we don’t.
First we’ll send a HEAD request like we did in the beginning of the tutorial, to the github.com server, on port 80 .
We’ll make the request by sending it from print by using printf and piping with Netcat (remember when we discussed this earlier).
You can see that the github.com server gives us the status code 301 , which means a redirect should be done.
Indeed, the github server accepts connection only with HTTPS or SSL encryption with the HTTP requests.
Let’s try using the port 443 as we know it is for HTTPS.
It also fails this time. This is because ncat is sending requests without SSL encryption. We have to enable SSL encryption.
Type the following command using the —ssl flag of the Ncat command:
As you can see, now the output is showing correctly. We can also see the cookie and some encryption information as well in the header.
Sometimes you’ll require a certificate to connect to the host. You can create an SSL Certificate and SSL key with —ssl-cert and —ssl-key respectively. Find more on this on the Ncat user manual’s SSL page .
Creating a simple chat using Netcat
Now that you know how to create a client and a server with Netcat, let’s build both and create a chatting functionality between them.
You can do this over remote network machines or within your local network. We’ll just need two computers that can run Netcat (it can be a computer, virtual machine or phone with a terminal and netcat installed)
What we’ll do: On the first machine (doesn’t matter which) we’ll just run the command to create a server and listen on a port, in our case 4000. On the second machine we’ll run the command to connect to the first machine’s IP and port, thereby establishing the connection. From there we can just write messages from one machine and they’ll instantly appear on the other.
Let’s get started.
Within your local network
For our example, I’ll create a chat with a VMware virtual machine running Ubuntu 20.04.
You can try out the same thing, or you can use machines connected to your WiFi – such as if you have multiple computers that can have Netcat installed on them, or an Android phone running Termux (installed from f-droid.org on which you can install Netcat).
Most likely there are options for iOS, and other operating systems as well, however I haven’t tried them myself.
Make sure both the machines have Netcat installed.
First, figure out the private IP address (IPv4) of the computer where we’ll run the server on, because we’ll need to know it so we can connect to it from the second computer.
Finding your private IP address
Your private IP address is different than your public IP address [which is the IP address most of us are familiar with].
A private IP address is an IP address used within a private network, such as your home network (unlike the public IP address which you would use to access the internet).
Typically, a private IP address is assigned to each device connected to your local network by your router. Say you have multiple computers and phones, a printer and a smart TV – all of them are assigned a private IP address.
IP ranges used by private networks are, so your private IP address should be from one of those ranges.
- 10.0.0.0/8
- 172.16.0.0/12
- 192.168.0.0/16
On Linux, you can determine your private IP address using command such as ip addr , ifconfig or hostname -I (uppercase I).
Determine your private IP address using ip addr or ifconfig
We’ll use ip addr since it’s meant to be a replacement for ifconfig , and ifconfig may not come pre-installed on recent Linux systems.
When you run it, the system will display all your network interfaces.
What we’re interested in is what comes after inet in the details for the network interface that we’re using.
Your output may display more network interfaces, such as eth0 , wlan0 and so on.
To determine the network interface that you’re using you can use the route command:
The Iface column on the same line with default in the Destination column should tell you the interface that you are using (the highlighted line).
As we can see, the interface I’m using is ens33 , and if we look up to the output from where I ran ip addr, under ens33 and after inet we see 192.168.145.131 .
So my private IP address is 192.168.145.131 .
Determine your private IP address using hostname -I
You can also easily display your private IP address using hostname -I (uppercase I), however you will be shown multiple IPs if you have multiple configured interfaces.
For example, when I run it on the same machine as before, I get a quick and clean private IP address in the output.
However, when I run it on a different machine:
In this case, the second IP (192.168.33.10) is the one I can connect to on my local network via Netcat.
I usually use the ip addr method.
We’ll refer to the computers as:
- Machine 1 – the computer whose private IP address we’ve determined, where we will create the server and listen on port 4000
- Machine 2 – the computer that we’ll use to connect to Machine 1
Now, assuming that you’ve found your private IP address for Machine 1, create a server on it, listening on any port (I’ll use 4000). To do this run:
Now Netcat will be listening on Machine 1 which has the IP address of 192.168.145.131 . This is our server.
Now let’s connect to this server from another device within our local network (which is Machine 2.
We’ll use the server’s IP address and port to connect to it. Run the following command, replacing the IP with your machine’s private IP address:
As we can see our client has connected to the server. If we take a look at our server we’ll instantly see the machine connected to it:
Now the client-server connection has been established. You can type in anything in any of the machines and you’ll see the message instantly on the other machine. Here are the commands and outputs of each machine:
[Video] Demo of creating a simple chat using Netcat
Here’s a very short video demonstrating this. On the left there’s what we call Machine 1, which is an Ubuntu 20.04 virtual machine, and on the left I’m using Cmder on Windows 10.