What Are VMware Virtual CPU Performance Monitoring Counters (vPMCs)?
This kind of strange name is simple to explain, but some people might not know about it. Hence this post. In this post, we will talk about What Are VMware Virtual CPU Performance Monitoring Counters (vPMCs).
This feature can be enabled on a per-VM basis (by editing a virtual hardware of a VM) and allows the application installed within the VM to be optimized or debugged as those counters allow more precise identification of eventual CPU performance.
There are some limitations for vMotion for example where the destination host has compatible CPU performance counters or for VMs which are Fault Tolerance (FT) enabled.
Quote from VMware:
CPU Performance Monitoring Counters (PMCs) provide a way for software to monitor and measure processor performance. These counters are commonly used by tools such as software profilers. Beginning with virtual machines that have ESX 5.1 and later compatibility (hardware version 9), you can enable the virtual performance monitoring counters (vPMCs) feature to allow software running on virtual machines to access this performance information, just as it would when running on a physical machine.
Where to Enable VMware Virtual CPU Performance Monitoring Counters?
You can use vSphere Web client where you Select your VM > Edit Settings > Expand CPU > Performance Counters Checkbox > OK to validate.
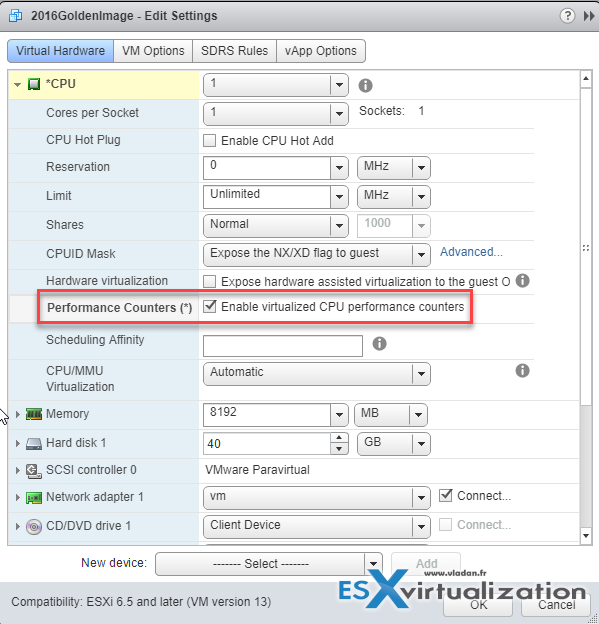
System Requirements:
Virtual Hardware 9 – VM’s virtual hardware has to be 9 or higher (vSphere 5.1 and higher)
Intel Nehalem and higher
Intel VT-x or AMD-V Enabled
Required Priviledges – Virtual machine > Configuration > Settings is set on the vCenter Server system.
Limitations:
As being said, there are some limitations. Which exactly?
- If virtual CPU performance counters are enabled, you can migrate the virtual machine only to hosts that have compatible CPU performance counters.
- If an ESXi host’s BIOS uses a performance counter or if Fault Tolerance is enabled, some virtual performance counters might not be available for the virtual machine to use.
Wrap up:
I’m not sure that many folks using it, but as with everything, there might be some use cases for that when you’re having an application specific requirements and you need this option. VMware Virtual CPU Performance Monitoring Counters simply allows you to benefit of more precise CPU metrics as those can give you an additional path for identifying and improving CPU performance.
And that’s app development folks needs. More precision in order to tweak performance problems. If you or someone from your organization is using Virtual CPU performance counters, don’t hesitate to share.
Enable Virtualized CPU Performance Counters on VMware
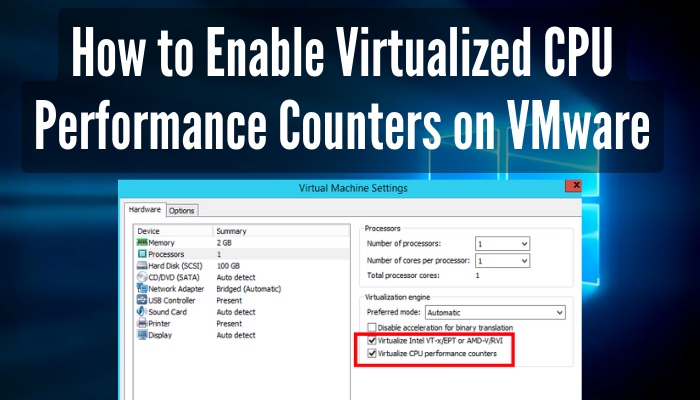
Are you looking for a way to precisely measure the CPU performance while running a virtual machine on your PC? I’ve got just the thing for you. It’s a built-in feature in VMware called Virtual Performance Monitoring Counters(vPMCs).
Despite having a lengthy & complicated name, enabling this feature is quite simple.
Let’s dive into this write-up as I have discussed the most effortless way to turn on this feature.
How to Activate Virtual CPU Performance Monitoring
To enable virtual CPU performance monitoring in VMware, select a virtual machine in the inventory and click on Edit settings. Now click on Processors(for version 6.7 & newer) or expand the CPU section(for version 6.5 or older) & tick the box for Virtualize CPU performance counters.
Too brief for you? Don’t worry, below I have discussed the concise steps to enable performance monitoring counters in great detail.
But before we do, let’s see the requirements to enable this feature.
Prerequisites for Enabling CPU Performance Counters
There are some conditions your computer must meet before you can enable virtualized CPU utilization counter. Such as virtual machine compatibility, system configuration, privileges in the vCenter server system, etc.
Additionally, if you’re an Intel user, you’ll need to enable Hyper-V for Windows 10 & Windows 11 from the BIOS. For AMD users, they’ll need to enable SMV from the BIOS as well.
Here are the prerequisites for enabling performance counters in VMware:
- Check if the virtual machine compatibility is ESXi 5.1 or later.
- Make sure your computer has at least 4 CPU cores & 4GB system RAM.
- Ensure you have the privilege to change settings from the vCenter Server
- Enable Hyper-V(for Intel) or SMV/AMD-V(for AMD) from the BIOS.
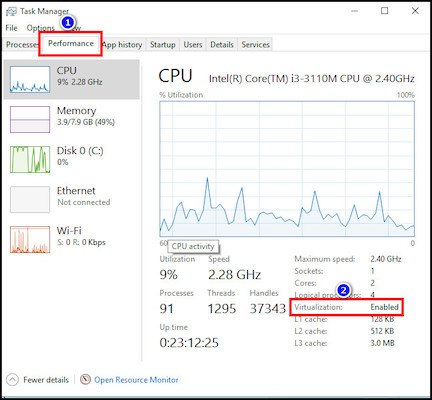
To easily check whether CPU virtualization is turned on, open Task Manager and go to the Performance tab. Now check whether the Virtualization is enabled.
CPU Performance Counter Enabling Procedure
If your system matches the above requirements, follow these steps one by one to activate performance counters for CPU usage.
Here’s how to enable virtualized CPU performance counters:
For VMware vSphere Version 7.0 & 6.7
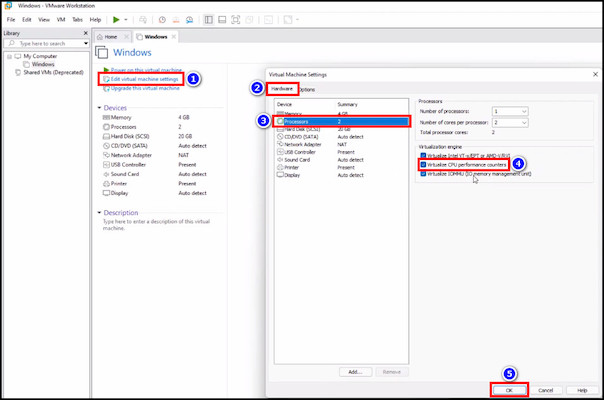
- Run VMware Workstation and select your preferred virtual machine from the inventory/library.
- Click on Edit virtual machine settings.
- Select Processors from the Hardware tab.
- Tick the box for Virtualize CPU performance counters.
- Click OK.
For VMware vSphere Version 6.5 & Older
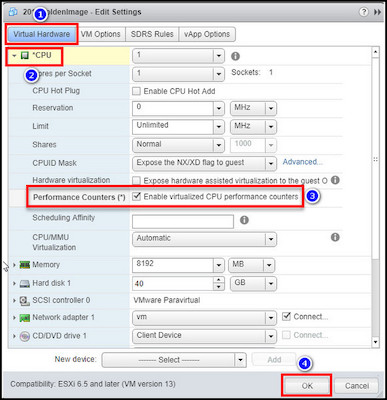
- Launch VMware Workstation and choose the virtual machine from the inventory.
- Click on Edit settings and select the Virtual Hardware tab.
- Expand the CPU section.
- Go to Performance Counters(*) and tick the box for Enable virtualized CPU performance counters.
- Hit OK.
Keep in mind, the performance monitoring counters won’t be virtualized if the host is already using the physical CPU counter for another use.
Frequently Asked Questions
What does virtualize CPU performance counters do?
VMware’s Virtual CPU Performance Monitoring Counters (vPMCs) provide an easy way for users to keep track of CPU utilization while running a virtual machine.
Do I need to have Hyper-V enabled to run VMware Workstation?
Yes. Enabling Hyper-V for Intel and SMV for AMD is required to run virtualization via VMware Workstation.
Ending Remark
Tools such as processor performance counters are very useful for software profiling. It helps the developers to further optimize and debug programs running on the virtual machine.
Hopefully, this article has helped you achieve this goal by letting you know how to enable such a feature.
Nhat Nguyen

To configured or change any hardware setting on a VM, the Virtual Machine cannot be running. If it is running you must power off your VM before you can make any changes.
For this tutorial, I will be going through some of the hardware configurations that are available in VM you can change to make your VM runs better.
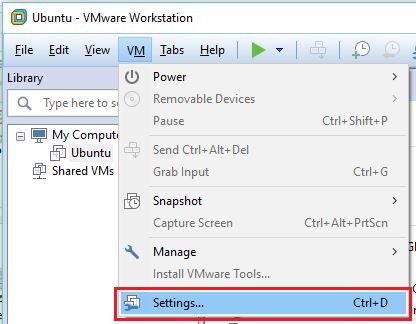
1. Click on VM, go down to Settings and click on it.

3. First, we will look at memory. If you click Memory on the left under Device you will be able to see that on the right you can adjust the amount of memory your VM can have. So let’s say your host computer has 8GB of memory and you want to dedicate 1GB of memory to your Virtual Machine you can set the number to 1024MB or Megabytes (1024MB = 1GB) and that will dedicate 1 Gigabyte of memory to your Virtual Machine.
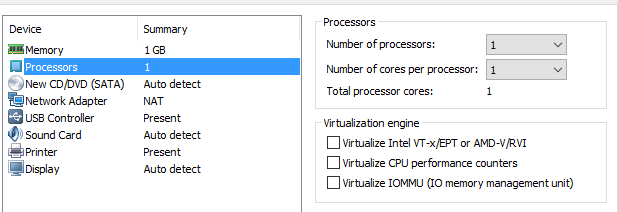
3. Virtualize IOMMU (IO memory management unit) — Click Here to learn about Virtualize IOMMU
1. Click on the CD/DVD (SATA) to view the option for CD/DVD. Under CD/DVD you can browse for an ISO file or use the default setting to automatically detect CD/DVD on the host computer. The Connect at power on the option is just to allow the VM to automatically connect to the host computer CD/DVD when it is turned on.
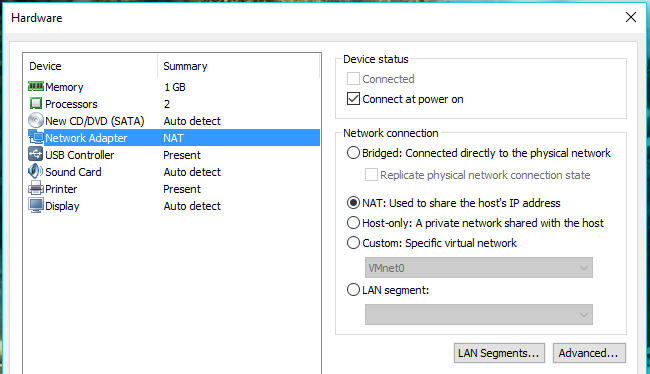
2. Connect at power on — Allow your VM to automatically have a network card when it is turned on
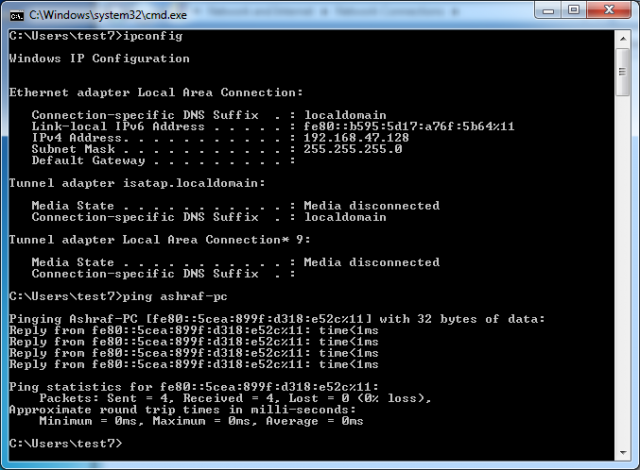
3. Bridge: Connected directly to the physical network — As the name implies, this option “bridges” the virtual network to the physical network. This means that the virtual machine will appear to the network as an identifiable separate machine. It will even ask the local DHCP server (if any) for its IP address (See screenshot of the command prompt below) and will appear in the DHCP leases of that DHCP server as a separate machine with a unique MAC address.

This connection will allow the virtual machine to offer resources to the network. For example, it can host a file server, a web server or any sort of server you need. You do not need to have a separate physical machine to host your home server: it can be a VM on your always-on desktop.
This option is also called Auto-bridging because it will automatically detect a functional LAN card installed on the host machine
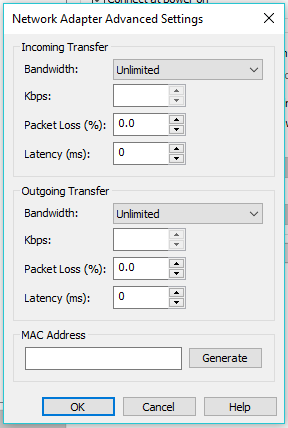
2. NAT: Used to share the host’s IP address — This is the most common configuration and the default for a newly created machine is to NAT. In this configuration, the host will act as a router that hides the virtual machine behind it. The virtual machine will have access to the network through the default connection of the host. To other devices on the network, all traffic will appear to be coming from the host. This means that although a virtual machine should be able to access network resources (and the Internet), it will not be able to offer resources to the network. This network connection will have its own private range that is assigned by DHCP
3. Host-Only: A private network shared with the host — This option can be used when you do not want the virtual machine to see the rest of the network or the Internet. This network connection can also take its IP through DHCP (See below), but the IP range will be different than that of NATed machines
4. Custom: Specific virtual network — The fourth option is actually nine different options (See below), three of which we have already discussed. They include Auto-bridging, NATing and host-only. The other six options are available for you to use or to customize.
For example, you can have separate test environments that do see each other or the host: Environment A that contains a domain controller(s), member server(s) and some test workstation(s) on VMnet2. Environment B is a complete replica on VMnet3. Both environments can have the same IP scheme and never conflict as they are isolated from each other. This option is also great for testing VMs and/or applications that you do not trust without any risk to your host or network.
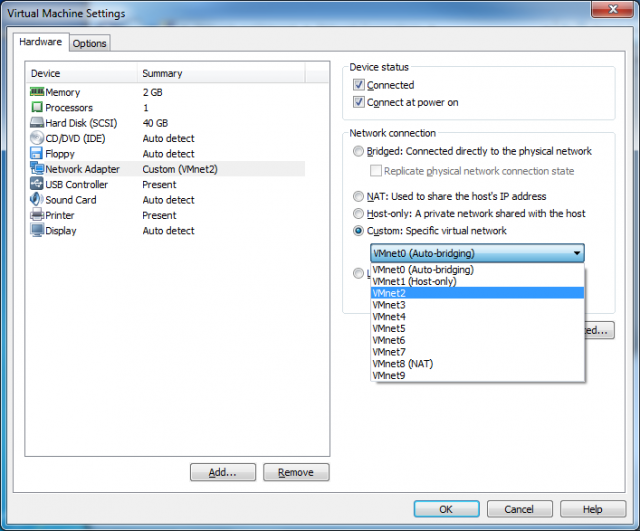
The true power of custom networks is the ability to customize them (which is not available in the same dialog screen). For that, you will need the Virtual Network Editor (See below) which can be used to edit all nine virtual networks.

In the Virtual Network Editor, you can specify to which physical network you want to map your virtual machine bridged network (Figure 1). Doing so will allow you to create a custom Virtual Machine network (VMnets) that is mapped to one of the other physical network cards (Figure 2).
This becomes very important if you need a multi-homed Virtual Machine like a router or a firewall. For example, if you want to test Microsoft ISA, you can bridge one of the network cards to the Internet while bridging the second to the rest of the network, offering your home/lab network filter/accelerated Internet.
It can also be very useful if you want different VMs to be on different Internet links. I have this setup for one of the customers I do remote support for. I once had a complete failure on the network which made me unable to connect remotely. Since then I’ve created a VM that is directly connected to a separate WiMax Internet link from the rest of the network. The VM has another NIC to give me visibility to the internal network.
You can also use the editor to edit the IP address ranges of NAT and Host-Only DHCP servers or disable it completely. An example of this occurs when you need to simulate a 192.168.100.0/24 network rather than the 192.168.13.0 /24 chosen in this setup for NAT Network.
Virtualize cpu performance counters что это
I want to install Ubuntu on my VMware Player, but I facing the following error:
How can I solve this?
3 Answers 3
Edit the .vmx file and search for vpmc.enabled . Set it to FALSE .
More about performance counters here:
Virtualized performance counters are not supported on the host CPU type
This error report clearly shows that your host CPU model won’t support Virtualization. So you can’t run any Virtualization softwares like VirtualBox,VMWare,etc.
I encountered this problem on my Mac after upgrading to a new Macbook pro. I went to the VM settings, then Processor and Memory tab, then «advanced options» and uncheck both options. I was then able to boot up the virtual machine.
Not the answer you’re looking for? Browse other questions tagged vmware-player or ask your own question.
Related
Hot Network Questions
Subscribe to RSS
To subscribe to this RSS feed, copy and paste this URL into your RSS reader.
Site design / logo © 2022 Stack Exchange Inc; user contributions licensed under cc by-sa. rev 2022.6.10.42345
By clicking “Accept all cookies”, you agree Stack Exchange can store cookies on your device and disclose information in accordance with our Cookie Policy.