How to Install and Configure Apache Web Server on Ubuntu
Apache or Apache HTTP server is a free and open source web server, developed and maintained by the Apache Software Foundation. Its popularity can be judged by the fact that around 46% of the websites worldwide are powered by Apache. Apache allows website developers to serve their content over the web. It serves as a delivery man by delivering files requested by users when they enter a domain name in their browser’s address bar.
This tutorial is about installing and configuring Apache2 on your Ubuntu system. The commands and procedures mentioned in this article have been run on an Ubuntu 18.04 LTS system. Since we are using the Ubuntu command line, the Terminal, in this article; you can open it through the system Dash or the Ctrl+Alt+T shortcut.
Install Apache 2 on Ubuntu Linux
Please follow the following steps in order to install the Apache2 software through Ubuntu official repositories.
Step 1: Update system repositories
You can download the latest version of a software by first updating the local package index of Ubuntu repositories. Open the Terminal and enter the following command in order to do so:

Step 2: Install Apache 2 with the apt command
Next, enter the following command as sudo in order to install Apache2 and its required dependencies:

You may be prompted with a y/n option to continue installation. Please enter Y, after which the installation procedure will begin.
Step 3: Verify the Apache installation
When the installation is complete, you can check the version number and thus verify that Apache2 is indeed installed on your system by entering the following command:

Configure the Firewall Settings
In order to configure Apache, we first need to allow outside access to certain web ports of our system and allow Apache on your UFW firewall.
Step 1: List the UFW application profiles
In order to configure the firewall, let us first list the application profiles we will need to enable access to Apache. Use the following command to list such available applications:
In the above output, you can see three Apache profiles all providing different levels of security; Apache being the one that provides maximum restriction with port 80 still open.
Step 2: Allow Apache on UFW and verify its status
Allowing Apache on UFW will open port 80 for network traffic, while providing maximum security to the server. Please configure UFW to allow Apache through the following command:

The status of UFW will now display Apache enabled on the firewall.
$ sudo ufw status
Configure the Apache Web server Settings
Step 1: Verify that the Apache service is running
The first step is to verify that the Apache2 service is up and running on your system, through the following command:

The status “active (running) verifies that the apache2 service is running.
Step 2: Verify that Apache is running properly and listens on your IP address
You can also verify if Apache is running by requesting a page from the Apache server. For this purpose, you can use your server’s IP in order to access the Apache landing page.
Use the following command to know about your server’s IP:

Then try the IPs, one by one from the output, in your web browser as follows:
http://server_IP
In my case, http://192.168.100.4 and http://192.168.100.5. Doing so will display the following Apache web page for Ubuntu, verifying that the Apache server is working properly.

Set Up Virtual Hosts in Apache
A virtual host is similar to what you have server blocks in Nginx. It is used to manage configurations for more than one domain from one server. We will present an example of how to set up a virtual host through the Apache server. We will set up a website named sampledomain.com by using the server block that is enabled by default in Apache for Ubuntu 18.
Step 1: Set up a domain name
The server block that is enabled by default is capable of serving documents from /var/www/html. However, we will create a directory at /var/www/ leaving the default directory intact.
Create this directory through the following command, replacing sampledomain.com by your respective domain name.

Then assign the ownership of the directory through the following commands:

Let us now create an index page that we can later access to test if Apache is running our domain name. Create an HTML file either through the Nano editor or any of your favorite text editor.
Enter the following HTML for the index page:

We are using the nano editor to create the HTML file.
You can save a file in nano by using Ctrl+X and then enter Y and hitting Enter.
Apache needs a virtual host file to serve the contents of your server. The default configuration file for this purpose is already created but we will make a new one for our custom configurations.
Enter the following customized configuration details for our domain name:

We are using the nano editor to create this .conf file.
You can save a file in nano by using Ctrl+X and then enter Y and hitting Enter.
Step 2: Enable the domain configuration file
Let us enable the configuration file we created with the a2ensite tool:

The output will suggest activating the new configuration but we can do it all collectively after running the following command that disables the original configuration file:

Now restart the Apache service:
Step 3: Test for errors
Finally, let us test if there are any configuration errors through the following command:
If you do not get any errors, you will get the following output:

However, the following error is common in Ubuntu 18.04

Resolve the error:
Enter the following command in order to resolve the above-mentioned error:


Now when you check again for errors, you will see this error resolved through the following output:

Step 4: Test if Apache is serving your domain name
Apache server is now configured to serve your domain name. This can be verified by entering your server name as follows in any of the web browsers running on your system:
http://sampledomain.com
The index page should display as follows, indicating that Apache is now ready to serve your server block!

Some Common Apache Management Commands
After setting up the web server, you might have to perform some basic management operations on Apache. Here are the commands that you can enter in your Terminal application for these operations.
Use this command as sudo in order to start the Apache server.
Use this command as sudo in order to stop the Apache server when it is in start mode.
Use this command as sudo in order to stop and then start the Apache service again.
Use this command as sudo in order to apply the configuration changes without restarting the connection.
Use this command as sudo in order to enable Apache to be started every time you boot your system.
Use this command as sudo in order to disable if you have set up Apache to be started every time you boot your system.
Conclusion
Through this article, you have learned to install and configure the Apache web server on your Ubuntu system. This includes making some changes to your UFW firewall and then configuring your web server for your IP address. We also recommend you to set up a virtual host through Apache; this will give you a basis on how to use Apache to host your files on the Internet. The basic Apache management commands will also help you as a web administrator to manage your web server in an optimal manner.
Karim Buzdar
About the Author: Karim Buzdar holds a degree in telecommunication engineering and holds several sysadmin certifications. As an IT engineer and technical author, he writes for various web sites. You can reach Karim on LinkedIn
Install and Configure Apache Web Server on Ubuntu 20.04
Note: We have explained the procedure explained in this article on a Ubuntu 20.04 LTS system.
Installing Apache2; Step 1: Update
First, we will need to update the system repository index to install the most recent version of Apache2. To do so, launch the Terminal by using the Ctrl+Alt+T shortcut and execute the following command:
Note that, only an authorized user can install, update, or remove the packages from the Linux system.
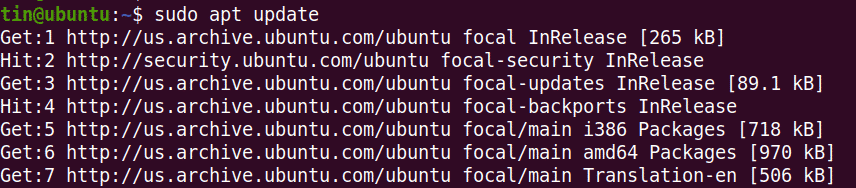
Step 2: Install Apache2
Next in this step, we will install Apache2 web server. For this, execute the below command in Terminal:
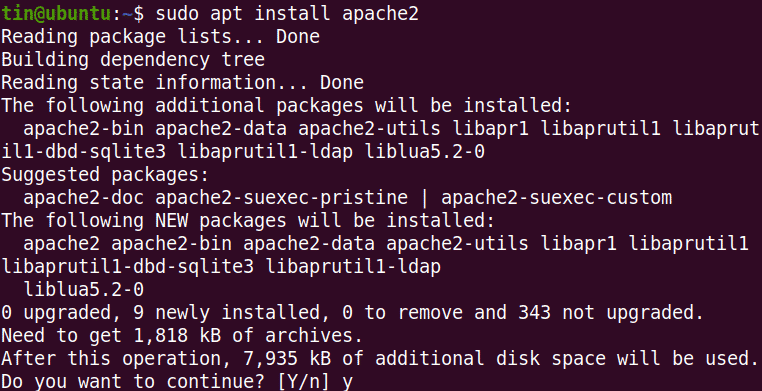
The system might ask for confirmation by providing you with a Y/n option. Hit y and then Enter to continue. After that, the Apache2 web server and its all dependencies will be installed on your system.
Once installed, verify the version of the Apache server as follows:

Firewall configuration
Now, we will need to open certain ports on our system in order to access Apache from outside. First, let’s list the application profiles that we need to give Apache access to. Run the following command to do so:
Here you can see different apache profiles.
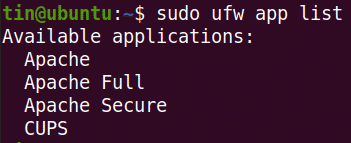
We will use the highly restrictive profile ‘Apache’ to enable network ctivity on port 80.
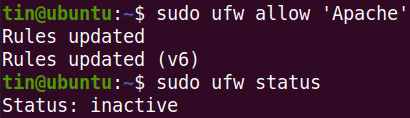
Now check the status which will show Apache allowed in firewall.
Configuring Apache web server; Verifying Apache service
Before moving towards configuration, first, verify if the Apache service is operational. For this, execute the below command in Terminal:

From the above output, you can see the Apache2 service is active and running.
Another approach to verify if Apache is running fine by requesting a web page from the Apache web server. To do so, find your IP address using the following command:

Then open the web browser and access apache welcome page as follows:
Replace the 192.168.72.134 by the IP address of your machine.
By navigating to the above link in the browser, you see the Apache welcome page which is the indication that the Apache server is working properly.
Setting Up Virtual Hosts in Apache
If you have multiple domains that need to be server from the single Apache web server, then you will require to set up virtual hosts. In the following, we will show you how to set up a virtual host in Apache. We will set up the domain name “info.net”. Make sure to replace the info.ne with your own domain name.
Step 1: Create a directory for your domain
In this step, we will create a directory for our domain name. This directory will be used for storing the data on our website.
Run the following command in Terminal by replacing the info.net with your own domain name:

Change the directory ownership to current user:
 Assign necessary permissions as follows:

Step 2: Make a sample page for your website
We have setup virtual host and assign necessary permission. Now we, will create a sample page for our website. We will create the sample page using Nano editor, however, any text editor can be used for this purpose.
Copy paste these lines of HML code:
Now use Ctrl+O to save and then Ctrl+X to exit the file.

Step 3: Create a virtual host file
Apache server comes with virtual host file by default. This file is used to serve the contents of the web server. However, we will generate the new virtual host file with the following command:
Now enter the below lines by replacing the info.net by your own domain name.

Now use Ctrl+O to save and then Ctrl+X to exit the file.
Step 4: Activate virtual host configuration file
In this step, we will be creating the virtual host configuration file. For this, execute the following command in Terminal:

Now disable the “000-default.conf” default virtual configuration file as follows:

Now restart Apache to activate the new configuration as follows:
Step 5: Test for errors
Once all the configurations are completed, you can test for any configuration errors:
You might receive the following error:

In order to resolve this error, edit the servername.conf file:
Then add this line by replacing the info.net with your own domain name:

Save and exit the servername.conf file and run:

Now again execute:
This time, hopefully, you will not receive any error.

Step 6: Test virtual host
Now the Apache web server is ready to serve our domain. Let’s test this by navigating to the following link in the browser:
Replace the info.net with your domain name.
The following index page shows the Apache server is ready to serve our domain name.

Managing Apache server
In order to manage the Apache server, here are some of the useful commands that you can run in Terminal:
To start the Apache server:
To stop the Apache server:
To stop and then start Apache”
To reload apache server to update the new configurations:
To start Apache at boot:
To disable Apache at boot:
This article has explained in detail the installation and configuration of Apache web server in Ubuntu 20.04. We have also explained setting up a virtual host. Now you can set up multiple domains in the same Apache server. In the end, we have mentioned some commands that can be very helpful in managing the Apache web server.
About the author

Karim Buzdar
Karim Buzdar holds a degree in telecommunication engineering and holds several sysadmin certifications. As an IT engineer and technical author, he writes for various web sites. He blogs at LinuxWays.
How to Install Apache Web Server on Ubuntu 20.04
This guide will take you through the installation of the Apache webserver on Ubuntu 20.04. It includes managing the Apache2 services, open webserver port in the firewall, testing the Apache2 installation, and configuring a Virtual Host environment.
Requirements:
Installing Apache2 in Ubuntu 20.04
1. First, log into your Ubuntu 20.04 system and update your system packages using the following apt command.
2. Once the update process is complete, install the Apache2 web server software as follows.
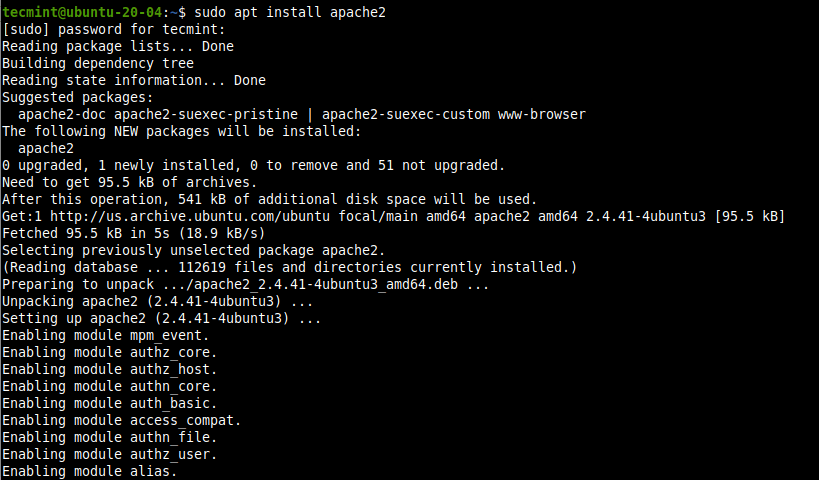
3. While installing the Apache2 package, the installer triggers systemd to automatically start and enable the apache2 service. You can verify that the apache2 service is active/running and is enabled to automatically start at system startup using the following systemctl commands.
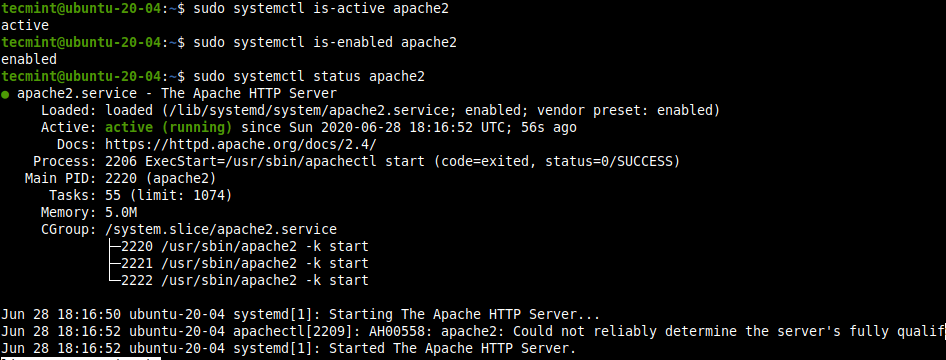
Managing the Apache in Ubuntu 20.04
4. Now that your apache web server is running, it’s time to learn some basic management commands to manage the apache process using the following systemctl commands.
Configuring Apache in Ubuntu 20.04
5. All Apache2 configuration files are stored in the /etc/apache2 directory, you can view all files and subdirectories under it with the following ls command.
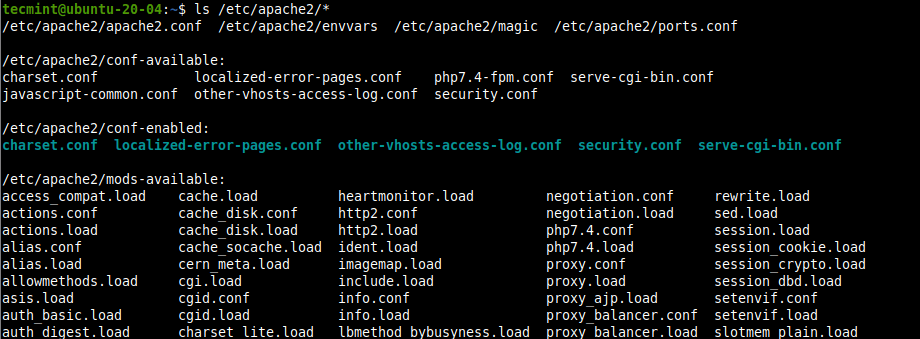
6. The following are the key configuration files and sub-directories you should take note of:
- /etc/apache2/apache2.conf – The main Apache global configuration file, that includes all other configuration files.
- /etc/apache2/conf-available – stores available configurations.
- /etc/apache2/conf-enabled – contains enabled configurations.
- /etc/apache2/mods-available – contains available modules.
- /etc/apache2/mods-enabled – contains enabled modules.
- /etc/apache2/sites-available – contains configuration file for available sites (virtual hosts).
- /etc/apache2/sites-enabled – contains configuration file for enabled sites (virtual hosts).
Note that if the server’s FQDN is not set globally, you will get the following warning every time you check the apache2 service status or run a configuration test.
Set the ‘ServerName’ directive globally in the main apache configuration file to suppress this message.
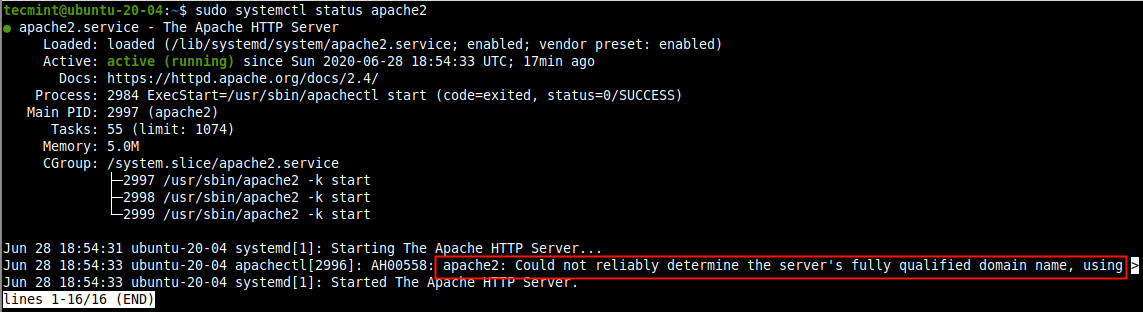
7. To set the web server’s FQDN, use the ServerName directive in /etc/apache2/apache2.conf file, open it for editing using your favorite text editor.
Add the following line in the file (replacing webserver1.tecmint.com with your FQDN).
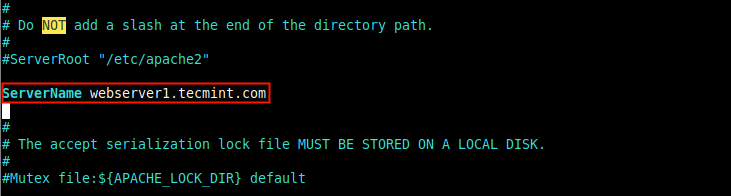
8. After adding the server name in the apache configuration, check the configuration syntax for correctness, and restart the service.

9. Now when you check the apache2 service status, the warning should not appear.
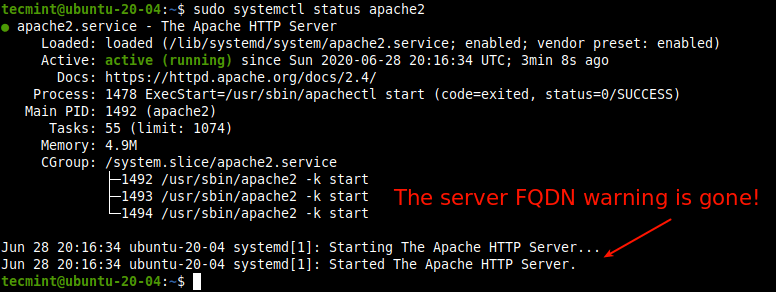
Opening Apache Ports in UFW Firewall
10. If you have the UFW firewall enabled and running on your system, you need to open the HTTP (port 80) and HTTPS (port 443) services in the firewall configuration, to allow web traffic to the Apache2 web server via the firewall.
Testing Apache on Ubuntu 20.04
11. To test if the Apache2 webserver installation is working fine, open a web browser, and use your server’s IP address to navigate:
To find out your server’s public IP address, use any of the following curl commands.

If you see the Apache Ubuntu default welcome web page, it means your web server installation is working fine.
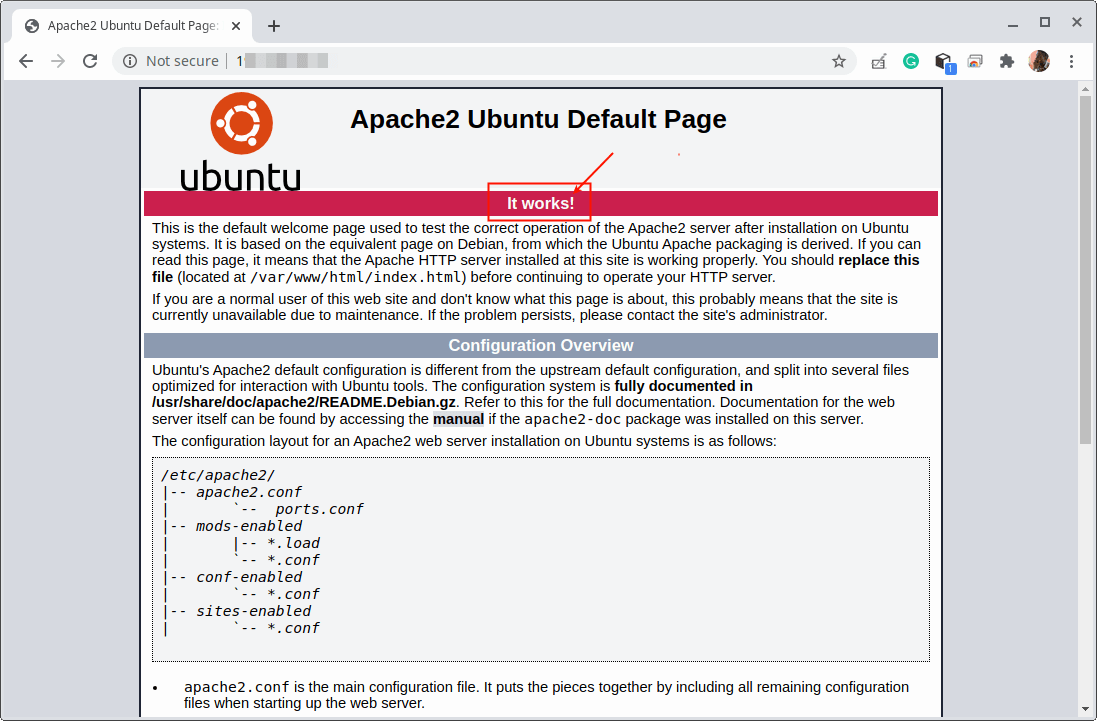
Setting Up Virtual Hosts in Ubuntu 20.04
Although the Apache2 web server is configured by default to host one website, you can use it to host multiple web sites/applications using the concept of “Virtual Host”.
Therefore Virtual Host is a term that refers to the practice of running more than one web site/application (such as example.com and example1.com) on a single server.
Additionally, Virtual Hosts can be “name-based “(meaning that you have multiple domain/hostnames running on a single IP address), or “IP-based” (meaning that you have a different IP address for every web site).
Note that the default virtual host which serves the Apache Ubuntu default welcome web page which is used to test the Apache2 installation is located in the /var/www/html directory.
12. For this guide, we will create a virtual host for the web site called linuxdesktop.info . So let’s first create the web document root for the site which will store the site’s web files.
13. Next, set the appropriate ownership and permissions on the created directory.
14. Now create a sample index page for testing purposes.
Copy and paste the following html code in it.
Save the file and exit it.
15. Next, you need to create a virtual host configuration file (which should end with the .conf extension) for the new site under the /etc/apache2/sites-available directory.
Then copy and paste the following configuration it the file (remember to replace www.linuxdesktop.info with your FQDN).
Save the file and exit it.
16. Next, enable the new site and reload the Apache2 configuration to apply the new changes as follows.
17. Finally, test if the new virtual host configuration is working fine. In a web browser, use your FQDN to navigate.
If you can see the index page for your new website, it means the virtual host is working fine.

That’s all! In this guide, we have shown how to install the Apache webserver on Ubuntu 20.04. We also covered how to manage the Apache2 services, open the HTTP and HTTPS services/ports in the UFW firewall, tested the Apache2 installation, and configured and tested a Virtual Host environment. Do you have any queries, use the comment form below to reach us.
Tutorial Feedback.
If You Appreciate What We Do Here On TecMint, You Should Consider:
TecMint is the fastest growing and most trusted community site for any kind of Linux Articles, Guides and Books on the web. Millions of people visit TecMint! to search or browse the thousands of published articles available FREELY to all.
If you like what you are reading, please consider buying us a coffee ( or 2 ) as a token of appreciation.
Начальная настройка веб сервера на Ubuntu 20.04.4 LTS в 2022 году под множество изолированных сайтов
Открываем консоль, через SSH и проверяем текущую дату и время на сервере с помощью следующей команды:
Вывод будет примерно следующим:
Мы привыкли к 24 часовому отображению времени и нам его нужно изменить. Для этого вписываем в консоль следующую команду и нажимаем «Enter»:
В выпадающем окне «Geographic area:» выбираем «Europe«.
На следующей странице в «Time zone:» выбираем «Moscow«.
После чего наблюдаем измененные часовые пояс и время в удобном для нас формате, например:
Обращаем ваше внимание на то, что встроенный в Ubuntu планировщик заданий «cron«, использующийся для периодического выполнения заданий в определённое время автоматически не подхватывает новый часовой пояс и его надо перезагрузить командой:
1.0.2. Проверка настройки кодировки сервера и установка кириллицы в консоли
Если в консоли нет поддержки UFT-8 и кириллицы, то у нас могут возникнуть некоторые неприятные ситуации. Заранее избежать их мы можем, если установим, правильно настроим и сконфигурируем локаль используя команду:
После этого производим следующую настройку:
Выбираем желаемые локализации в окне «Locales to be generated:«
«en_US.UTF-8 UTF-8» является предпочтительным выбором в большинстве случаев, но вы можете добавить «ru_RU.UTF-8 UTF-8«
В следующем окне «Default locale for the system environment:» предпочтительно выбирать «en_US.UTF-8«
1.0.3. Производим замену названия сервера/hostname
На просторах интернета, в чатах и тематических форумах многие задаются вопросом, можно ли изменить название сервера и как изменить название сервера в консоли SSH, которое вы постоянно наблюдаете, когда открываете консоль и влияет ли оно на что-либо.
Изменение hostname влияет в основном на восприятие и на наш взгляд правильно каждый сервер называть своим понятным и читаемым именем, а не тем, что вам рандомно генерирует хостер, например мы можем заменить «vps-server-548739» на понятное для вас имя «companyname-ru-msk-WEBServer-01».
Имя сервера может быть свободно изменено в любой момент следующей командой:
Для применения настроек изменённого имени сервера нужно сделать перезагрузку командой:
1.0.4 Обновляем UBUNTU
Далее нам необходимо обновить все пакеты в системе до актуальных версий:
Выбираем варианты на ваш выбор:
1.0.5. Настройка ssh
1.0.5.1. Меняем порт ssh сервера на произвольный
Использование 22 порта для ssh является дурным тоном и добавляет вашему серверу десятки, сотни и даже тысячи лишних подключений в попытках подобрать пароль и взломать ваш сервер.
Изменение порта не делает ваш сервер безопасным или защищеннее, но позволяет отсеять некоторое количество ботов, автоматически сканирующих ssh на 22 порту.
Используя следующую команду меняем порт на понравившийся вам, желательно не использовать порты из первой тысячи (1-999) и порты используемые другими приложениями (список основных используемых портов можно посмотреть в википедии), если эти приложения когда-либо могут оказаться установленными на ваш сервер:
В редакторе находим строку со следующим содержимым:
С большой вероятностью эта строка будет закомментирована знаком решетки (#), т.к. используются значения по умолчанию, т.е. порт 22.
Нам же нужно раскомментировать эту строку (удалить знак «#») и заменить порт на желаемый, например на 62222 (любой на ваш выбор).
В обязательном порядке нужно записать и сохранить в надежном месте (или в нескольких) ваш новый порт, во избежание дальнейших проблем с подключением к серверу!
Перезапускам демон ssh для применения настроек:
Если вы допустили какую-либо ошибку в конфигурационном файле, то вы можете потерять связь с сервером. Будьте осторожны!
1.0.5.1.2. Устанавливаем netstat
Устанавливаем netstat и проверяем корректность сделанных изменений:
После установки вводим следующую команду:
В результатах мы должны увидеть указанный ранее порт, например:
После чего отключаемся от сервера по ssh, меняем в вашей программе порт на указанный ранее (пр.: 62222) и подключаемся уже с новым портом.
1.0.5.2. Отключаем DebianBanner
Добавим ещё один полезный параметр, который отсутствует в файле sshd_config – DebianBanner. Этот параметр добавляет в строку ответа sshd информацию об операционной системе, при обращению к серверу по протоколу TELNET или при сканировании nmap. Эта строка может выглядеть так: SSH-2.0-OpenSSH_5.5p1 Debian-6+squeeze1.
Скроем информацию о нашей операционной системе:
Добавляем следующую строку в конце файла:
Для применения изменений перезагружаем демон ssh:
1.0.5.3. Включаем проверку прав на директорию подключения StrictModes
Опция «StrictModes» определяет должен ли ssh проверять права пользователей в их домашних каталогах и файлы rhosts перед тем, как авторизовать на сервере. Эта опция должна всегда быть установлена в «yes», т.к. некоторые пользователи по неосторожности допускают запись в своих каталогах и файлах любым авторизованным пользователям, что в свою очередь является критической уязвимостью в случае взлома одного из аккаунтов.
Во избежание этого момента вносим следующие правки в файл
Находим и изменяем (раскомментируем):
Для применения изменений перезагружаем ssh:
1.0.5.4. Добавление нового системного пользователя UBUNTU 20.04 LTS
Ввиду того, что заходить под рут аккаунтом не рекомендовано, то мы должны создать нового пользователя, например «your_user_name»:
После чего вводим СЛОЖНЫЙ пароль этого пользователя и записываем в надежном месте, а лучше в двух, т.к. потеряв его вы в дальнейшем потеряете доступ к серверу.
Пример хорошего пароля: 0$j%lQM1ArBS
После этого нужно дать возможность пользователю выполнять команды sudo:
Добавляем следующую строку в самом конце:
После этого у вас появится возможность, авторизовавшись на сервере по ssh под новым пользователем зайти под рутом, для этого выполняем:
вводим пароль пользователя root
После этого обязательно нужно отключить возможность авторизации root пользователя по ssh
1.0.5.5. Отключаем доступ у root пользователя PermitRootLogin (дополняется)
Этот параметр разрешает или запрещает вход по SSH под суперпользователем «root». Запрещаем вход суперпользователю.
Снова редактируем знакомый нам конфигурационный файл ssh:
sudo nano /etc/ssh/sshd_config
Находим и изменяем:
Для применения изменений перезагружаем ssh:
sudo service ssh restart
После этого можно отключиться от ssh и попробовать снова залогиниться под пользователем root. Если вы всё правильно настроили, то ничего не получится. Нужно подключаться по дополнительному созданному вами пользователю your_user_name.
На запрос пароля sudo надо отвечать СВОИМ паролем. На su — паролем рута.
PermitRootLogin no означает, что нельзя зайти root пользователем по ssh, надо зайти иным пользователем, а потом (если надо) поднимать привилегии до рута. Нормальная политика безопасности. Имя root слишком известно ��
Можно сделать НЕБЕЗОПАСНЫЙ финт ушами и отключить у вашего только что созданного пользователя (your_user_name) ввод пароля после попытки запуска команд от суперпользователя root (su/sudo/sudo -s).
Открываем от root пользователя следующий файл:
После этого в конец файла добавляем строку:
Не забыв заменить your_user_name на имя вашего нового пользователя.
После этого вы сможете запускать команды не вводя пароль root пользователя.
Стоить помнить, что данный способ является плохим примером безопасности!
1.0.6. Устанавливаем htop
htop — продвинутый монитор процессов, написанный для Linux. Он был задуман заменить стандартную программу top. Htop показывает динамический список системных процессов, список обычно выравнивается по использованию ЦПУ. В отличие от top, htop показывает все процессы в системе. Также показывает время непрерывной работы, использование процессоров и памяти. Htop часто применяется в тех случаях, когда информации даваемой утилитой top недостаточно, например при поиске утечек памяти в процессах. Htop написан на языке Си и использует для отображения библиотеку Ncurses. Я всегда ставлю его при установке системы и моментально забываю про утилиту top.
Для выхода нажимаем F10 или CTRL+C
Более детальную информацию по использованию утилиты htop можно найти на этой странице
1.0.7. Устанавливаем Midnight Commander
Midnight Commander — консольный файловый менеджер для Linux.
Если вам приходится работать с большим количеством файлов в консольном окружении, то вы можете найти такую работу достаточно утомительной. В графическом окружении имеются файловые менеджеры, которые помогают повысить скорость работы с файлами. Вам не нужно помнить название и синтаксис каждой команды, связанной с файлами.
В консольном окружении для работы с файлами вы должны знать основные команды и их синтаксис. К счастью, в Linux также имеется текстовый файловый менеджер, работающий в консольном окружении. Он называется Midnight Commander (далее мы будем называть его просто MC).
Для выхода из mc (Midnight Commander) нажимаем клавишу F10
1.0.7. Устанавливаем и настраиваем ProFTPD (FTP-сервер на UBUNTU 20.04 LTS)
Мы очень надеемся, что большинство из вас прекрасно понимает, что устанавливать ftp сервер proftpd (как и любой другой) в 2022 году очень неразумно. Используйте SFTP, т.к. ftp протокол является небезопасным и устаревшим.
Установка производится командой:
Открываем файл настроек:
Далее отключаем ipv6 (зачем вам на сервере с ftp — ipv6? *сарказм* )
По желанию можно изменить приветственное название от сервера:
Рекомендуем вам изменить стандартный ftp порт, например на 48921:
Для того, что бы пользователи не могли выйти из домашнего каталога изменяем (раскомментируем) строчку:
Для разрешения перезаписи файлов проверяем наличие следующей строк:
Следующие настройки proftpd добавляем в конце текущего файла.
Пользователь root не должен иметь возможности попасть на ftp сервер, это реализуется добавлением следующей строки:
Разрешаем дозагрузку файлов, при передаче которых произошла ошибка:
В целях безопасности отключаем идентификацию proftpd сервера (в консоли ftp клиента):
Так же можно изменить идентификацию на произвольную:
На этом настройка ftp сервера proftpd завершена, перезапускам его:
Небольшое отступление для тех, кто набрел на эту статью, после того, как казалось бы правильно настроенный сервер при попытке подключения сообщает что-то вроде: «FTP ошибка 530, некорректные данные аутентификации, «ProFTPD login failing with 530» или «proftpd 530 login incorrect», то вы наверняка будете рады тому, что найдете ниже, а именно следующую строку и правильный процесс создания пользователя.
Далее нужно выполнить следующие операции:
В конце файла добавить:
Сохраняем файл и закрываем редактирование.
Добавление пользователей proftpd ftp сервера
Предположим, что мы создаем пользователя с именем «sample_user_name«, в таком случае команда будет выглядеть следующим образом:
где, sample_user_name — это имя пользователя, папка которого будет находиться по адресу /home/sample_user_name/
Создаем пароль пользователя:
Вводим пароль, подтверждаем и всё, готово, можно подключаться к ftp серверу.
1.0.8. Устанавливаем и настраиваем file2ban на UBUNTU 20.04 LTS
Принцип работы fail2ban прост. Специальный сервис ищет в системных журналах (логах) записи о неудачных попытках аутентификации и при определенных условиях с помощью iptables блокирует IP-адреса, с которых ведется атака.
Устанавливаем пакет fail2ban:
Теперь нужно сделать так, чтобы сервис fail2ban автоматически запускался при загрузке системы:
sudo systemctl enable fail2ban
После этого служба fail2ban запустится автоматически. В этом можно убедиться, проверив статус следующей командой:
Результат должен быть примерно следующим:
Файлы настроек fail2ban расположены в каталоге /etc/fail2ban/:
- /fail2ban.conf – дефолтные настройки сервиса fail2ban;
- /fail2ban.d/ – пользовательские настройки сервиса fail2ban;
- /jail.conf – дефолтные настройки для защищаемых сервисов;
- /jail.d/ – пользовательские настройки для защищаемых сервисов;
- /filter.d/ – настройки шаблонов поиска в системных журналах (логах);
- /action.d/ – настройки исполняемых действий;
- /paths*.conf – настройки путей для различных операционных систем.
Во избежание перезаписи ваших настроек при обновлении пакетов, рекомендуем вместо редактирования файлов с дефолтным настройками создавать собственные (пользовательские) файлы настроек.
Вам необходимо удалить дефолтные настройки защиты sshd (очищаем файл):
После этого создаём файл /etc/fail2ban/jail.d/sshd.local
И добавляем в него следующую текстовую конфигурацию:
Теперь если параметр enabled будет иметь значение true, сервис fail2ban заблокирует соответствующий IP-адрес на количество секунд, прописанное в параметре bantime, при условии, что за период, указанный в секундах в параметре findtime, с этого адреса будет проведено заданное параметром maxretry или большее число неудачных попыток ssh-аутентификации. По прошествии периода, прописанного в параметре bantime, заблокированный IP-адрес автоматически разблокируется.
В нашем примере IP-адрес будет блокироваться на 86400 секунд (24 часа), если в течение последних 7200 секунд (2х часов) с него было осуществлено 2 и более неудачных попыток аутентификации.
Настройка сервиса fail2ban завершена, необходимо его перезапустить:
В ходе использования fail2ban вам может понадобиться на время снять блок с конкретного IP-адреса или добавить его в список исключений.
Прежде всего, убедитесь, что нужный IP-адрес находится в списке заблокированных:
В результате выполнения этой команды вы получите список, где будет указано количество неудачных попыток аутентификации и список заблокированных IP-адресов.
Образец результата команды:
Добавить ip в список исключений fail2ban ssh:
Разблокировать ip в fail2ban ssh:
1.0.9. Настройка приветствия консоли, устанавливаем landscape-common UBUNTU 20.04 LTS
Установка производится командой:
После чего перезагружаем сервер:
Дополнительно можно почитать https://4skill.ru/nastrojka-privetstviya-konsoli-ubuntu-server/
1.1.0. Установка и настройка nginx на UBUNTU 20.04 LTS
Установка самой последней версии nginx всё ещё занимает чуть больше времени, чем стандартная команда
Её мы использовать не будем, т.к. основной репозиторий Ubuntu 20.04 содержит не самую последнюю версию Nginx, то нам приходится ещё две минуты использовать консоль вашего сервера, для подключения официального Nginx репозитория.
Установите пакеты, необходимые для подключения apt-репозитория:
Для подключения apt-репозитория стабильной версии nginx, выполните следующую команду (я использую её):
Если предпочтительно использовать пакеты для основной версии nginx, выполните следующую команду вместо предыдущей:
Для UBUNTU 18.04.2:
Для UBUNTU 20.04.1:
Теперь нужно импортировать официальный ключ, используемый apt для проверки подлинности пакетов:
Проверьте, верный ли ключ был импортирован:
Вывод команды должен содержать полный отпечаток ключа 573B FD6B 3D8F BC64 1079 A6AB ABF5 BD82 7BD9 BF62:
Чтобы установить/обновить nginx, выполните следующие команды:
После этого можно проверить актуальность установленной версии nginx командой:
И сравнить версию с версией на официальном сайте nginx https://nginx.org/en/download.html (Stable version)
1.1.1. Конфигурирование nginx на UBUNTU 20.04 LTS для мультисайтинга
Переименовываем старый файл настроек nginx:
Создаем новый файл конфигурации nginx:
Вставляем в него следующее содержимое:
Создаем две новых папки под конфигурационные файлы:
Перезагружаем nginx командой:
После чего переходим в браузере по адресу: http://ip_вашего_сервера
Если всё настроено правильно, то вы должны будете увидеть примерно следующий текст:
1.2.0. Установка и настройка MySQL/MariaDB на UBUNTU 20.04 LTS
MySQL является системой управления базами данных с открытым исходным кодом и обычно используется, как часть популярного стека LAMP (Linux, Apache, MySQL, PHP/Python/Perl). MySQL использует реляционную базу данных и SQL (Structured Query Language, язык структурированных запросов) для управления данными.
Короткая версия установки очень проста: достаточно обновить индекс пакетов, установить пакет mysql-server, а затем запустить скрипт настройки безопасности.
Обновляем индекс пакетов apt командой:
Затем устанавливаем сам пакет MySQL:
[ранее] Установка mysql-server:
[предпочтительный вариант] Установка mariadb-server:
В случае новой установки MySQL вам необходимо выполнить скрипт безопасности. Он изменяет некоторые настройки по умолчанию на более безопасные, например, удалённый вход для пользователей root и пользователи, созданные по умолчанию. В старых версиях MySQL вам было необходимо также инициализировать директорию данных вручную, теперь это делается автоматически.
Выполните скрипт безопасности командой:
После чего вы получите сообщение о необходимости ввести пароль root пользователя, если он у вас установлен:
Можно смело нажимать «Enter», т.к. пароль у вас ещё не установлен.
После чего вы увидите предложение установить пароль для root пользователя:
Выбираем «Y«, придумываем сложный пароль и вписываем его два раза.
После чего вы получите следующее сообщение:
Соглашаемся и удаляем анонимных пользователей, предназначенных только для тестирования установки.
Соглашаемся с тем, что root пользователь может подключаться с localhost, выбираем «Y«.
Удаляем тестовую базу данных «Y«:
Перезагружаем привилегии «Y«:
Сообщение об успешной настройке должно выглядеть следующим образом:
1.3.0. Установка и настройка apache2-mpm-itk на UBUNTU 20.04 LTS
Модуль apache2-mpm-itk для Apache нужен для того чтобы запускать виртуальные хосты vhosts под своим UID или GID, проще говоря, скрипты сайта должны быть недоступны для других хостов даже для чтения (в случае взлома одного сайта не смогли взломать другой сайт находящихся на этом сервере).
Я уже давно использую apache2-mpm-itk на своих серверах, но после попытки установить apache2-mpm-itk в Ubuntu 18.04, понял что кое-что изменилось.
Теперь apache2-mpm-itk является отдельным модулем в Apache2 и устанавливается как модуль.
Чтобы установить модуль apache2-mpm-itk в Ubuntu 18.04 необходимо:
Установить apache2 в Ubuntu 20.04 LTS:
После чего вы получите ошибку, это нормально.
Установить модуль libapache2-mpm-itk:
Включаем модуль apache2-mpm-itk:
Редактируем файл конфигурации, т.к. Apache по умолчанию принимает запросы из интернета (80 порт и из-за его занятости была ошибка), а у нас это делает nginx:
И изменяем строку:
Перезагружаем apache командой:
Проверяем, какие модули у нас установлены:
То модуль apache2-mpm-itk установлен в Ubuntu 20.04 LTS и можно дальше настраивать сервер.
В виртуальных хостах apache ничего не изменилось:
Где user-www меняем на вашего пользователя.
1.4.0. Установка и настройка php 8.1.x на UBUNTU 20.04 LTS
В случае ошибки «add-apt-repository: command not found» добавления смотрим подсказку ниже.
Добавляем PPA репозиторий:
1.4.1. Fix add-apt-repository: command not found error
Иногда после этой команды мы наблюдаем ошибку следующего вида:
Ошибка проста. Пакет add-apt-repository не установлен в вашей системе.
Если вы попытаетесь использовать sudo apt-get install add-apt-repository, это не сработает.
Это связано с тем, что команда add-apt-repository находится в пакете software-properties-common, и вам необходимо установить этот пакет, чтобы установить add-apt-repository.
Поэтому во избавление ошибки (если она появилась) используем следующую команду:
Если ошибка не появились или вы её успешно исправили, то далее обновляем список командой:
Установите PHP 8.1.7, используя следующую команду:
php 7.3:
php 8.0.1:
php 8.1.7:
На появившиеся в процессе установки вопросы отвечаем «Y«
Используйте следующую команду, чтобы проверить версию PHP, установленную на вашем сервере:
Вывод должен быть следующим:
Перезапускаем Apache для применения изменений:
Дополнительно вносим изменения в конфигурационный файл Apache:
Находим следующие строчки:
Их нужно закомментировать и добавить после них следующие пять строчек:
В итоге мы должны получить часть конфига, которая будет выглядеть следующим образом:
После чего снова перезагружаем Apache:
Дабы однажды не столкнуться с ошибкой вроде:
Нужно включить rewrite модуль Apache:
После чего нужно снова перезагрузить сервер Apache:
sudo service apache2 restart
После этого нам желательно настроить наш первый тестовый сайт и проверить его работоспособность.