Setting up Visual Studio Code
Getting up and running with Visual Studio Code is quick and easy. It is a small download so you can install in a matter of minutes and give VS Code a try.
Cross platform
VS Code is a free code editor, which runs on the macOS, Linux, and Windows operating systems.
Follow the platform-specific guides below:
VS Code is lightweight and should run on most available hardware and platform versions. You can review the System Requirements to check if your computer configuration is supported.
Update cadence
VS Code releases a new version each month with new features and important bug fixes. Most platforms support auto updating and you will be prompted to install the new release when it becomes available. You can also manually check for updates by running Help > Check for Updates on Linux and Windows or running Code > Check for Updates on macOS.
Note: You can disable auto-update if you prefer to update VS Code on your own schedule.
Insiders nightly build
If you’d like to try our nightly builds to see new features early or verify bug fixes, you can install our Insiders build. The Insiders build installs side-by-side with the monthly Stable build and you can freely work with either on the same machine. The Insiders build is the same one the VS Code development team uses on a daily basis and we really appreciate people trying out new features and providing feedback.
Portable mode
Visual Studio Code supports Portable mode installation. This mode enables all data created and maintained by VS Code to live near itself, so it can be moved around across environments, for example, on a USB drive. See the VS Code Portable Mode documentation for details.
Additional components
VS Code is an editor, first and foremost, and prides itself on a small footprint. Unlike traditional IDEs that tend to include everything but the kitchen sink, you can tune your installation to the development technologies you care about. Be sure to read the Additional Components topic after reading the platform guides to learn about customizing your VS Code installation.
Extensions
VS Code extensions let third parties add support for additional:
- Languages — C++, C#, Go, Java, Python
- Tools — ESLint, JSHint , PowerShell
- Debuggers — PHP XDebug.
- Keymaps — Vim, Sublime Text, IntelliJ, Emacs, Atom, Brackets, Visual Studio, Eclipse
Extensions integrate into VS Code’s UI, commands, and task running systems so you’ll find it easy to work with different technologies through VS Code’s shared interface. Check out the VS Code extension Marketplace to see what’s available.
Next steps
Once you have installed and set up VS Code, these topics will help you learn more about VS Code:
-
— Learn how to install Git, Node.js, TypeScript, and tools like Yeoman. — A quick orientation to VS Code. — Learn about the powerful VS Code editor. — Move quickly through your source code. — Debug your source code directly in the VS Code editor. — Configure your proxy settings.
If you’d like to get something running quickly, try the Node.js tutorial walkthrough that will have you debugging a Node.js web application with VS Code in minutes.
Common questions
What are the system requirements for VS Code?
How big is VS Code?
VS Code is a small download (< 100 MB) and has a disk footprint of less than 200 MB, so you can quickly install VS Code and try it out.
How do I create and run a new project?
VS Code doesn’t include a traditional File > New Project dialog or pre-installed project templates. You’ll need to add additional components and scaffolders depending on your development interests. With scaffolding tools like Yeoman and the multitude of modules available through the npm package manager, you’re sure to find appropriate templates and tools to create your projects.
How do I know which version I’m running?
On Linux and Windows, choose Help > About. On macOS, use Code > About Visual Studio Code.
Why is VS Code saying my installation is Unsupported?
VS Code has detected that some installation files have been modified, perhaps by an extension. Reinstalling VS Code will replace the affected files. See our FAQ topic for more details.
How can I do a ‘clean’ uninstall of VS Code?
If you want to remove all user data after uninstalling VS Code, you can delete the user data folders Code and .vscode . This will return you to the state before you installed VS Code. This can also be used to reset all settings if you don’t want to uninstall VS Code.
The folder locations will vary depending on your platform:
- Windows — Delete %APPDATA%\Code and %USERPROFILE%\.vscode .
- macOS — Delete $HOME/Library/Application Support/Code and
Как настроить Visual Studio Code для C, C++, Java, Python
Visual Studio Code — популярный редактор кода, бесплатный и с открытым исходным кодом. Но я уверен: каждый из нас, кто пытался настроить Visual Studio Code для разработки приложений на C++, Java или Python, прошел через стадию: “О Боже! Почему нельзя как-нибудь попроще?” Я сам пробовал настроить VS Code пару раз и в итоге закончил тем, что использовал CodeBlocks. 🙁
Прочитав много документации, посмотрев ряд роликов на YouTube и потратив несколько дней на саму настройку VS Code, я пишу эту статью, чтобы все это не пришлось проделывать уже вам!
Сегодня я покажу, как настроить среду разработки для спортивного программирования на C++, Java и Python в VS Code с нуля. Мы также посмотрим, какие расширения больше всего пригодятся, чтобы начать работу с VS Code. В конечном счете, ваша среда разработки будет выглядеть примерно так:
1. Устанавливаем Visual Studio Code
Скачайте последнюю версию Visual Studio Code с официального сайта. Рекомендуется загрузить системный установщик (System Installer), но если у вас нет прав администратора, то пользовательский установщик (User Installer) тоже подойдет. Выполните все обычные шаги по установке и обязательно проставьте все следующие чекбоксы:
Если у вас уже установлен VS Code, но вы все равно хотите начать с чистого листа, следуйте этим инструкциям, чтобы полностью удалить VS Code.
2. Настраиваем расширения
Ниже приведен список расширений, которые нам понадобятся для правильной настройки VS Code. Откройте VS Code и перейдите на панель расширений (Ctrl + Shift + X), которая находится на левой панели инструментов, и начните загружать друг за другом следующие расширения:
-
от Microsoft — [Важно] Для корректной работы этого расширения нам понадобится установленный и добавленный в PATH компилятор MinGW. Если у вас его нет, следуйте этому руководству. от austin. от Microsoft — вам нужно будет настроить Python для работы этого расширения. Загрузите и установите последнюю версию отсюда. от Microsoft — [Важно] Перед установкой убедитесь, что в вашей системе настроены Java 8 JDK и JRE и указаны все необходимые переменные среды для Java. Если нет, посмотрите это видео о том, как настроить Java на вашем компьютере. от Jun Han — мы будем использовать это расширение для запуска всех наших программ. Для этого необходимо выполнить некоторые шаги по настройке. Мы увидим эти шаги в следующих разделах.
Расширения, перечисленные ниже, необязательны для дальнейшей настройки, но я рекомендую вам обратить на них внимание, посмотреть, заинтересуют ли они вас, и если нет, то перейти к следующему разделу.
- (Необязательно) Material Theme от Mattia Astronio — это расширение содержит множество приятных глазу тем. Вы можете выбрать любую, какая понравится. Лично я предпочитаю Monokai, которая доступна в VS Code по умолчанию, без каких-либо расширений.
Чтобы выбрать тему, нажмите Ctrl + Shift + P. Откроется палитра команд. Осуществите поиск по слову “theme” и выберите опцию Color Theme. Чтобы настроить иконки, можете выбрать опцию File Icon Theme.
Расширения для тех, кто интересуется FrontEnd-фреймворками для веб-разработки, такими как Angular и React:
- (Необязательно) Angular Language Service от Angular.
- (Необязательно) Angular Snippets от John Papa.
- (Необязательно) ES7 React / Redux / GraphQL / React-Native snippets от dsznajder.
- (Необязательно) React Native Tools от Microsoft.
- (Необязательно) Live Server от Ritwick Dey.
3. Настраиваем внешний вид редактора
Итак, мы уже установили VS Code и несколько расширений. Теперь мы готовы настраивать среду разработки. Я создал шаблон для спортивного программирования в VS Code и загрузил его в свой профиль на Github.
Перейдите по этой ссылке и загрузите шаблон себе на компьютер. Распакуйте его в любое место по вашему выбору. После этого откройте получившуюся папку в VS Code. Вы должны увидеть что-то вроде этого:
Пройдитесь по файлам main.cpp, Main.java и main.py и посмотрите на записанный в них образец кода. По сути, шаблонный код, предоставленный в образцах для каждого из этих трех языков, принимает входящие данные из файла input.txt и обеспечивает вывод в файл output.txt. Для каждой программистской задачи, которую вы хотите решить, просто создайте копию этого шаблона и напишите свой код в функции solve().
Теперь создадим ту разбивку экрана, которую вы могли видеть на самом первом изображении в этой статье. Эта разбивка позволяет сразу видеть как ввод, так и вывод вашего кода, что делает ее очень удобной в использовании.
Name already in use
vscode-docs / docs / setup / windows.md
- Go to file T
- Go to line L
- Copy path
- Copy permalink
- Open with Desktop
- View raw
- Copy raw contents Copy raw contents
Copy raw contents
Copy raw contents
Visual Studio Code on Windows
- Download the Visual Studio Code installer for Windows.
- Once it is downloaded, run the installer (VSCodeUserSetup-
.exe). This will only take a minute. - By default, VS Code is installed under C:\Users\
\AppData\Local\Programs\Microsoft VS Code .
Alternatively, you can also download a Zip archive, extract it and run Code from there.
Tip: Setup will add Visual Studio Code to your %PATH% , so from the console you can type ‘code .’ to open VS Code on that folder. You will need to restart your console after the installation for the change to the %PATH% environmental variable to take effect.
User setup versus system setup
VS Code provides both Windows user and system level setups. Installing the user setup does not require Administrator privileges as the location will be under your user Local AppData (LOCALAPPDATA) folder. User setup also provides a smoother background update experience.
The system setup requires elevation to Administrator privileges and will place the installation under Program Files. This also means that VS Code will be available to all users in the system.
See the Download Visual Studio Code page for a complete list of available installation options.
If you need to run a 32-bit version of VS Code, both a 32-bit Installer and Zip archive are available.
VS Code ships monthly releases and supports auto-update when a new release is available. If you’re prompted by VS Code, accept the newest update and it will be installed (you won’t need to do anything else to get the latest bits).
Note: You can disable auto-update if you prefer to update VS Code on your own schedule.
Windows Subsystem for Linux
Windows is a popular operating system and it can be a great cross-platform development environment. This section describes cross-platform features such as the Windows Subsystem for Linux (WSL) and the new Windows Terminal.
Recent Windows build
Make sure you are on a recent Windows 10 build. Check Settings > Windows Update to see if you are up-to-date.
Windows as a developer machine
With WSL, you can install and run Linux distributions on Windows. This enables you to develop and test your source code on Linux while still working locally on your Windows machine.
When coupled with the WSL extension, you get full VS Code editing and debugging support while running in the context of WSL.
See the Developing in WSL documentation to learn more or try the Working in WSL introductory tutorial.
New Windows Terminal
Available from the Microsoft Store, the Windows Terminal (Preview) lets you easily open PowerShell, Command Prompt, and WSL terminals in a multiple tab shell.
Once you have installed VS Code, these topics will help you learn more about VS Code:
-
— Learn how to install Git, Node.js, TypeScript, and tools like Yeoman. — A quick orientation to VS Code. — Learn how to configure VS Code to your preferences through settings. — Lets you jump right in and learn how to be productive with VS Code.
What command-line arguments are supported by the Windows Setup?
VS Code uses Inno Setup to create its setup package for Windows. Thus, all the Inno Setup command-line switches are available for use.
Additionally, you can prevent the Setup from launching VS Code after completion with /mergetasks=!runcode .
Scrolling is laggy and not smooth
On certain devices, editor scrolling is not smooth but laggy for an unpleasant experience. If you notice this issue, make sure you install the Windows 10 October 2018 update where this issue is fixed.
I’m having trouble with the installer
Try using the zip file instead of the installer. To use this, unzip VS Code in your AppData\Local\Programs folder.
Note: When VS Code is installed via a Zip file, you will need to manually update it for each release.
Icons are missing
I installed Visual Studio Code on my Windows 8 machine. Why are some icons not appearing in the workbench and editor?
VS Code uses SVG icons and we have found instances where the .SVG file extension is associated with something other than image/svg+xml . We’re considering options to fix it, but for now here’s a workaround:
Using the Command Prompt:
- Open an Administrator Command Prompt.
- Type REG ADD HKCR\.svg /f /v «Content Type» /t REG_SZ /d image/svg+xml .
Using the Registry Editor (regedit):
- Start regedit .
- Open the HKEY_CLASSES_ROOT key.
- Find the .svg key.
- Set its Content Type Data value to image/svg+xml .
- Exit regedit .
Unable to run as admin when AppLocker is enabled
With the introduction of process sandboxing (discussed in this blog post) running as administrator is currently unsupported when AppLocker is configured due to a limitation of the runtime sandbox. If your work requires that you run VS Code from an elevated terminal, you can launch code with —no-sandbox —disable-gpu-sandbox as a workaround.
# Установка Visual studio code на Windows
VSCode — удобная бесплатная среда разработки для программистов от Майкрософт. Она не требовательна к ресурсам и хорошо расширяема с помощью дополнительных модулей — плагинов.
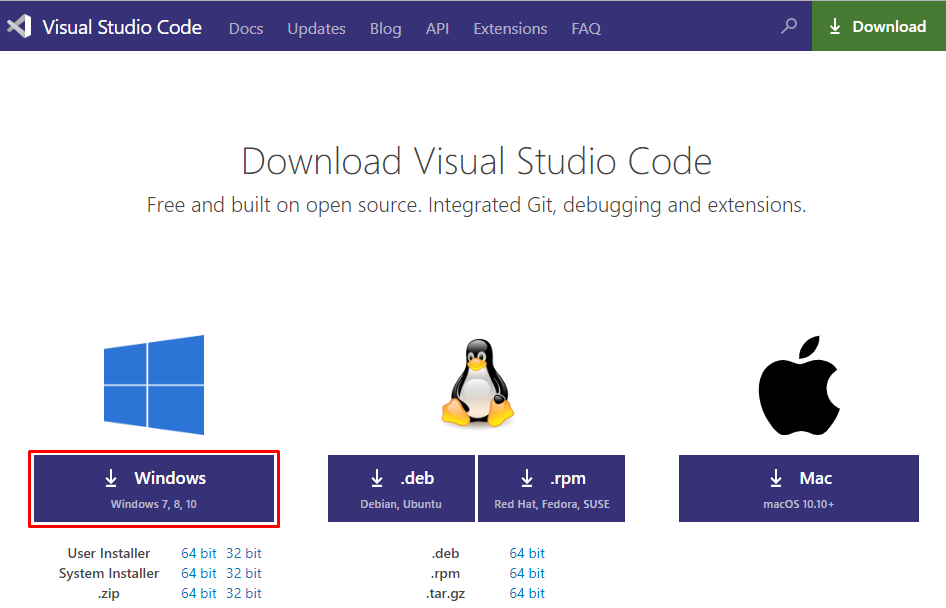
# Шаг 1
и загрузите необходимые файлы. В нашем примере мы собираемся загрузить установочные файлы для Node.js.
# Шаг 2
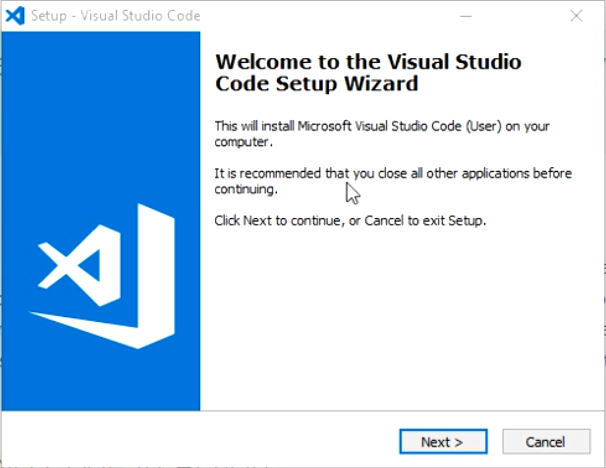
Дважды щелкните загруженный MSI-файл, для скачивания. Нажмите кнопку «Next» на первом экране, чтобы начать установку.
# Шаг 3
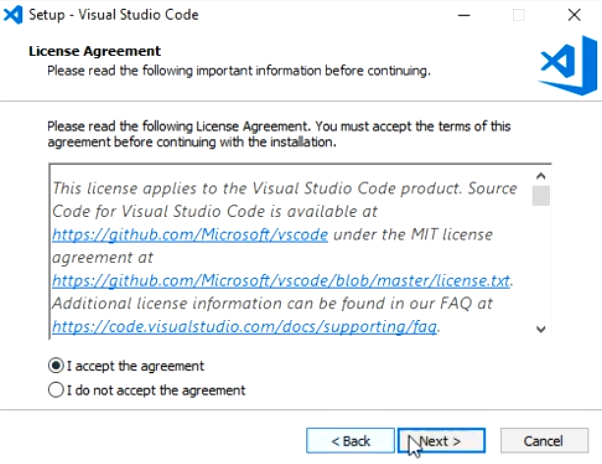
На следующем экране примите лицензионное соглашение и нажмите кнопку «Далее».
# Шаг 4
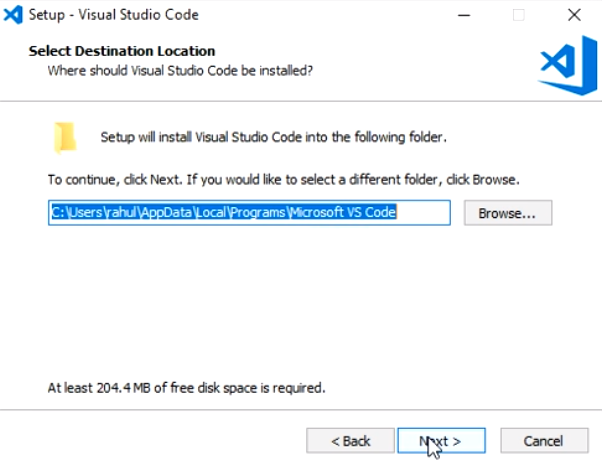
На следующем экране выберите место, где необходимо установить VSCode, и нажмите кнопку «Далее».
Если вы не знаете куда устанавливать оставьте путь по-умолчанию.
Нажмите кнопку «Next», чтобы продолжить установку.
# Шаг 5
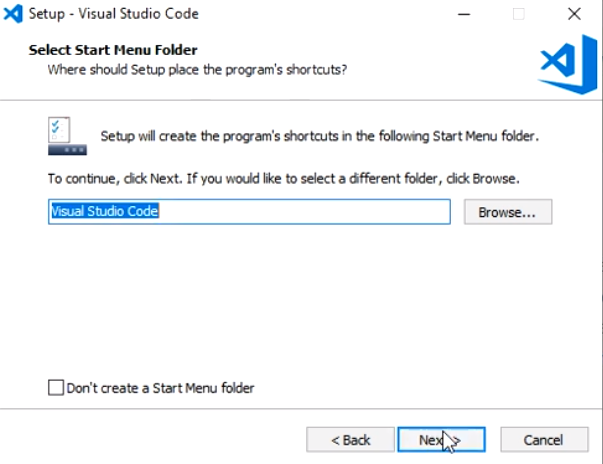
В следующем окне предлагается добавить ярлык vscode в меню пуск. Нажимаем "Next" (далее).
# Шаг 6
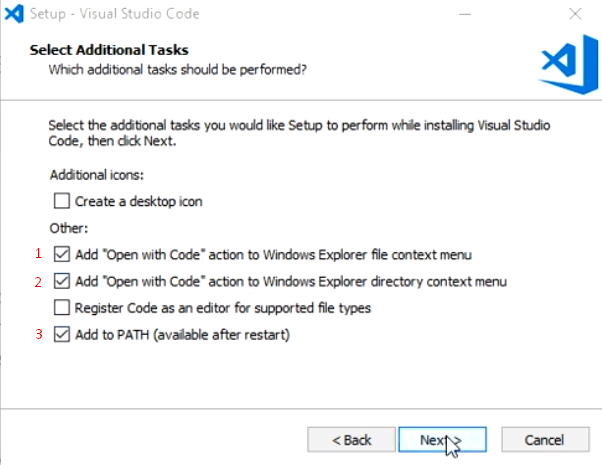
Проставьте следующие галочки для удобства дальнейшей работы:
- добавляет возможность открытия файла в VSCODE, через контекстное меню файла.
- добавляет возможность открытия папки в VSCODE, через контекстное меню папки.
- добавляет служебный путь в операционную систему (обязательно должно быть выбрано!)
# Шаг 7
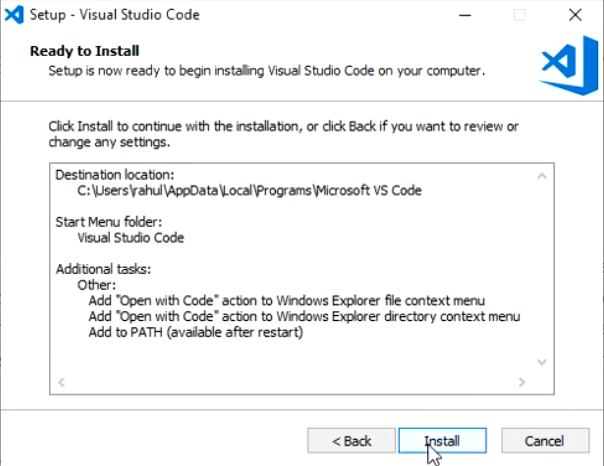
На следующем экране нажмите кнопку «Install» (установить), чтобы начать установку.
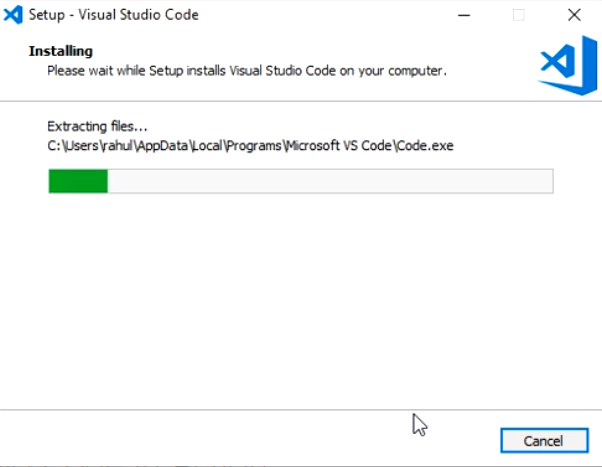
. далее вы увидите процесс установки:
# Шаг 8
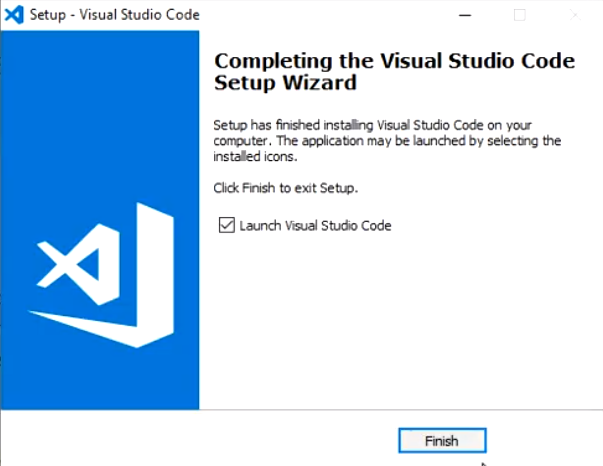
Установленная галочка означает, что после установки запустится программа VSCode. Нажмите кнопку "Finish" (Завершить), чтобы завершить установку.
Загруженное окно программы VSCode:
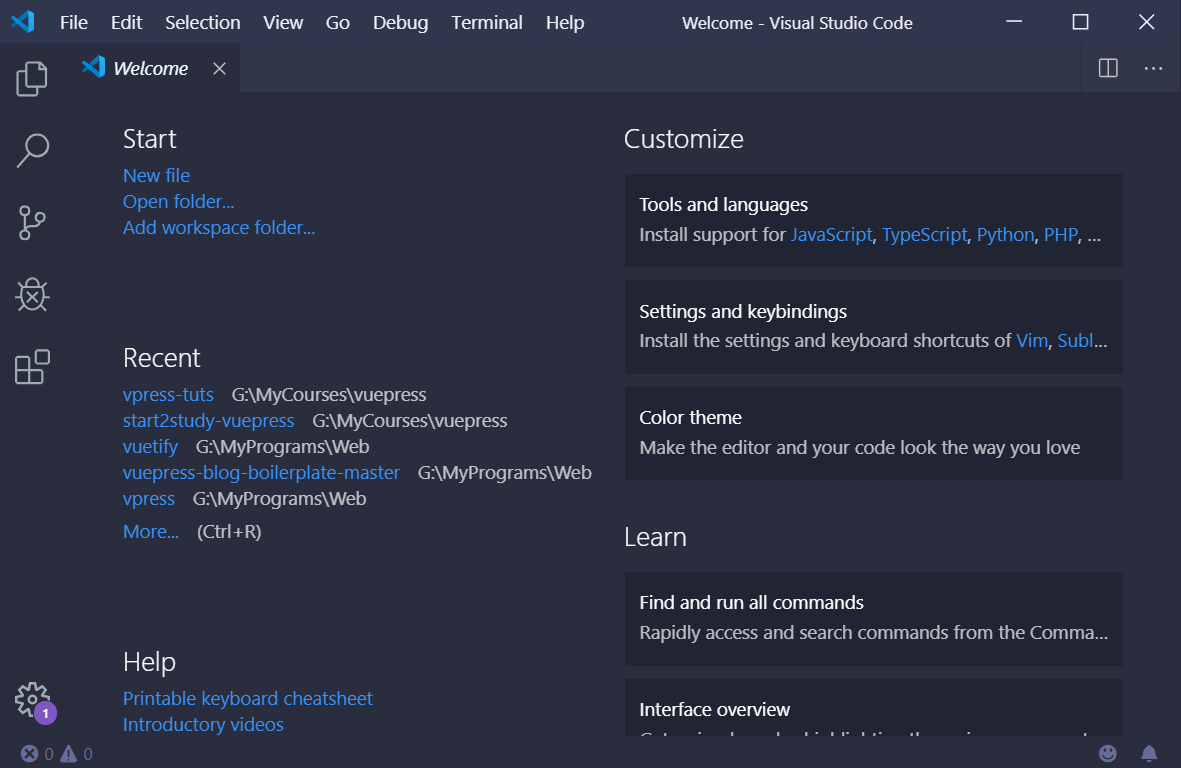
Можно приступать к установке плагинов для разработки. . или, если в них нет необходимости, сразу начинать работу. ��
# Расширения — plagins
Для удобства и увеличения скорости работы разработчики устанавлюивают дополнительные модули (расширения) для работы называемые плагинами.
# Установка плагинов в VSC
Запустив VSC. На правой панели иконок щелкаем на иконку с квадратиками:
Откроется панель поиска и установки плагинов. В строке поиска набираем имя плагина и устанавливаем его.
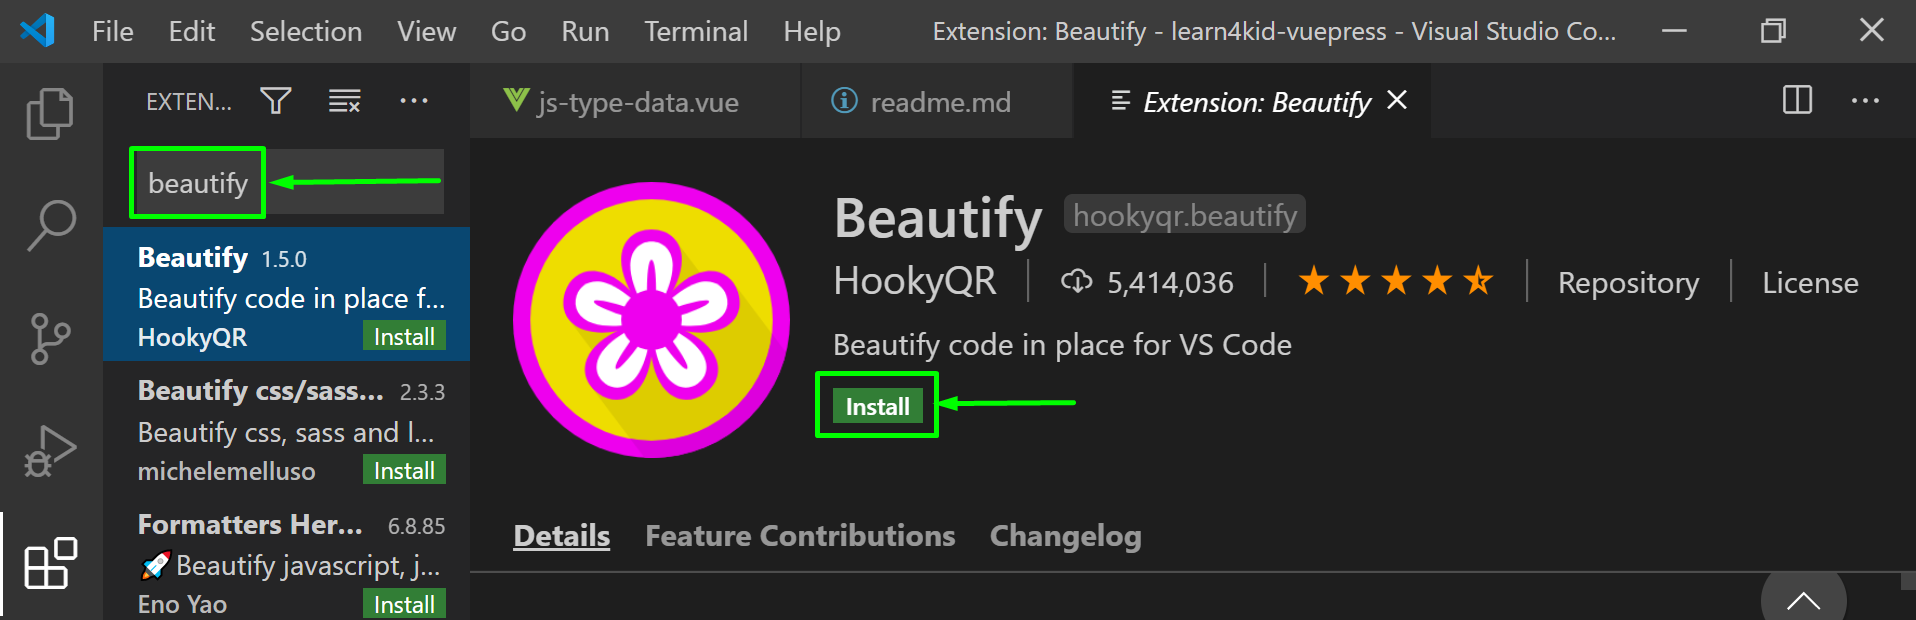
Установка может занять пару минут. Пока происходит установка можно искать следующий плагин и начинать его утанавливать. Ранее это конфликтов не вызывало. После установки расширений можно, для верности, перезапустить VSCode.
Не устанавливайте слишком большое количество плагинов, это может замедлить работу VSCode.
# Рекомендуемые плагины
Плагины не обязательны и могут быть заменены в зависимости от личных предпочтений.