Проброс USB устройств в виртуальную машину Hyper-V
 15.01.2021
 itpro
itpro
 Hyper-V, Windows 10, Windows Server 2016, Windows Server 2019, Виртуализация
 комментариев 14
Одним из существенных недостатков Hyper-Vперед другими гипервизорами (например, ESXi или Proxmox) являются отсутствие полноценной возможности пробрасывать USB устройства с хоста в виртуальные машины. Начиная с версии Hyper-V 2012 R2 появился ряд изменений, касающихся возможностей USB Passthrouth, однако этот функционал все еще уступает возможностям конкурентов. В этой статье мы расскажем об особенностях проброса USB устройств в Hyper-V.
Особенности USB Passthrough в Hyper-V
Под термином USB passthrough понимается возможность проброса USB устройства из хостового гипервизора (или по сети с другого сервера/устройства) в виртуальную машину. С помощью USB passthrough вы можете прокинуть внутрь ВМ токен, USB ключ, модем или любое другое оборудование, подключенное через USB порт.
Плохая новость в том, что в Hyper-V нет нормальной поддержки проброса USB устройств, вы не сможете пробросить любое USB устройство с физического хоста в виртуальную машину (в VMWare с этим на порядок лучше – см. статью USB passthrough в VMWare ESXi). Есть несколько встроенных возможностей использования USB устройства в Hyper-V, но у всех них есть существенные ограничения. На данный момент можно использовать следующие технологии для проброса USB устройства в Hyper-V.
- Проброс USB дисков с хоста Hyper-V;
- Расширенные возможности консоли Hyper-V — Enhanced Session Mode;
- Проброс USB устройства через RDP сессию;
- Использование программного/аппаратного средства для проброса USB по сети (USB over IP).
Проброс USB диска в виртуальную машину Hyper-V
Вы можете довольно просто пробросить подключенный к хосту USB диск напрямую внутрь любой запущенной виртуальной машины Hyper-V. Рассмотрим, как предоставить виртуальной машине Hyper-V прямой доступ к USB диску.
- Данная инструкция работает только для USB дисков, которые в системе видятся как fixed, т.е. флешки, смарт-карты и прочие removable-устройства прокинуть внутрь виртуальной машины не получится ( хотя есть небольшой трюк, позволяющий заставить Windows видеть сменное устройство как жесткий диск);
- Для таких дисков невозможно создать снапшот/чекпоинт.
- Подключите внешний USB диск к хосту Hyper-V (это может быть как любой хост с Windows и установленной ролью Hyper-V, так и Free Hyper-V Server). Диск появится в системе и ему будет назначена буква диска (если буква диска не назначилась, см. статью);
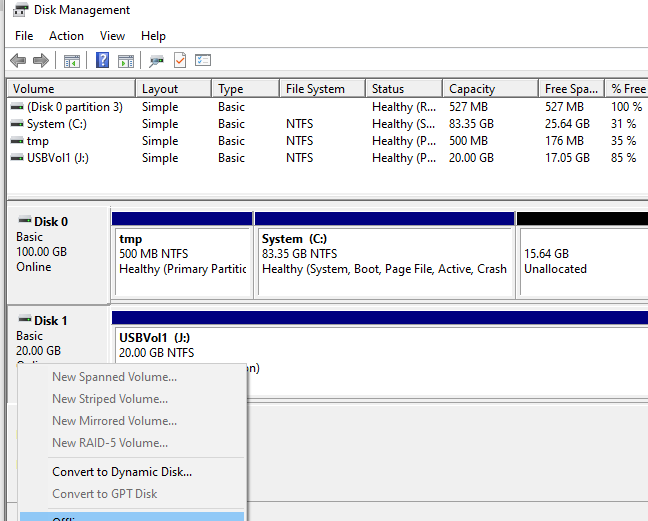
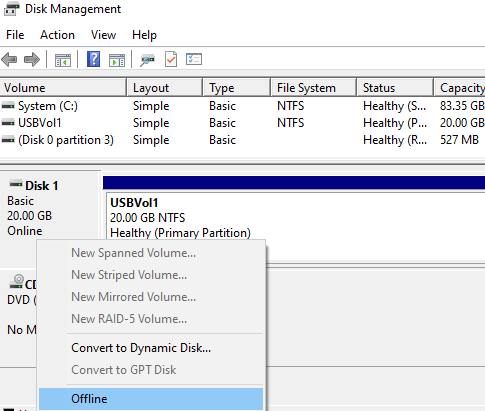
- Откройте консоль управления дисками Disk Management (diskmgmt.msc) на хосте Hyper-V. Щелкните правой кнопкой мыши по диску (левая колонка, в нашем примере USB диск размером 20 Гб имеет идентификатор Disk 1) и выберите Offline.
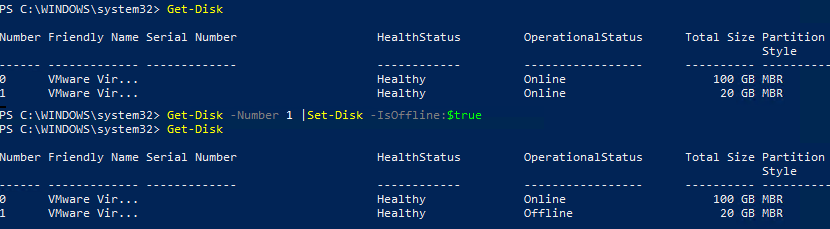
Если у вас используется Windows Server Core или Hyper-V Server, в которых отсутствуют некоторых графические оснастки, вы можете управлять локальными дисками с помощью PowerShell модуля управления дисками. Следующие команды могут вывести список физических дисков на хосте и перевести указанный диск в режим offline: Get-Disk
Get-Disk -Number 1 |Set-Disk -IsOffline:$true
Все! Вы напрямую пробросили внешний USB диск внутрь виртуальной машины Hyper-V и можете его использовать.
Для безопасного извлечения USB диск можно открыть консоль Hyper-V Manager и перейти в окно настроек виртуальной машины. В разделе SCSI Controller выберите жесткий диск, который нужно удалить и нажмите Remove. Сохраните изменения. После этого жесткий диск можно физически извлечь из USB порта хоста Hyper-V.
Проброс USB устройств через Enhanced Session Mode в Hyper-V
В версии Hyper-V, представленной в Windows Server 2012 R2/ 8.1 практически любые USB устройства можно прокинуть внутрь виртуальной машины с помощью технологии Enhanced Session Mode (ESM). Для подключения используется утилита Hyper-V Manager vmconnect.exe . Она позволяет подключится к консоли виртуальной машины и выбрать USB устройства, которые нужно пробросить.
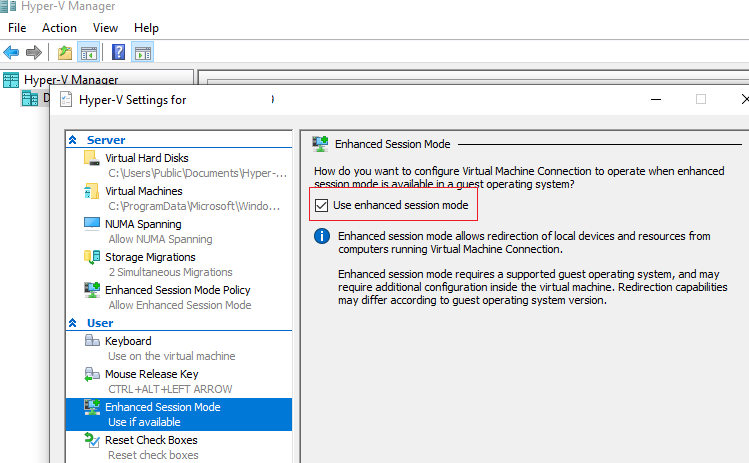
Сначала нужно включить Enhanced Session Mode в настройках сервера Hyper-V. Это можно сделать с помощью PowerShell:
Set-VMHost -EnableEnhancedSessionMode $true
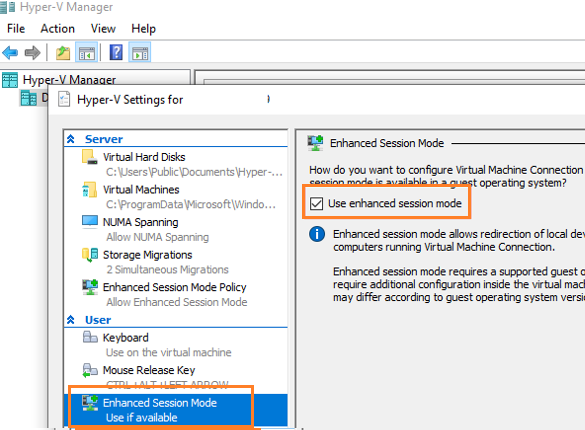
Или в меню Hyper-V Settings -> Enhanced Session Mode.
Перезапустите службу Hyper-V Virtual Machine Management:
Get-Service vmms | Restart-Service
В разделе Integration Services настроек ВМ нужно включить опцию Guest Services.
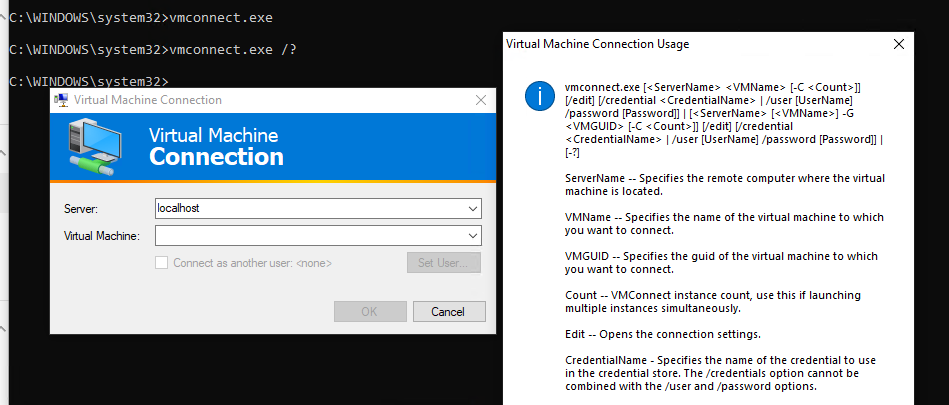
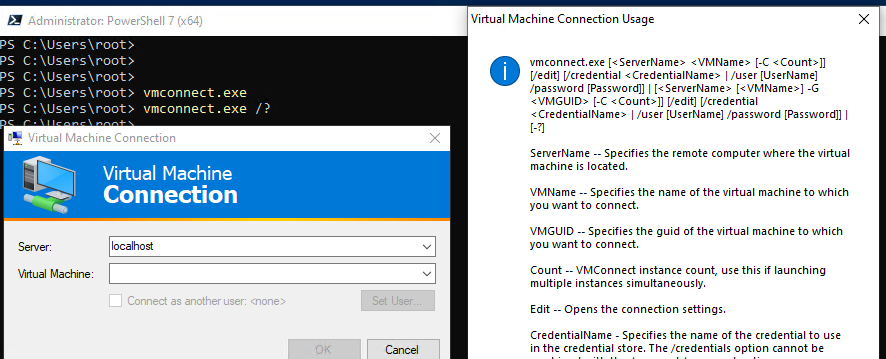
Для проброса USB устройства через Enhanced Session Mode нужно запустить консоль Hyper-V, выбрать ВМ и нажать Connect. Либо вы можете запустить утилиту vmconnect.exe (Virtual Machine Connection), указать Hyper-V сервер и имя ВМ (утилита поддерживает некоторые параметры командной строки, поэтому вы можете отдавать пользователям настроенный bat файл).
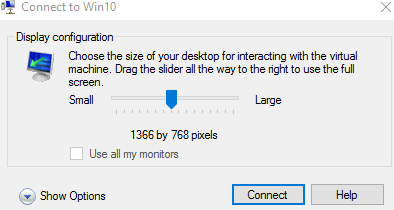
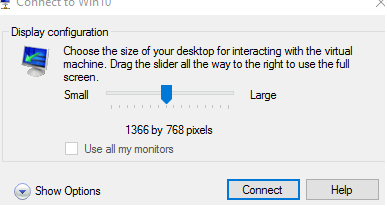
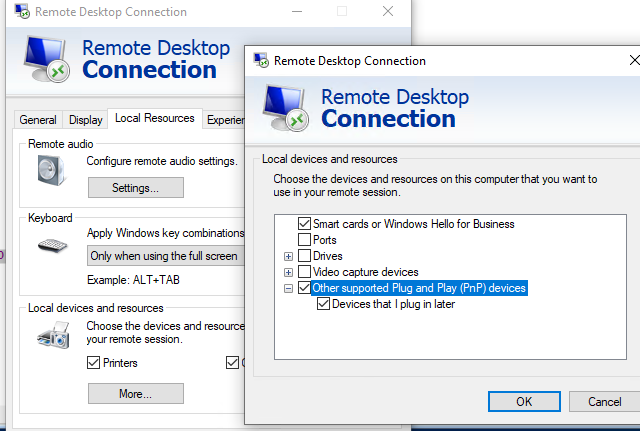
Ели ВМ поддерживает Enhanced Session Mode, появится окно, похожее на свойства RDP подключения. Нажмите Show Option -> Local Resources -> Local device and resources -> More.
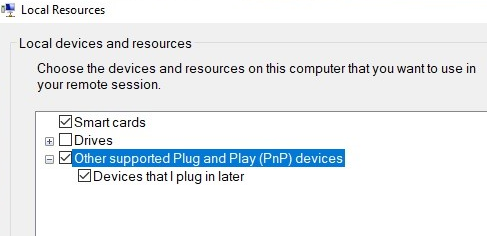
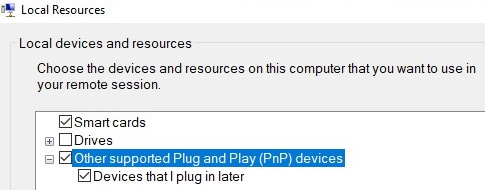
Выберите USB устройства на вашем компьютере, которое нужно пробросить в ВМ. Если устройства, которое вам нужно, сейчас не подключено, выберите опции Other supported Plug and Play (PnP) devices и Devices that I plug in later.
Теперь все подключённые к вашему компьютеру USB устройства будут автоматически доступны в консольной сессии виртуальной машины Hyper-V.
Основные возможности и ограничения Enhanced Session Mode
- В качестве гостевых ОС поддерживается только Windows (начиная с Windows 8.1/Windows Server 2012 R2);
- Вам не нужен прямой доступ к ВМ. Все подключения выполняются через Hyper-V хост (вы подключаетесь к нему через сеть по порту TCP 2179), а подключение к ВМ выполняется через шину VMBus;
- На компьютере пользователя должен быть установлен Hyper-V Manager

Данный метод похож на возможность проброса USB устройств через RDP сессию. Мы не будет рассматривать его подробнее.
Методы проброса USB устройства через сеть (USB over IP или в RDP сессии) позволяют сохранить доступ к USB ключу при миграции виртуальной машины на другой хост (Hyper-V Live Migration /vMotion).
![]() Предыдущая статья Следующая статья
Предыдущая статья Следующая статья ![]()

alt=»Править настройки vhdx диска» width=»58″ height=»56″ /> Как увеличить/уменьшить размер виртуального диска Hyper-V?
Вот из за таких «телодвижений» не люблю использовать hyper-v
Все же должно быть быстро и ясно, что бы протестировать что то на виртуальной системе
«это вам не нужно» отвечу любимой мантрой линуксоидов
Вооще в 2022, ознакомившись с аналогами, и правда не могу представить вариант, при котором обязательно использовать Hyper-V вместо бесплатного Proxmox, у которого возможности на голову выше, в том числе проброс любого устройства или порта USB, в том числе HASP-ключа, для чего в случае с виндовой виртуализацией нужно обязательно покупать отдельную железку/софтину.
Про мантру с вами согласен, но когда имеется альтернатива, похоже и правда «это вам не нужно» =)
Данная инструкция работает НЕ только для USB дисков .
Любые диски, подключенные по SATA, можно подключить в виртуальную машину ( при условии, что их можно перевести в режим OFFLINE )
usb диск не получается сделать offline, нет такой опции
Данная инструкция работает только для USB дисков, которые в системе видятся как fixed, т.е. флешки, смарт-карты и прочие removable-устройства прокинуть внутрь виртуальной машины не получится (
А проброс ключа 1C каким-то образом возможен, кроме USB over Ethernet?
USB-вебкамера так же просто?
Через Enhanced Session Mode не захотела.
У меня не видит флешку. Всё настроил. Сделайте инструкцию по ошибкам и пробросу веб-камеры
Статьи по заказу — по отдельному тарифу ��
ДЛя проброса USB камеры и других устройств можно использовать RemoteFX.
Включить параметр GPO «Allow RDP redirection of other supported RemoteFX USB devices from this computer» в
Computer Configuration > Administrative Templates > Windows Components > Remote Desktop Services > Remote Desktop Connection Client > RemoteFX USB Device Redirection
Теперь можно подключиться к консои ВМ:
«vmconnect.exe localhost /edit» ->»Show Options», на вкладке «Local Resources» нажать «More» и выбрать камеру в разделе «Other supported RemoteFX USB Devices».
Ну и вот если уж прям совсем подробно:
_https://social.technet.microsoft.com/Forums/windows/en-US/a11eee73-86e0-4782-b2ab-60dfd19556ab/how-to-add-webcam-to-a-hyperv-virtual-machine?forum=win10itprovirt
Enable group policy changes to allow RemoteFX 3D video adapter to work in the HyperV Host
Enable group policy changes to allow RemoteFX 3D video adapter to work in HyperV Client
Enable group policy changes to allow audio to be redirected to HyperV client
Enable group policy changes to allow audio to be recorded from HyperV clientss
Allow enhanced session mode» in hyper manager — server settings
Add RemoteFX 3d Video Adapter in hyperV manager — settings for a given virtual machine
Add the resources to the VM during when a «local resources» menu pops up during boot
На эту страницу я заходил ранее. Эта инструкция для Hyper-V, где он включён как компонент Windows. Вот цитата оттуда: I was able to add my Webcam and USB headset to a VM running on my Windows 10 Pro machine
А у нас гипервизор без GUI, Window Hyper-V Server 2019, который бесплатный, там нет графического интерфейса, это Core. Всё это я пробовал, и ничего не работает. Покажите, снимите видео, где Хайпер-Ви без гуя, и посмотрим, будет ли это работать
Ок, а откуда вы планируете прокидывать USB устройства? По сети или локальные устройства с хоста? По идее при пробросе локальных устройств с самого хоста HV в ВМ все должено работать аналогично
Одной из существенных проблем гипервизора HyperV является невозможность пробросить USB устройство в виртуальную машину.
Есть решение этой проблемы — open source проект usbipd-win. С его помощью можно пробросить USB устройство, подключенное к машине под управлением Windows в любую другую по сети, либо в локальный Linux, работающий по WSL2 (инструкция от microsoft).
На базе проекта usbip существует много различных продуктов. Конкретно usbipd-win это только сервер под Windows. Я начал с него, потому что он максимально просто устанавливается и настраивается. Можно через winget поставить:
> winget install usbipd
Либо скачать msi пакет из репы. Далее смотрим список подключенных устройств и публикуем одно из них:
> usbipd list
> usbipd bind —busid=4-3
Опубликованный с помощью этого сервера ключ можно подключить к Linux или Windows машине. Под Linux достаточно установить соответствующие пакеты с утилитой и модулем ядра. Для Debian вот эти:
# apt install usbip hwdata usbutils
После этого можно смотреть список опубликованных ключей и подключать один из них:
# usbip list —remote=10.20.1.56
# usbip attach -remote=10.20.1.56 —busid=4-3
Для подключения этих ключей в Windows, нужно установить Windows Agent. Взять его можно из другого репозитория usbip-win. Там есть инструкция по установке агента. Она немного замороченная, по сравнению с установкой сервера, но ничего особо сложного нет. Вопрос решаемый.
Точно так же можно публиковать USB устройства с Linux по сети на другие машины. Есть пакет сервера и под OpenWRT. Таким простым и бесплатным способом можно решить вопрос проброса USB ключей. Для HASP работает отлично.
USB Device Passthrough (Redirect) to Hyper-V Virtual Machine
One of the significant disadvantages of Hyper-V over other hypervisors (for example, VMWare ESXi or Proxmox) is the lack of a feature of redirecting USB devices from the host to virtual machines. Since version Hyper-V 2012 R2, there have been a number of changes regarding USB Passthrough options, but this functionality is still inferior to those of competitors. In this article, we will discuss the specifics of USB redirection in Hyper-V.
An Overview of Hyper-V USB Passthrough
USB passthrough refers to the ability to redirect a USB device from the host hypervisor (or over the network from another server/device) to a virtual machine. Using a USB passthrough, you can redirect a USB stick, token, USB dongle, modem, or any other device connected to the physical host’s USB port to the virtual machine.
The bad news is that Hyper-V doesn’t support full-featured USB passthrough. You cannot redirect an arbitrary USB device from a physical host to a virtual machine (VMWare is much better with this – see the article USB passthrough in VMWare ESXi). There are several built-in options for using an external USB device in a Hyper-V VM, but they all have significant limitations. Currently, you can use the following ways to redirect a USB device to Hyper-V virtual machine.
- Redirecting USB drives from Hyper-V host;
- Enhanced Session Mode on Hyper-V Console;
- USB Redirection via RDP;
- Using software/hardware solution for USB redirecting over the network (USB over IP).
Accessing a USB Hard Drive from a Hyper-V Virtual Machine
You can fairly easily redirect a host-attached USB drive directly inside any running Hyper-V virtual machine. Let’s see how to give a Hyper-V virtual machine direct access to the host’s USB drive.
- This guide only works for USB drives that are detected by the system as fixed. You can’t redirect to VM this way USB flash drives, smart cards and other removable devices (although there is a little trick to make Windows see a removable device as a fixed hard drive).
- For these drives, you cannot create a snapshot/checkpoint.
- Connect an external USB drive to the Hyper-V host (this can be any host with Windows and the Hyper-V role installed, or Free Microsoft Hyper-V Server). The drive will appear in a system and a drive letter will be assigned to it (if a drive letter has not been assigned, check the article);
- Open the Disk Management ( diskmgmt.msc ) console, right-click the drive (in our example, the ID of the 20 GB USB drive is Disk 1) and select Offline.
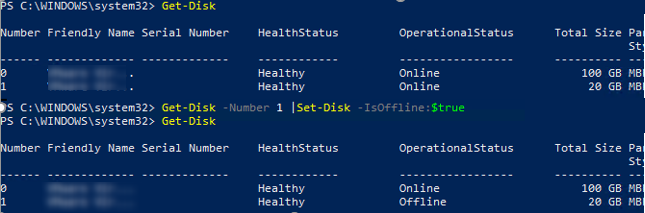
If you are using Windows Server Core or Hyper-V Server, which don’t have some of the graphical mmc snap-ins, you can manage your local disks using Disk Management PowerShell module. The following commands can list the physical disks on the host and take the specified disk offline:
Get-Disk
Get-Disk -Number 1 |Set-Disk -IsOffline:$true
That’s all! You have directly connected external USB media into Hyper-V virtual machine and now can use it.
To safely remove the USB drive, you can open the Hyper-V Manager console and go to the virtual machine settings window. In the SCSI Controller section, select the hard drive you want to remove and click Remove. Save your changes. After that, you can physically remove the hard drive from the USB port of the Hyper-V host.
Redirect USB Device to VM with Hyper-V Enhanced Session Mode
In the version of Hyper-V introduced in Windows Server 2012 R2/8.1, any USB device can be forwarded to a virtual machine from a client computer using Enhanced Session Mode (ESM). The Hyper-V Manager tool vmconnect.exe is used to connect. It allows you to connect to the virtual machine console and select the USB devices you want to redirect.
First you need to enable Enhanced Session Mode in the Hyper-V server settings. This can be done using PowerShell:
Set-VMHost -EnableEnhancedSessionMode $true
Or in the Hyper-V Settings -> Enhanced Session Mode.
Restart the Hyper-V Virtual Machine Management service:
Get-Service vmms | Restart-Service
In the Integration Services section of the VM settings, you must enable the Guest Services option.
In order to redirect the USB device through Enhanced Session Mode, you need to open the Hyper-V console, select the virtual machine, and click the Connect button. Or you can run the vmconnect.exe tool (Virtual Machine Connection), specify the Hyper-V server and the virtual machine name. The vmconnect tool supports some command line options, so you can give a customized bat file with the options you want to users.
If the VM supports Enhanced Session Mode, a window similar to the RDP connection properties will appear. Click Show Option -> Local Resources -> Local device and resources -> More.
Select the USB devices on your computer to be redirected to the VM. If the device you want is not currently connected, select the “Other supported Plug and Play (PnP) devices” and “Devices that I plug in later options”.
Now all USB devices connected to your computer will be automatically available in the console session of the Hyper-V virtual machine.
Key features and limitations of Hyper-V Enhanced Session Mode:
- Only Windows are supported as guest OS (starting from Windows 8.1 / Windows Server 2012 R2);
- You don’t need direct network access to the virtual machine. All connections are made through the Hyper-V host (you connect to it over the network via TCP port 2179), and the Hyper-V connects to the VM via the VMBus;
- Hyper-V Manager must be installed on the client’s computer.
This method is similar to redirecting USB devices from local host over an RDP session. We won’t consider this in more detail.
If you are redirecting USB devices over the network (USB over IP or over an RDP session), you can still access the USB key even after migrating the virtual machine to another host (Hyper-V Live Migration / vMotion).
Enabling Hyper-V USB passthrough to Access a USB Storage
Download a free trial of Veeam Backup for Microsoft 365 and eliminate the risk of losing access and control over your data!
Table of Contents
Transferring files via USB storage to a Hyper-V virtual machine (VM) is not uncommon, especially when copying a large amount of data. But if you need to access a USB storage device in Hyper-V, you’ll need to perform several steps to enable Hyper-V USB passthrough access.
Unlike other hypervisors, such as VMWare Workstation, that make USB devices available inside VMs in a few clicks, Hyper-V requires quite a few more steps to accomplish the same. And in this article, you’ll learn ways to enable USB passthrough in Hyper-V.
Let’s get started!
Prerequisites
This article is a tutorial, and if you’d follow along with the examples, you’ll need to have the following.
- Hyper-V on Windows 10 or Windows Server 2016 and above – This article will use Hyper-V on Windows 10 version 21H1, and the host’s name is PH-5CG0022245.
- A Hyper-V virtual machine (VM) – The examples in this tutorial will be using a Windows Server 2016 VM named ATAWIN2016-1. Also, this guide assumes that you’ve already started your VM.
- One or more USB storage devices that you’ve already attached to the computer. This tutorial will be using an external USB hard drive and a USB flash drive.
Enabling Server-Side Hyper-V USB Passthrough Access
In a nutshell, the Server-Side Hyper-V USB passthrough means that you’ll be attaching a USB device to the Hyper-V host. In turn, the Hyper-V VM should have access to the USB device as if the device is directly connected to the VM.
This USB passthrough access method is appropriate if:
- The Hyper-V VM guest OS is either Windows or Linux.
- You only require access to non-removable USB mass storage devices. No other USB device types are compatible with server-side Hyper-V USB passthrough access.
- You want to control which USB storage devices are available to anyone who logs in to the Hyper-V VM.
Setting the USB Drive Offline on the Host
The host and the VM cannot have simultaneous access to the USB drive. For this reason, you’ll need to set the USB drive offline on the host first before you can enable it for Hyper-V USB passthrough access.
The Windows OS does not allow setting removable drive types offline, such as USB thumb drives or memory cards. Consequently, removable drive types are not applicable for Hyper-V USB passthrough access.
To enable the server-side Hyper-V USB passthrough, follow the steps below.
1. Open the Disk Management console. To do so, right-click Start and click Disk Management.
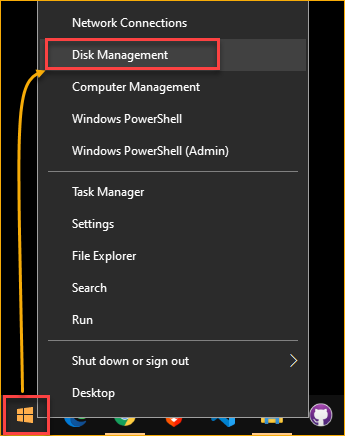
Opening the Disk Management console
2. On the Disk Management window, look for the USB drive and set it to offline. To do so, right-click the Disk and click Offline. The example below sets Disk 2 offline.
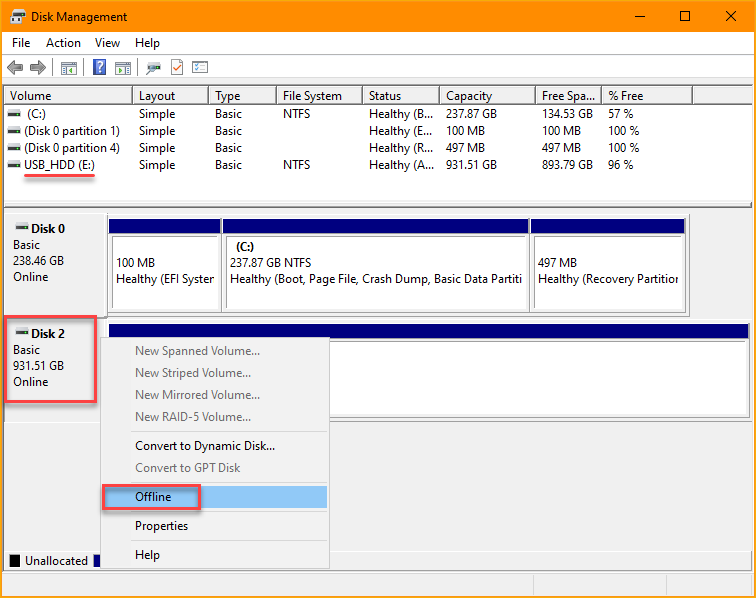
Setting the USB drive offline
As a result, the disk becomes offline and loses its drive letter assignment, as shown below.
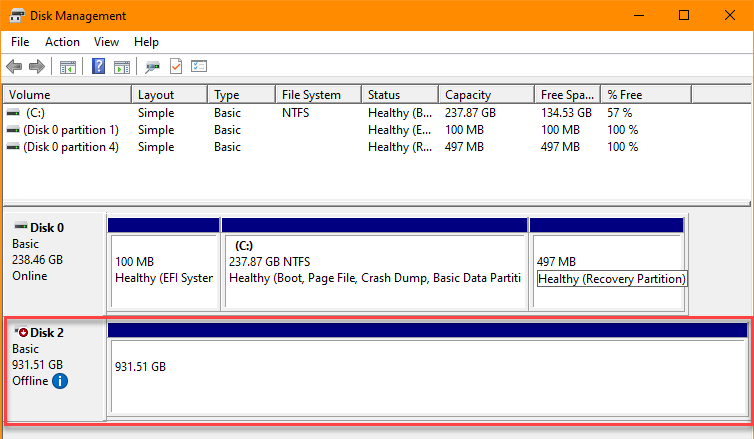
The disk is now offline
Adding the USB Drive to the Virtual Machine
The USB storage is offline on the host, which means the host operating system no longer has active access to the drive. You can now enable the Hyper-V USB passthrough by adding the USB storage as a new hard disk inside the VM. To do so, proceed as follows.
1. Switch to your Hyper-V Virtual Machine Connection (VMConnect) window. Click File —> Settings to open the VM settings.
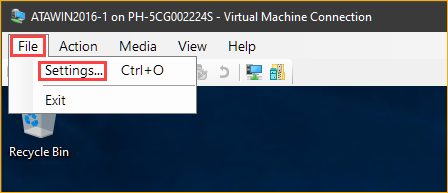
Opening the VM settings
2. On the VM settings window, click SCSI Controller —> Hard Drive —> Add.
Can you add the hard drive to the IDE Controller instead of the SCSI Controller? — Yes. But know that once you added the drive as an IDE device, you cannot remove it from the VM without turning off the VM first. In contrast, you can remove the SCSI drive from a running VM.
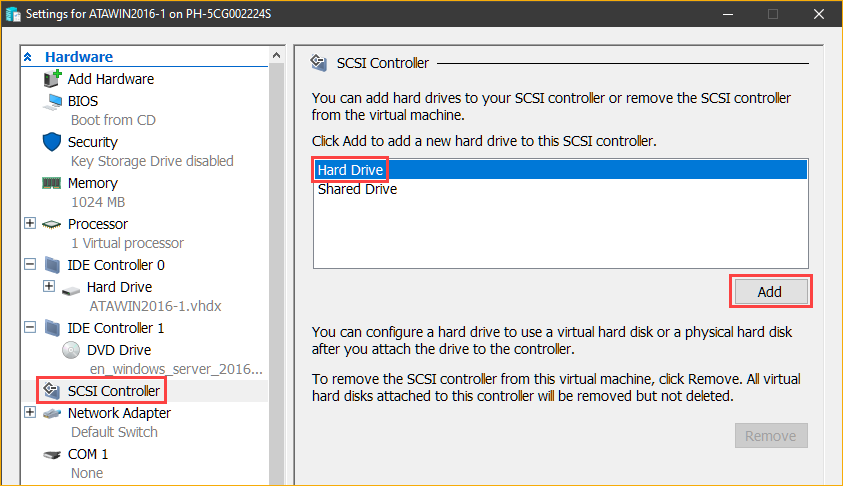
Adding a SCSI hard Drive
3. On the Hard Drive page, under the Media section, select the Physical hard disk option. Next, click the drop-down box and select the USB drive. The drive you’re choosing must have the same disk number must be the same as the disk you took offline in the Disk Management console.
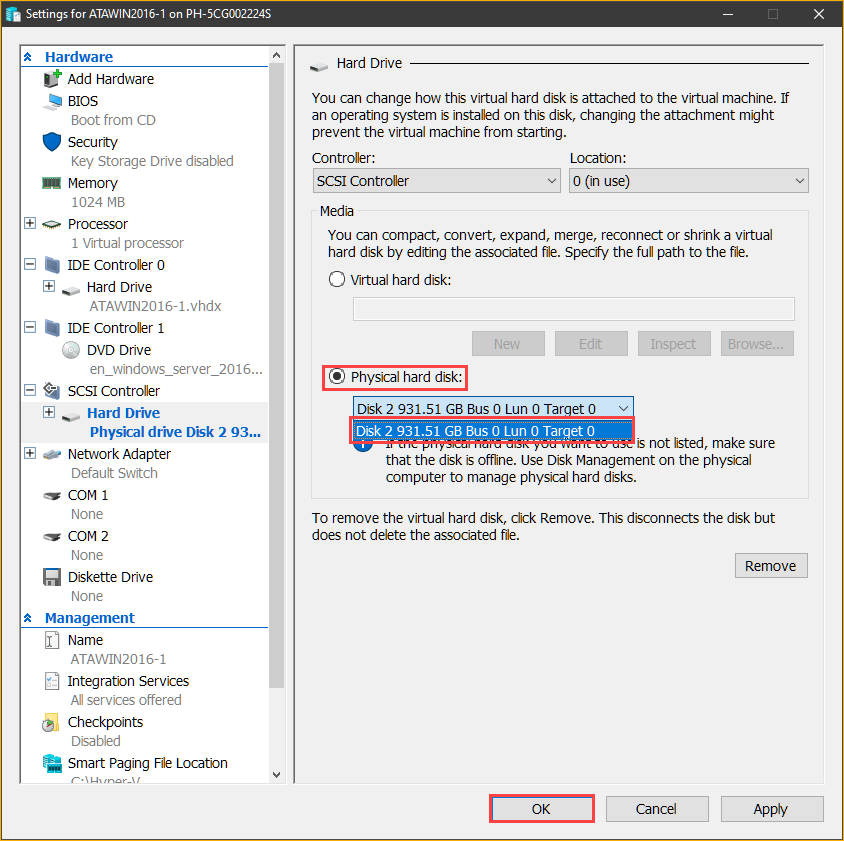
Selecting the USB drive
4. After adding the drive, open the File Explorer on your Hyper-V VM. You should now see the USB storage drive inside the VM, like the screenshot below.
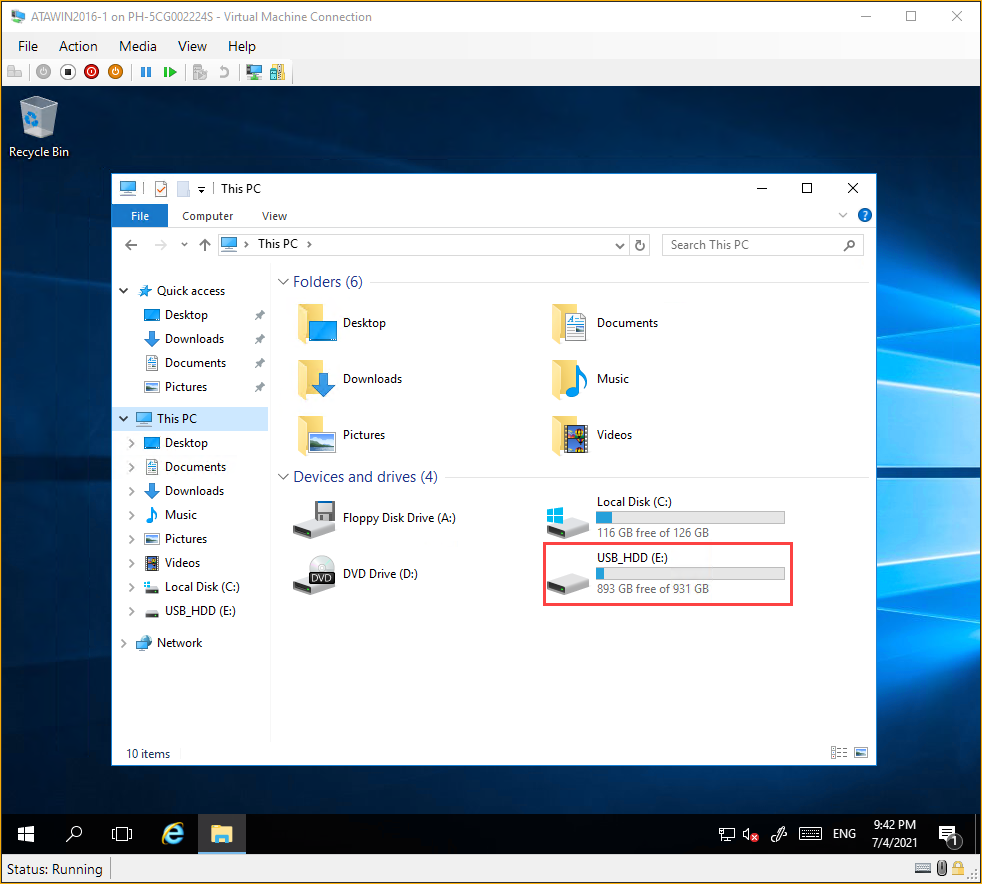
Verifying the USB drive access inside the Hyper-V VM
Removing the USB Drive from the Virtual Machine
Suppose you’ve already accomplished your task involving the USB drive. When you no longer need the USB drive access on the VM, removing it only takes a few steps. To do so, follow the instructions below.
Open the VM’s settings by clicking on File —> Settings on the VMConnect window. Next, on the left pane, click the hard drive you added under the SCSI Controller. Finally, click the Remove button and click OK.
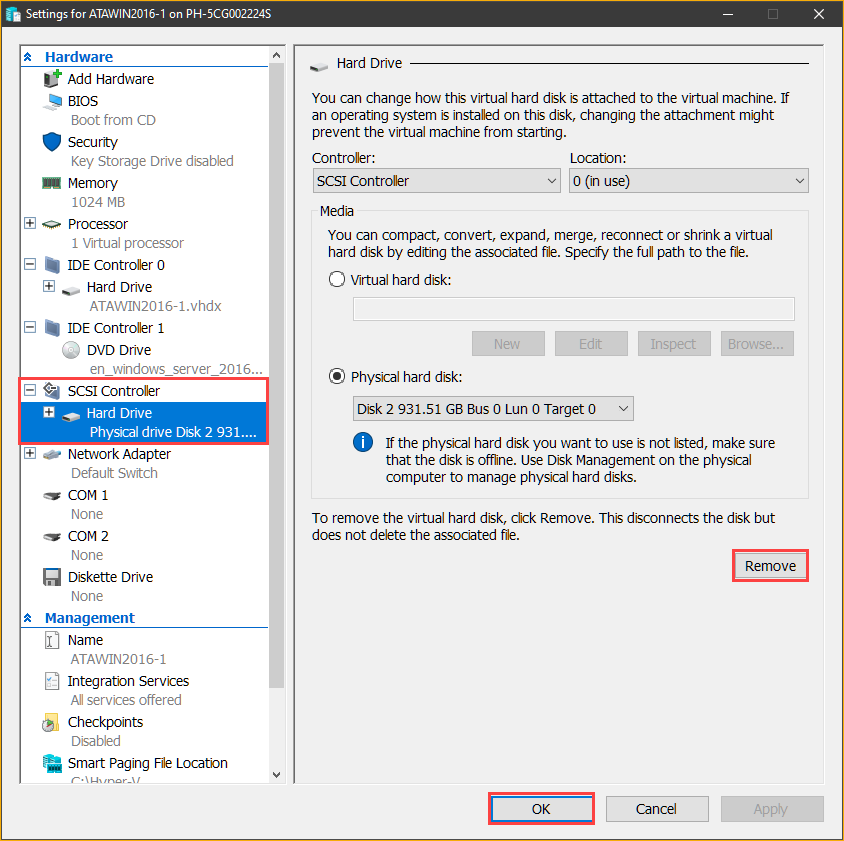
Removing the USB drive
Enabling Client-Side Hyper-V USB Passthrough Access (Enhanced Session Mode)
Another way to access USB devices in Hyper-V is through the client-side enhanced session mode. With enhanced session mode, connecting to the VM using VMConnect allows you to use the host’s local devices and resources inside the VM.
Using the enhanced session mode is ideal when:
- Your guest VM’s operating system is Windows. Linux VMs do not have enhanced mode support.
- You need to share the USB device access with the host or multiple VMs.
- You need access to USB devices other than USB mass storage types. The enhanced session mode allows you to access different device types inside the VM, such as printers and flash drives.
- Users need to select which USB devices will be available inside the VM before connecting to the VM.
Turning On the Enhanced Session Mode
If your Hyper-V host is a Windows 8.1 or Windows 10 computer, you may skip this step because enhanced session mode is on by default.
Before you can connect to the Hyper-V VM with the enhanced session mode, ensure that the enhanced session mode status is on. Follow the steps below to enable enhanced session mode on the Hyper-V host.
1. Open the Hyper-V Manager if you haven’t opened it yet. To do so, click Start —> Windows Administrative Tools —> Hyper-V Manager.
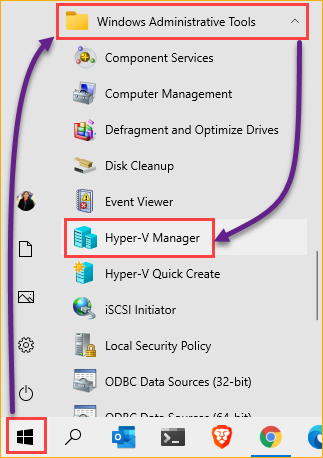 Opening the Hyper-V Manager window
2. On the Hyper-V Manager window, click to select the Hyper-V host on the left pane and click Hyper-V Settings under the Actions pane.
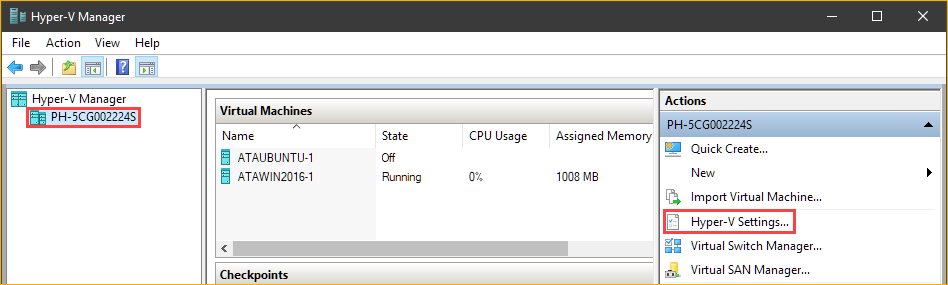
Opening the Hyper-V host settings
3. On the Hyper-V Settings window, click Enhanced Session Mode Policy under the Server section. Next, put a check on the Allow enhanced session mode box. This option allows enhanced session mode connections to the VMs running on the host.
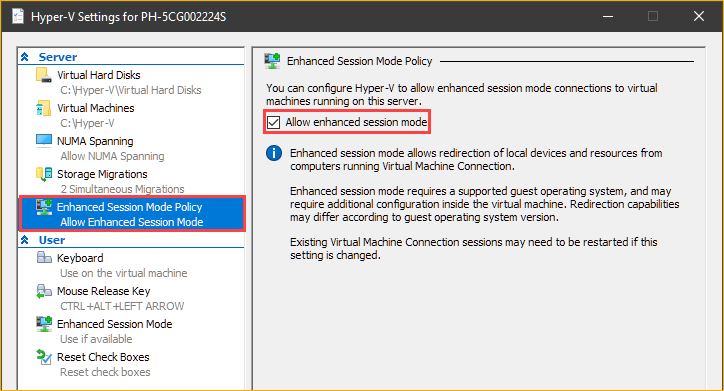
Enabling enhanced session mode on the Hyper-V host
4. Click Enhanced Session Mode under the User section. Next, put a check on the Use enhanced session mode box. This option enables VMConnect to connect to the guest VM in enhanced session mode. Finally, click OK.
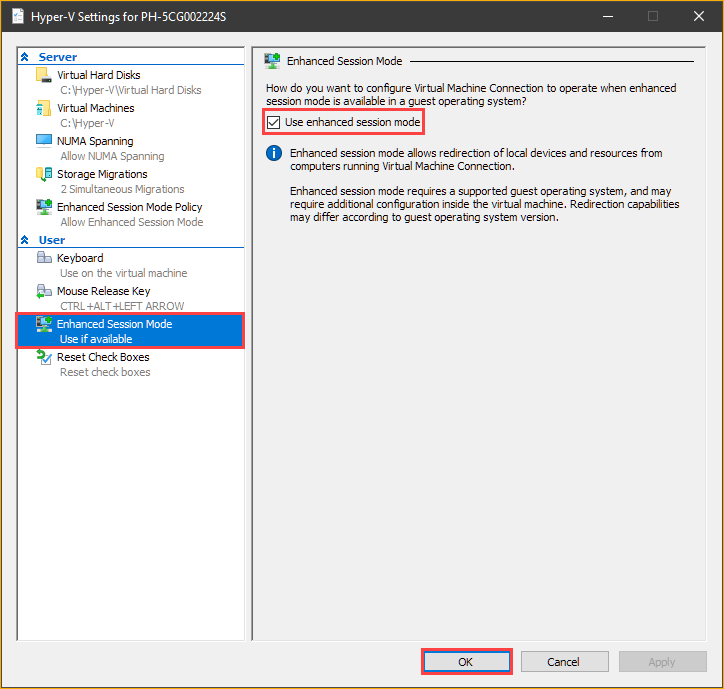
Enabling enhanced session mode on VMConnect
Accessing USB Devices in Enhanced Mode
After ensuring that enhanced session mode is enabled in Hyper-V, you can now access USB devices inside the Hyper-V VM. Follow the steps below to access USB storage devices in Hyper-V.
1. If you currently have a session with the VM, close the session first.
2. On the Hyper-V Manager, right-click on your VM and click Connect. Doing so opens the VMConnect window.
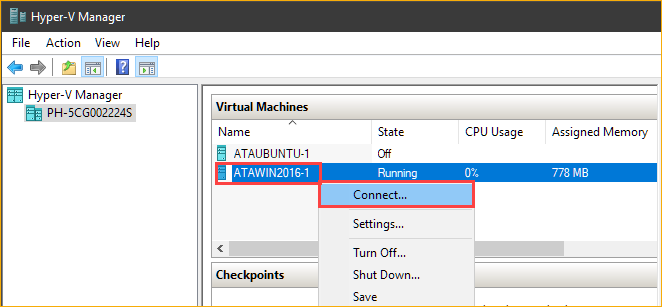
Connecting to the Hyper-V VM
3. On the Connect window, click Show Options to reveal more options available before connecting to the VM.
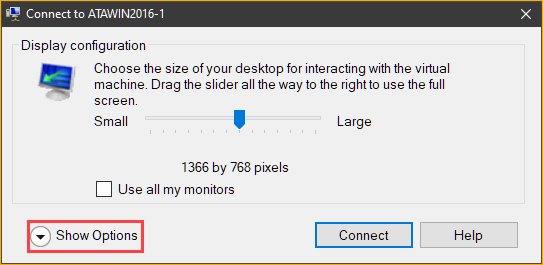
Click Show Options
4. Next, click the Local Resource tab. Under the Local devices and resources section, click More.
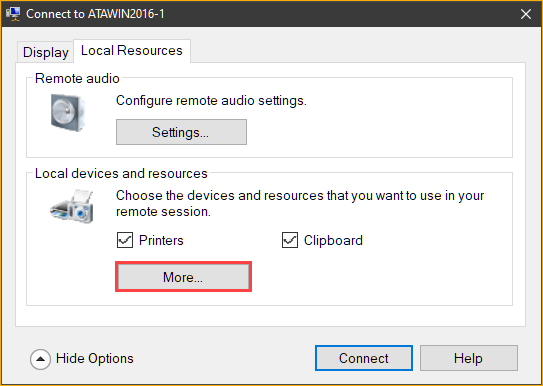
Click More under the Local Resource tab
5. Next, on the Local Resources window, click to expand Drives on the list. As you can see below, the existing drives attached to the host are available to select. In this example, the selected drives are the D (USB hard drive) and E (USB flash drive). After making your selection, click OK.
Selecting the Drives that I plug in later will cause the Hyper-V VM to automatically recognize and make available the USB drives that you may plugin later to the VM.
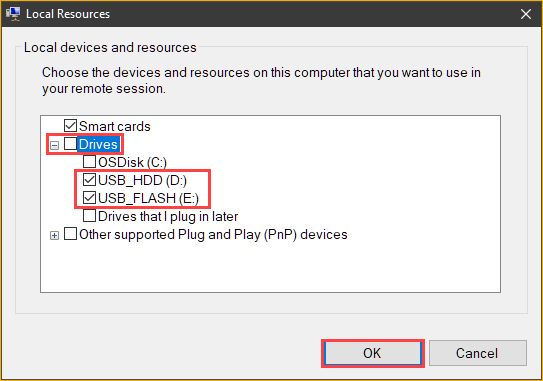
Selecting Drives
6. Back on the Local Resources tab, click Connect to start the session with the VM.
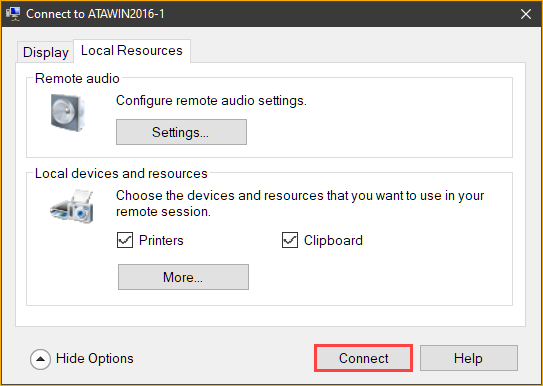
Click Connect to start the VMConnect session
7. Now, log in to your VM and open File Explorer to confirm the drives are available. As you can see below, the VM recognizes the USB drives as drives on a remote machine instead of local devices.
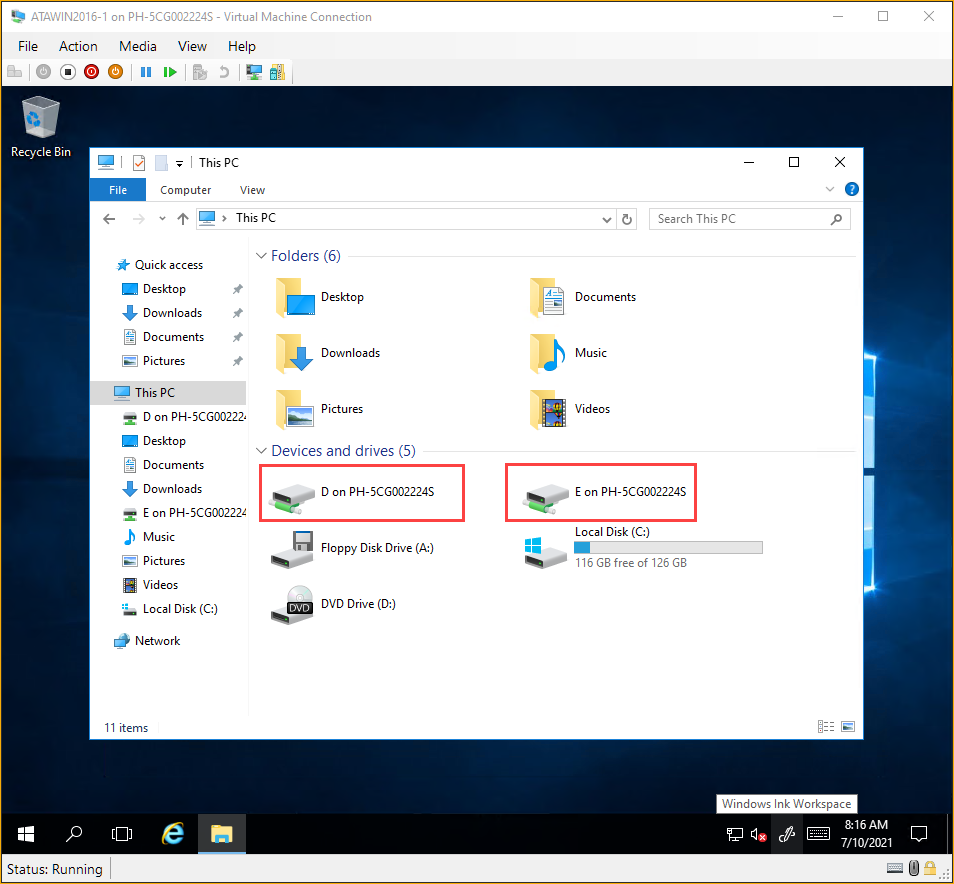
Viewing the drives list in File Explorer
8. Finally, to confirm the drives are accessible, double-click to open the drives and verify you can see their contents.
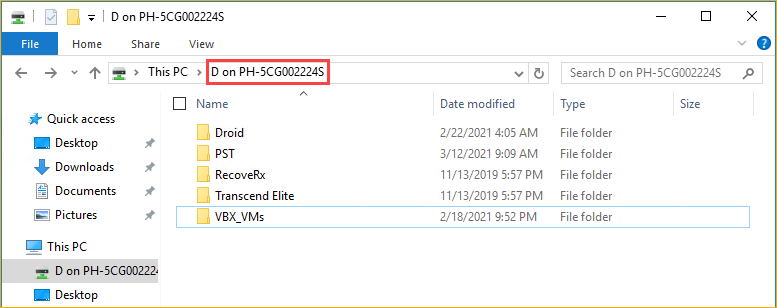
Accessing the USB drive contents inside the Hyper-V VM
Enabling Client-Side Hyper-V USB Passthrough (Remote Desktop Protocol)
The Hyper-V USB passthrough access methods you’ve learned so far involve using VMConnect as the client. But what if you’re using a computer that doesn’t have VMConnect? Or perhaps you don’t want to install the Hyper-V tools that include VMConnect on your management PC?
Typically, system admins remotely access servers through the Remote Desktop Protocol (RDP) using their preferred remote desktop clients. And like VMConnect, you can also access local resources to use inside the VM.
The main difference is that, in the VMConnect, you are accessing the devices attached to the Hyper-V host inside the VM. But in RDP, you’ll be accessing the USB devices attached to the RDP client instead.
This method applies not only to Hyper-V VMs but to any remote Windows machines that you access via RDP.
Follow the instructions below to access USB drives in Hyper-V via RDP. Although many RDP clients are available, this tutorial will be using the native RDP client in Windows. Also, before proceeding, make sure that you know the VM’s IP address.
1. Press CTRL+R to bring up the Run dialog.
2. On the Run dialog box, type mstsc in the Open box and press Enter. Doing so will launch the Remote Desktop Connection dialog box.
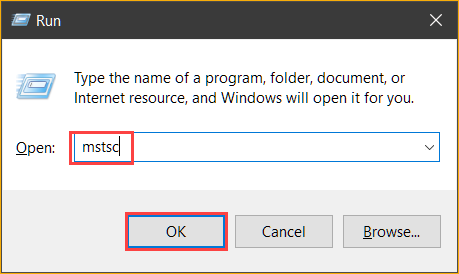
Opening the Remote Desktop Connection client
3. Under the General tab, enter the VM’s IP address into the Computer box. Also, enter the username that you use to log in to the VM.
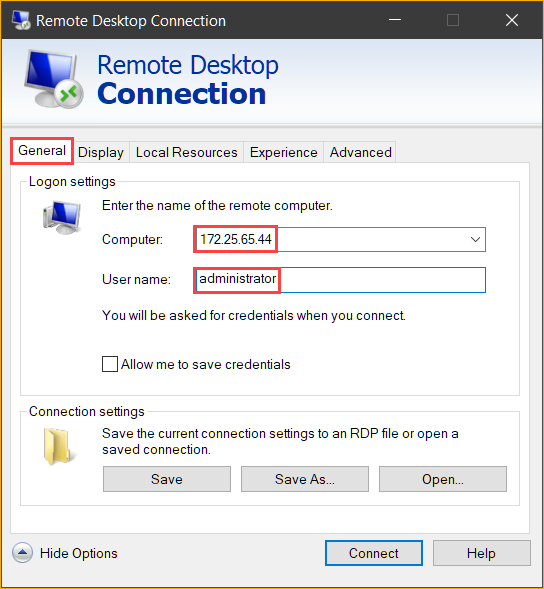
Enter the VM IP address and username
4. Next, click the Local Resources tab and click More.

Click More
5. On the list of Local Devices and Resources, click to expand Drives. Next, click to check the drives you want to access in the VM and click OK. As you can see below, this example chooses two USB drives— D and E. After making your selection, click OK.
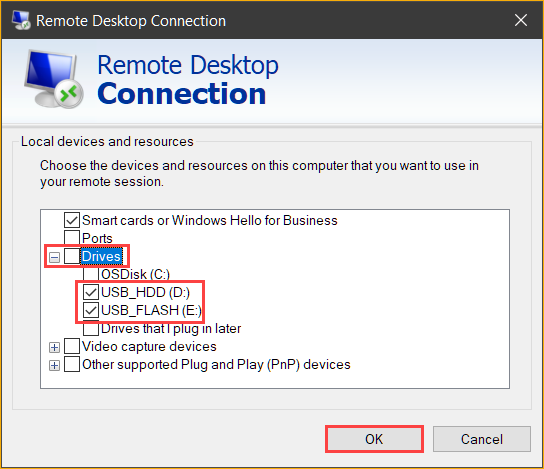
Selecting local devices
6. Now, click the Connect button on the Remote Desktop Connection window to start the remote desktop session.
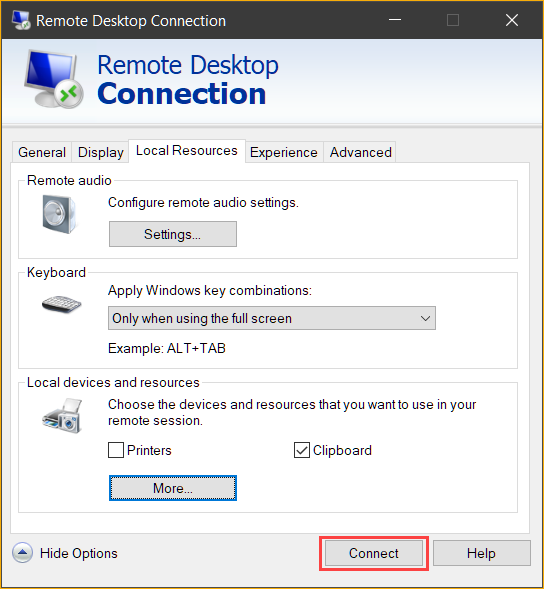
Click Connect to start the remote desktop session
7. If It’s your first time connecting to this VM, you may get a prompt saying Do you trust this remote connection? This confirmation prompt requires you to confirm that you trust that the remote connection will have access to your previously selected devices.
To avoid this prompt in the future, click to check Don’t ask me again for connections to this computer and click Connect.
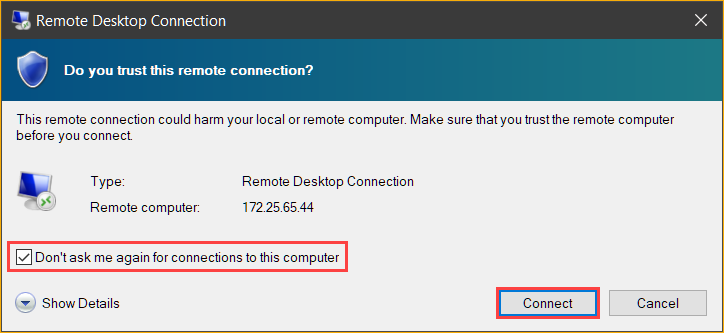
click to check Don’t ask me again for connections to this computer
8. At the credential prompt, type in the credential password and click OK.
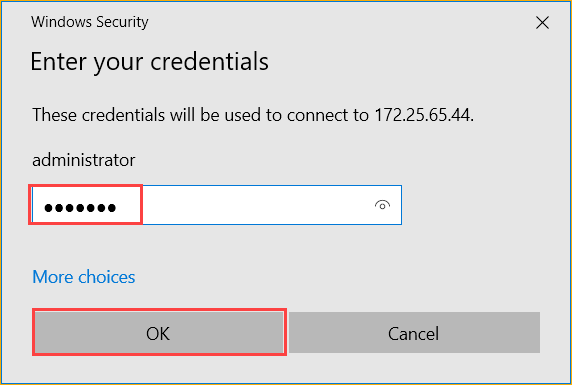
Enter credential password
9. After you’ve logged in to the VM, open File Explorer and confirm that the USB drives you selected are present.
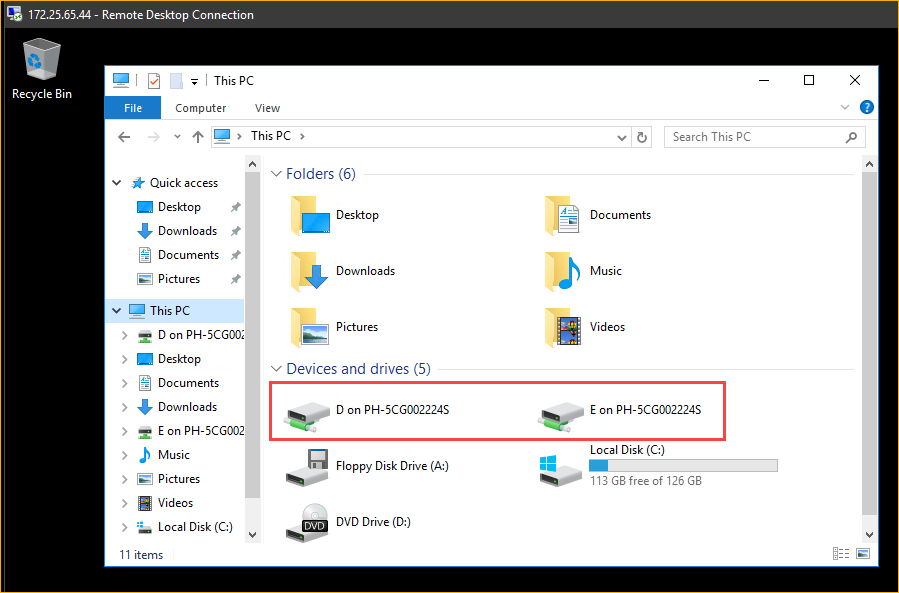
Confirming the USB drives are present inside the Hyper-V VM
Conclusion
Enabling Hyper-V USB passthrough in Hyper-V may seem complex at first glance. But knowing the right steps and which method works best based on your requirements makes the task less complicated. This article showed you different ways to enable USB storage access inside of a Hyper-V VM.
From using VMConnect either server-side or client-side to using a remote desktop client, which Hyper-V USB passthrough access method would you prefer? Do you know another method that this tutorial did not cover?
Hate ads? Want to support the writer? Get many of our tutorials packaged as an ATA Guidebook.
More from ATA Learning & Partners
Recommended Resources!
Recommended Resources for Training, Information Security, Automation, and more!
Get Paid to Write!
ATA Learning is always seeking instructors of all experience levels. Regardless if you’re a junior admin or system architect, you have something to share. Why not write on a platform with an existing audience and share your knowledge with the world?
ATA Learning Guidebooks
ATA Learning is known for its high-quality written tutorials in the form of blog posts. Support ATA Learning with ATA Guidebook PDF eBooks available offline and with no ads!
Hyper-V USB Passthrough: Detailed Guide to Attaching USBs to Hyper-V
Using a USB storage or other USB devices while operating a Hyper-V virtual machine (VM) can be challenging because, unlike other hypervisors, it doesn’t offer an easy out-of-the-box solution. Before you can access a USB device in Hyper-V, you will need to perform certain steps to enable Hyper-V USB passthrough .
And in this article, you’ll learn ways to enable USB passthrough in Hyper-V: using the built-in tools to transfer files from a USB storage, and sharing complex USB devices to the Hyper-V VM using dedicated software tools.
Attach any kind of USB device to
Hyper-V (Network-level redirection)
It is a known fact that Hyper-V cannot passthrough USB devices other than storage which is super inconvenient when you need to attach, for example, a ZigBee dongle, MFA/2FA dongle, a crypto token, or some other USB device.
To deal with that issue, you can use specialized software for redirecting USB devices over the network.
With FlexiHub, you can connect any type of USB device to a Hyper-V virtual machine and enjoy its functionality.