Как установить CentOS 8 с VirtualBox 6.1 в Windows 10 — VITUX
CentOS — широко используемый дистрибутив Linux, основанный на RedHat Linux. В этом руководстве я покажу вам шаг за шагом, как установить CentOS 8 на виртуальную машину VirtualBox. Операционная система хоста — Windows 10.
Учебное пособие состоит из двух частей:
- Настройка виртуальной машины в VirtualBox.
- Установка самой CentOS на эту виртуальную машину
Давайте начнем, не теряя времени зря.
Предварительные условия
Ниже приведены некоторые из требований, которые необходимо выполнить перед этой установкой.
- 2 ГБ оперативной памяти
- Процессор с тактовой частотой 2 ГГц или выше
- Жесткий диск 20 ГБ
- 64-битная система x86
Как получить CentOS 8.0?
Чтобы установить CentOS 8.0 на VirtualBox, выполните следующие действия:
Шаг 1. Откройте URL https://www.centos.org/download/ в вашем любимом браузере.

Шаг 2. Щелкните «Получить CentOS сейчас». Появится новое окно.

Шаг 3. Щелкните «CentOS Linux DVD ISO», как показано на изображении ниже.

Шаг 4. Щелкните любую из ссылок, чтобы загрузить файл CentOS ISO.

Как видите, это файл размером 6,6 ГБ. Поэтому дождитесь загрузки файла.

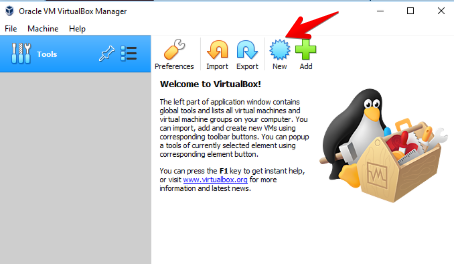
Шаг 5. После загрузки CentOS готов к установке на VirtualBox. Откройте VirtualBox, нажмите кнопку «Создать», чтобы создать новую виртуальную машину.
Шаг 6. Введите имя виртуальной машины в текстовое поле «Имя», например «CentOS». Теперь автоматически «Тип» будет выбран как «Linux», а версия будет выбрана как «Red Hat (64-бит)». Когда вы закончите, нажмите «Далее».

Шаг 7. Приведенный здесь объем памяти составляет 1024 МБ. Это минимальное требование. Вы можете увеличить его в соответствии с объемом памяти, доступной в вашей системе. По завершении нажмите «Далее».

Шаг 8.По умолчанию отмечена опция «Создать виртуальный жесткий диск сейчас». Нажмите «Создать», чтобы продолжить.

Шаг 9. Следующий интерфейс касается типа файла жесткого диска. По умолчанию это VDI (VirtualBox Disk Image), и это стандарт. Нажмите «Далее», чтобы продолжить.

Шаг 10.. На следующем этапе нам понадобится хранилище на физическом жестком диске. По умолчанию это «Динамически распределяется». По завершении нажмите «Далее».

Шаг 11. Минимальный виртуальный жесткий диск, необходимый для CentOS, составляет 8 ГБ, но опять же, это зависит от вашего компьютера. Вы можете настроить его в соответствии с размером жесткого диска вашей системы. Укажите путь к вашему виртуальному жесткому диску, как показано на изображении ниже.
Нажмите «Создать», чтобы продолжить.

Шаг 12. Виртуальная машина CentOS создается на VirtualBox. Мы загрузили файл ISO, но мы еще не нашли файл ISO. Для этого выберите виртуальную машину CentOS и нажмите «Настройки».

Шаг 13. В параметрах настроек нажмите «Хранилище», где мы сможем найти наш уже загруженный файл ISO.

Шаг 14. Перейдите к опции «Контроллер: IDE» в интерфейсе хранилища и нажмите «Пустой».

Шаг 15. Выберите круглый значок компакт-диска справа, а затем выберите «Выбрать / создать виртуальный оптический диск».

Шаг 16. Щелкните значок «Добавить» и выберите уже загруженный файл ISO.

Шаг 17. После добавления файла ISO нажмите «ОК», чтобы продолжить.

Шаг 18. Теперь конфигурация CentOS для виртуальной машины создана. Готово к запуску.
Щелкните виртуальную машину CentOS, а затем нажмите кнопку «Пуск» вверху.

Шаг 19. Выберите «Установить CentOS Linux 8.0.1905» и нажмите «Enter» на клавиатуре. Установка CentOS начнется немедленно.

Шаг 20. Дождитесь завершения процесса и нажмите «Enter Key», когда вам будет предложено.

Шаг 21.. Выберите желаемый язык для установки и нажмите «Продолжить», когда закончите. Мы выбрали английский (США).

Шаг 22.. У нас есть три основные категории настроек: локализация, программное обеспечение и система.

Шаг 23. Начнем с категории локализации, выберите опцию «Клавиатура».

Шаг 24.. По умолчанию выбран «Английский». Вы можете настроить его соответствующим образом, щелкнув значок «+». Нажмите «Готово», чтобы продолжить.

Шаг 25. В категории локализации нажмите «Language Support».

Шаг 26. По умолчанию выбран «английский». Вы можете отрегулировать его соответствующим образом. Нажмите «Готово», чтобы продолжить.

Шаг 27.. Следующая настройка — время и дата в категории локализации. Нажмите «Время и дата», чтобы правильно настроить время и дату в соответствии с вашим регионом.

Шаг 28. Выберите свой регион и город из раскрывающегося списка. Нажмите «Готово», чтобы сохранить новые настройки.

Шаг 29.. Щелкните «Политика безопасности» в категории «Система», как показано ниже.

Шаг 30. Вы можете добавить политики. Нажмите «Готово», чтобы продолжить.

Шаг 31. В категории программного обеспечения щелкните «Источник установки».
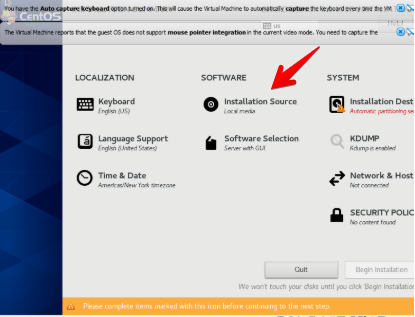
Шаг 32. Поскольку мы уже указали путь к файлу ISO, он определяется здесь автоматически. Нам не нужно ничего делать. Нажмите «Готово», чтобы продолжить.

Шаг 33.. В категории программного обеспечения щелкните «Выбор программного обеспечения».
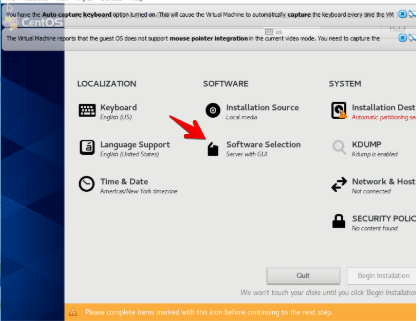
Шаг 34. «Сервер с графическим интерфейсом» уже выбран, поэтому менять его не нужно. Нажмите «Готово», чтобы продолжить.

Шаг 35. Щелкните «Место установки» в категории «Система».

Шаг 36. Размер уже указан, не забудьте выбрать «Автоматическое разбиение на разделы». Нажмите «Готово», чтобы продолжить.

Шаг 37. Как только все вышеперечисленные настройки будут сохранены, вы заметите, что кнопка «Начать установку» активна. Щелкните его, чтобы начать установку.

Шаг 38. Установка начнется немедленно. Сядьте поудобнее и расслабьтесь, пока он завершится. А пока вы можете установить пароль root и создать пользователя. Щелкните «Пароль root».

Шаг 39. Введите надежный пароль root и войдите повторно для проверки. По завершении нажмите «Готово».

Шаг 40. После завершения ввода пароля root. Вы можете продолжить создание пользователя. Щелкните значок «Создание пользователя» в окне на шаге 38.
Предоставьте следующую информацию.
- Полное имя
- Имя пользователя
- Пароль
- Подтвердите пароль
Когда вы предоставите вышеуказанные данные, нажмите «Готово», чтобы продолжить.

Шаг 41. После завершения установки необходимо перезагрузить систему. Щелкните «Устройства» -> «Оптические устройства». Снимите флажок «CentOS-8-x86_64-1905-dvd1.iso», чтобы загружать систему с жесткого диска, а не с загрузочного USB.

Шаг 42. Когда появится всплывающее окно, нажмите «Force Unmount», чтобы продолжить.

Шаг 43. Щелкните «Машина» -> «Сброс», чтобы перезапустить операционную систему.

Шаг 44. Нажмите «Выйти», чтобы продолжить.

Шаг 45. Введите пароль пользователя, которого вы создали на шаге №. 41, чтобы войти.
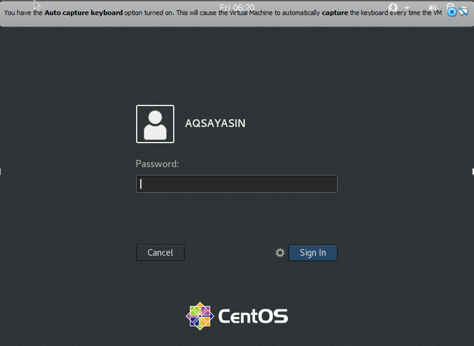
Вы успешно завершили установку CentOS 8.0. Надеюсь, вам понравилось читать статью.
How to install CentOS 8 with VirtualBox 6.1 on Windows 10
CentOS is a widely used Linux distribution based on RedHat Linux. In this guide, I am going to show you step-by-step how to install CentOS 8 in a VirtualBox virtual machine. The host OS is Windows 10.
- Setting up a virtual machine in VirtualBox.
- Installing CentOS itself into that virtual machine
Let’s get started without wasting any further time.
Pre-requisites
- 2 GB RAM
- 2 GHz or higher processor
- 20 GB Hard Disk
- 64-bit x86 System
How to get CentOS 8.0?
To install CentOS 8.0 on VirtualBox, follow these steps:
Step 1. Open the URL https://www.centos.org/download/ in your favorite browser.

Step 2. Click the “Get CentOS Now”. A new window will appear.

Step 3. Click “CentOS Linux DVD ISO” shown in the below image.

Step 4. Click any one of the links to download the CentOS ISO file.

As you can see it is a 6.6 GB file. Therefore, please wait until the file is downloaded.

Step 5. Once the CentOS is downloaded, it is ready to be installed on VirtualBox. Open VirtualBox, click the “New” button to create a new virtual machine.

Step 6. Enter the name of the virtual machine in “Name” textbox e.g. “CentOS”. Now automatically, “Type” will be selected as “Linux” and version will be chosen as “Red Hat (64-bit). When you are done, click “Next”.

Step 7. The memory size given here is 1024 MB. It is a minimum requirement. You can increase it according to the memory available on your system. Click “Next” when you are done.

Step 8.“Create a virtual hard disk now” option is checked by default. Click “Create” to proceed.

Step 9. The next interface is about the hard disk file type. By default, it is VDI (VirtualBox Disk Image) and it is a standard. Click “Next” to proceed.
Step 10. In the next step, we need storage on a physical hard drive. By default, it is “Dynamically allocated”. Click “Next” when you are done.
Step 11. The minimum virtual hard disk which CentOS needs is 8GB but again it depends on your computer. You can adjust it according to the hard disk size of your system. Provide the path of your virtual hard disk as shown in the below image.
Click “Create” to continue.
Step 12. The CentOS virtual machine is created on VirtualBox. We have downloaded the ISO file but we have not yet located the ISO file. For this purpose, select CentOS virtual machine and click “Settings”.

Step 13. In the settings option, click “Storage”, where we can locate our already downloaded ISO file.

Step 14. Go to the “Controller: IDE” option in the storage interface, and click on the “Empty” option.

Step 15. Select the round CD icon on the right side and then select “Choose/Create a Virtual Optical Disk”.

Step 16. Click the “Add” icon and select the already downloaded ISO file.

Step 17. After adding the ISO file, click “Ok” to proceed.

Step 18. Now the configuration of CentOS for the virtual machine has been created. It is ready to start.
Click on the CentOS virtual machine and then click on the “Start” button present on the top.

Step 19. Choose “Install CentOS Linux 8.0.1905” and press “Enter” from your keyboard. The installation of CentOS will start immediately.

Step 20. Wait for the process to finish, press an “Enter Key” when you are prompted.

Step 21. Choose your desired language for installation and click Continue when you are done. We have chosen English (United States).

Step 22. We have three major setting categories and those are Localization, Software, and System.

Step 23. Let’s start with the localization category, click the “Keyboard” option.

Step 24. By default, it has chosen “English” You can adjust it accordingly by clicking on the”+” icon. Click “Done” to continue.

Step 25. In the localization category, click the “Language Support”.

Step 26. By default, it has chosen “English”. You can adjust it accordingly. Click “Done” to continue.

Step 27. The next setting is Time & Date in the localization category. Click “Time & Date” to correctly adjust time and date according to your region.

Step 28. Select your region and city from the drop-down list. Click “Done” to save the new settings.

Step 29. Click “Security Policy” from the System category as shown below.

Step 30. You can add policies. Click “Done” to continue.

Step 31. In the software category, click the “Installation Source”.

Step 32. As we have already given the ISO file path and it is auto-detected here. We do not need to do anything. Click “Done” to continue.

Step 33. In the software category, click the “Software Selection”.

Step 34. “Server with GUI” is already chosen so there is no need to change it. Click “Done” to continue.

Step 35. Click “Installation Destination” from the System category.

Step 36. Size is already given, remember to select “Automatic Partitioning”. Click “Done” to continue.

Step 37. Once all of the above settings are saved, you will notice that the “Begin Installation” button is enabled. Click it to start the installation.

Step 38. The installation will start immediately. Sit back and relax while it completes. In the meantime, you can set the root password and create a user. Click the “Root Password”.

Step 39. Provide a strong root password and reenter to verify. Click “Done” when you are finished.

Step 40. After finishing providing the root password. You can go ahead creating a user. Click a “User creation” icon present on the window in step 38.
- Full name
- User name
- Password
- Confirm password
When you have provided the above details, click “Done” to continue.

Step 41. You have to restart the system when you are done with the installation. Click Devices -> Optical Devices. Uncheck “CentOS-8-x86_64-1905-dvd1.iso” to boot the system from the hard drive and not again from the bootable USB.

Step 42. When a pop-up is shown, click “Force Unmount” to continue.
Step 43. Click Machine -> Reset to restart the operating system.

Step 44. Click “Quit” to proceed further.

Step 45. Enter the password of the user you have created at step no. 41 to login.

You have successfully completed the CentOS 8.0 installation. I hope you have enjoyed reading the article.
Karim Buzdar
About the Author: Karim Buzdar holds a degree in telecommunication engineering and holds several sysadmin certifications. As an IT engineer and technical author, he writes for various web sites. You can reach Karim on LinkedIn
CentOS as a Guest OS in VirtualBox
Installation of CentOS as a guest OS is much like installing on real hardware. Start by downloading the ISO file[s] you wish to use for installation from a CentOS Mirror.
Creating a Virtual Machine
Create a New Virtual Machine (VM) with the Virtual Machine Wizard, choosing Linux for the OS Type and Red Hat or Red Hat (64 bit) for the Operating System. Memory should be at least 768MB for a graphical install to work. Next the virtual hard disk wizard will start. The OS disk should be at least 8GB. For a relatively full install, allocate at least 15GB, otherwise use all the defaults. Additional disk[s] can be added later if desired.
After the VM is created, run Settings, go to Storage, and under IDE Controller click on the CD icon on the left, then select the similar CD icon on the right and pick Choose a virtual CD/DVD from the list. Navigate to the directory where the ISO image[s] reside and pick one, for example CentOS-6.7-x86_64-LiveDVD.iso or CentOS-7-x86_64-DVD-1511.iso. Change any additional settings, such as the amount of memory for the virtual video adapter, and whether to use NAT or Bridged networking. For a first install attempt make a minimum of changes to the defaults.
Start the VM and perform a graphical install, or if desired a text install. After the install reboot and perform firstboot configuration.
Installing Guest Additions
You will need to be the root user for the following tasks. Login to a root shell or «su -» in a terminal window.
The installation of VB will require the building of kernel modules. If DKMS (Dynamic Kernel Module Support) is installed it will be used and will simplify kernel upgrades. Installing DKMS from the EPEL repository is recommended before installing VirtualBox. Don’t forget to configure the yum-priorities plugin. Installing DKMS may pull in required development dependencies, depending on the package source.
If DKMS is not used the Guest Additions will need to be reinstalled after every kernel update.
If the development environment and kernel source are not already installed:
You may also choose to only install a minimum set of individual development tool packages (at least gcc and make are required, in addition to kernel-devel) rather than the groupinstall which some may consider overkill. Replace «kernel-devel» with «kernel-PAE-devel» if using a PAE kernel on CentOS-5. If you are not using a standard CentOS kernel, you must acquire and install the source for your kernel from wherever you got the kernel. Do not try to install a Xen kernel in a Guest OS, or run KVM or any other nested virtualization hypervisor.
From the VM Devices menu select Install Guest Additions. . If running a GUI the virtual CD image for guest additions will automount — for instance under CentOS-6 with KDE it is mounted under /media/VBOXADDITIONS_5.0.14_105127. If autorun is enabled in a GUI you may get a window asking if you want to let the autorun execute, and asking for root authorization. Take all the defaults and the install should complete.
If not in a GUI, or if there is no autorun, as root mount /dev/cdrom or /dev/sr0 (if necessary) and cd to the mountpoint. Type ./VBoxLinuxAdditions.run to install.
Patch for specific CentOS version
Usually after a point release, which introduces major changes to the kernel or other subsystems, the compilation of the vBox tools fails. When such issues arise we will try to post applicable patches here, until this issue is fixed by vBox.
This page created by PhilSchaffner. Wiki contributors are invited to make corrections, additions, or modifications.
HowTos/Virtualization/VirtualBox/CentOSguest (последним исправлял пользователь анонимно 2019-12-09 09:11:13)
Install CentOS 8 on VirtualBox
So CentOS 8 is just released a few days ago and you would like to test it? Well, let us learn how to install CentOS 8 on VirtualBox.
Install CentOS 8 on VirtualBox
The installation of CentOS 8 on VirtualBox follows the same process you usually use to create VirtualBox VMs.
Please enable JavaScript
Download CentOS 8 ISO file
First things first. Get the CentOS 8 iso file from CentOS Mirror. You can simply grab a download link and use wget to pull the iso file.
Create New VirtualBox VM
Launch VirtualBox and create a new VM with your preferred settings such as networking, disk, system resources etc.
Attach CentOS 8 Installation ISO
Once you have created and setup a new VirtualBox VM for CentOS 8, click Storage > Controller:IDE.
Next, click the disk like icon with a plus sign to choose the CentOS 8 disk to attach.
Install CentOS 8 VM
Once you have setup your VM and attached the CentOS boot disk, start the vm to begin the installation.
When it runs, select the first installation option, Install CentOS Linux 8.0.1905 .
Next, choose your installation language, the installation disk and click Begin Installation to proceed with installation.
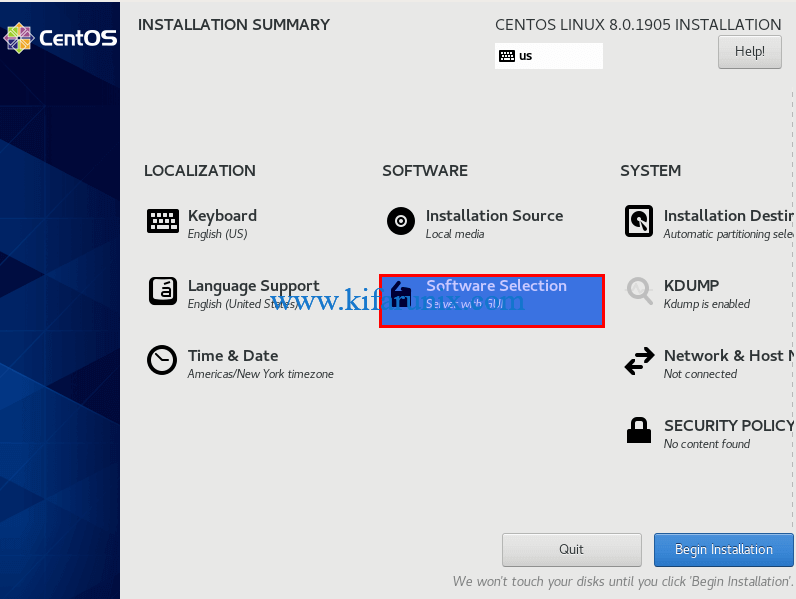
Want to Install the CentOS 8 minimal version instead? Click on Software Selection. (By default, Server with GUI is selected for install).
Next, select Minimal Install > Done and begin the installation.
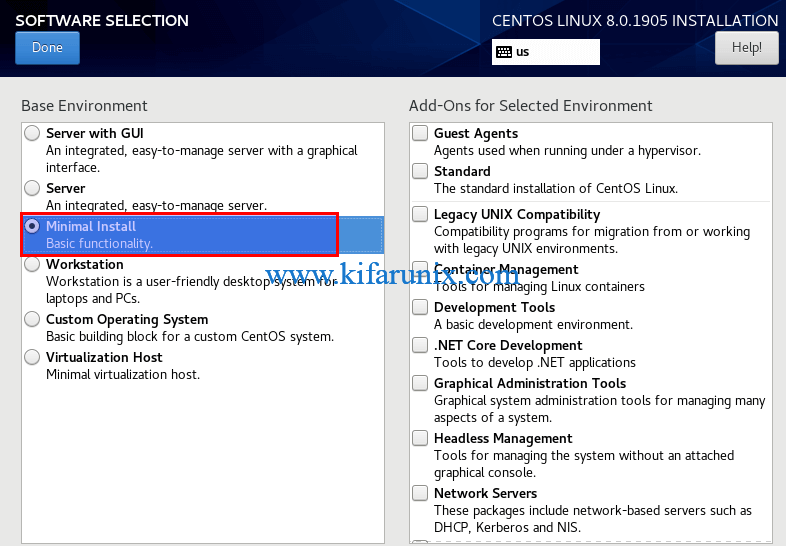
This guide installs server with GUI CentOS 8 edition.
Set your root password and if you want, create a non-root user account and proceed. 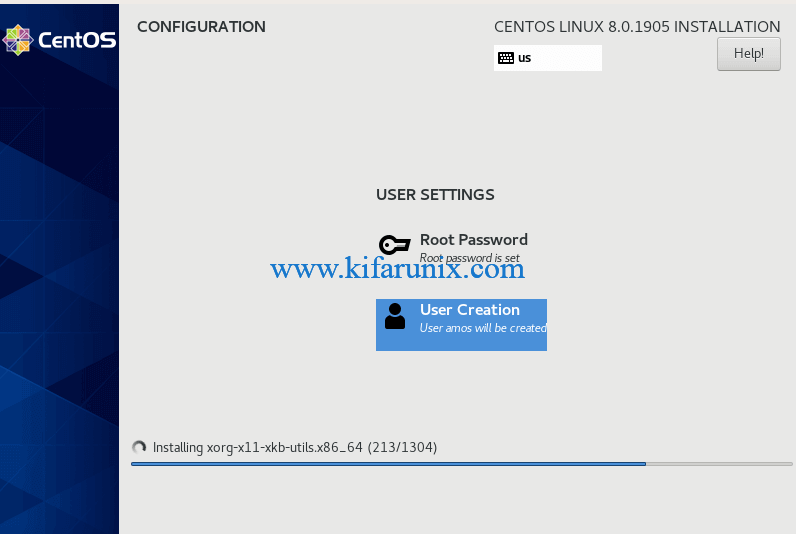
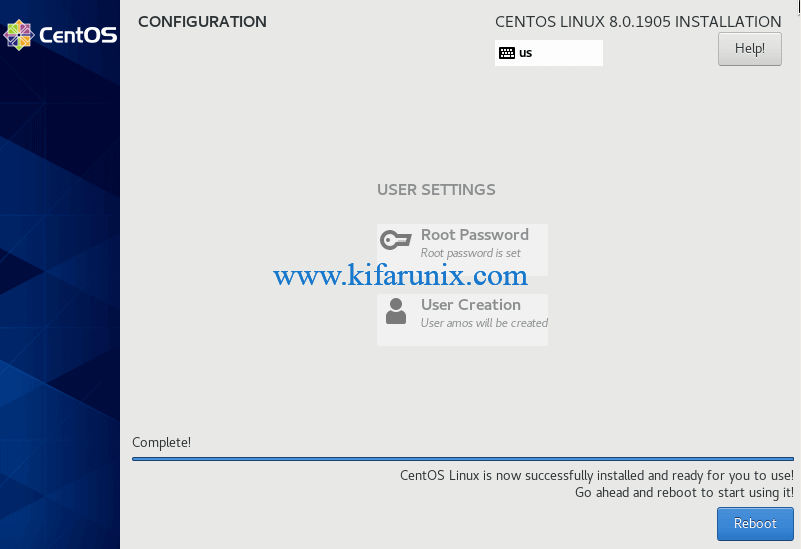
After the installation completes, instead of rebooting your CentOS 8 virtual machine just power it off and detach the installation ISO file from the storage, otherwise the installation process will reinitiate.
Running CentOS 8 Server on VirtualBox
Once you have detached the installation medium, boot up your CentOS 8 virtual machine.
Accept CentOS 8 EULA
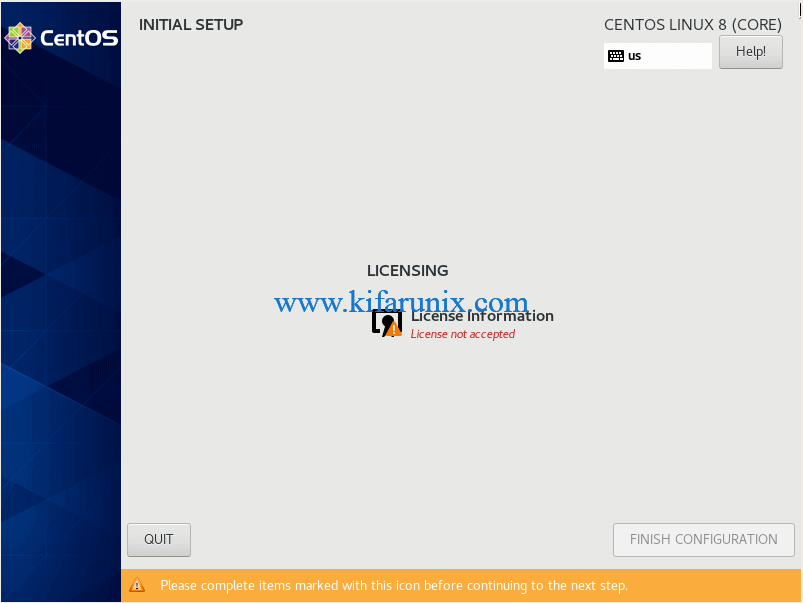
CentOS 8 requires that your accept the End User License Agreement.
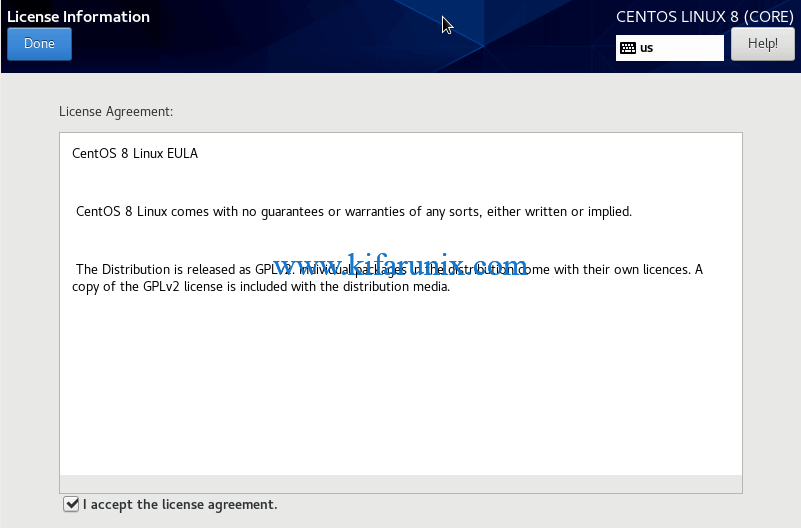
Hence, click on the License Information and accept the license.
Click Done and finish the configuration to proceed to CentOS 8 desktop.