Восстановите и загрузите ReAgent.xml сейчас
Иногда система Windows отображает сообщения об ошибках поврежденных или отсутствующих файлов ReAgent.xml. Подобные ситуации могут возникнуть, например, во время процесса установки программного обеспечения. Каждая программа требует определенных ресурсов, библиотек и исходных данных для правильной работы. Поэтому поврежденный или несуществующий файл ReAgent.xml может повлиять на неудачное выполнение запущенного процесса.
Файл был разработан Microsoft для использования с программным обеспечением Windows. Здесь вы найдете подробную информацию о файле и инструкции, как действовать в случае ошибок, связанных с ReAgent.xml на вашем устройстве. Вы также можете скачать файл ReAgent.xml, совместимый с устройствами Windows 10, Windows 8.1, Windows 8, Windows 7, Windows 7, которые (скорее всего) позволят решить проблему.
 Совместим с: Windows 10, Windows 8.1, Windows 8, Windows 7, Windows 7
Исправьте ошибки ReAgent.xml
Информация о файле
| Основная информация | |
|---|---|
| Имя файла | ReAgent.xml |
| Расширение файла | XML |
| Тип | Data |
| Описание | Extensible Markup Language |
| Программного обеспечения | |
|---|---|
| программа | Windows 10 |
| Программного обеспечения | Windows |
| автор | Microsoft |
| Версия программного обеспечения | 10 |
| подробности | |
|---|---|
| Размер файла | 1078 |
| Самый старый файл | 2009-06-10 |
| MIME тип | application/xml |

Наиболее распространенные проблемы с файлом ReAgent.xml
Существует несколько типов ошибок, связанных с файлом ReAgent.xml. Файл ReAgent.xml может находиться в неправильном каталоге файлов на вашем устройстве, может отсутствовать в системе или может быть заражен вредоносным программным обеспечением и, следовательно, работать неправильно. Ниже приведен список наиболее распространенных сообщений об ошибках, связанных с файлом ReAgent.xml. Если вы найдете один из перечисленных ниже (или похожих), рассмотрите следующие предложения.
- ReAgent.xml поврежден
- ReAgent.xml не может быть расположен
- Ошибка выполнения — ReAgent.xml
- Ошибка файла ReAgent.xml
- Файл ReAgent.xml не может быть загружен. Модуль не найден
- невозможно зарегистрировать файл ReAgent.xml
- Файл ReAgent.xml не может быть загружен
- Файл ReAgent.xml не существует
ReAgent.xml
Не удалось запустить приложение, так как отсутствует файл ReAgent.xml. Переустановите приложение, чтобы решить проблему.
Проблемы, связанные с ReAgent.xml, могут решаться различными способами. Некоторые методы предназначены только для опытных пользователей. Если вы не уверены в своих силах, мы советуем обратиться к специалисту. К исправлению ошибок в файле ReAgent.xml следует подходить с особой осторожностью, поскольку любые ошибки могут привести к нестабильной или некорректно работающей системе. Если у вас есть необходимые навыки, пожалуйста, продолжайте.
Как исправить ошибки ReAgent.xml всего за несколько шагов?
Ошибки файла ReAgent.xml могут быть вызваны различными причинами, поэтому полезно попытаться исправить их различными способами.
Шаг 1.. Сканирование компьютера на наличие вредоносных программ.
Файлы Windows обычно подвергаются атаке со стороны вредоносного программного обеспечения, которое не позволяет им работать должным образом. Первым шагом в решении проблем с файлом ReAgent.xml или любыми другими системными файлами Windows должно быть сканирование системы на наличие вредоносных программ с использованием антивирусного инструмента.
Если по какой-либо причине в вашей системе еще не установлено антивирусное программное обеспечение, вы должны сделать это немедленно. Незащищенная система не только является источником ошибок в файлах, но, что более важно, делает вашу систему уязвимой для многих опасностей. Если вы не знаете, какой антивирусный инструмент выбрать, обратитесь к этой статье Википедии — сравнение антивирусного программного обеспечения.
MBR2GPT Failed to Update ReAgent.xml on Windows 10? [Full Fix] [Partition Manager]
Many users encounter the failed to update ReAgent.xml error when converting MBR to GPT via the MBR2GPT. In this post, MiniTool will introduce a best alternative for the disk conversion and provide corresponding solutions to the error.
According to user reports, the Failed to Update ReAgent.xml error often occurs when running the mbr2gpt /convert command in WinPE. Some people also encounter the same error with the USB drive. This error can appears when converting disk in Command Prompt but also in Windows PowerShell. Here’s a true example from the answers.microsoft.com forum:

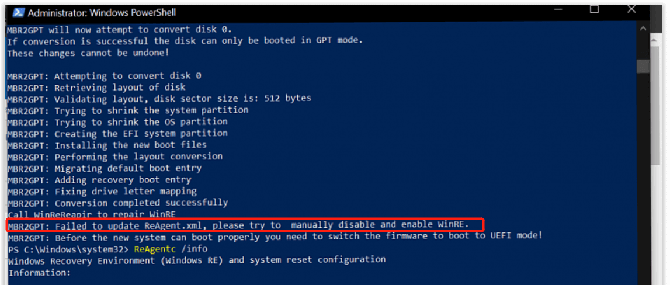
While trying to covert my Legacy BIOS system to UEFI I executed: mbr2gpt /covert /allowFullOS. Everything went swell, except: MBR2GPT: Failed to update ReAgent.xml, please try to manually disable and enable WinRE. How does one do that? I can’t reboot, as I have to instruct my BIOS to start using UEFE. It will not start with the Legacy BIOS anymore.
https://answers.microsoft.com/nl-nl/windows/forum/all/failed-to-update-reagentxml/74e53a5f-2e8a-4aee-9b03-d2019f04fb51
About the MBR2GPT Failed to Update ReAgent.xml Error
To fix the MBR2GPT failed to update ReAgent.xml error successfully, it is necessary to figure some questions out beforehand.
What Is MBR2GPT
When it comes to converting MBR to GPT on Windows 10, a lot of people may think of the MBR2GPT tool. It is also known as Windows Creator’s Update starting in Windows 10 1703 build 15063. The MBR2GPT.exe is a command line utility located within the System32 directory.
This tool can be used to convert an MBR disk (for Legacy BIOS) to GPT (for UEFI) effectively and non-destructively on Windows 10. It can run by entering the Windows Preinstallation Environment (WinPE) with an USB drive as well as the full Windows 10 operating system.
The MBR2GPT disk conversion command varies depending on your actual situation. If you are in WinPE, you should run the mbr2gpt /convert /disk: n command. While in full Windows 10 OS environment, you should run the mbr2gpt /convert /disk: n /allowfullOS command. Note that the N refers to the disk number.
Make sure that your computer supports UEFI boot before attempting to convert the disk from MBR to GPT. In addition, you need to reconfigure the firmware to boot to UEFI mode instead of Legacy BIOS after the converting.
Sometimes, however, this utility may run into various errors and issues like MBR2GPT validation failed, MBR2GPT cannot find OS partition, and the one discussed in this post.
What Is ReAgent.xml
What is ReAgent.xml? To answer this question, we have to mention the Windows Recovery Environment (WinRE). It is a recovery environment and minimal OS can troubleshoot the problems regarding to the unbootable operating systems based on WinPE. In WinRE, you can restore OS from an image backup, fix bootloader, and run a command like mbr2gpt /convert.
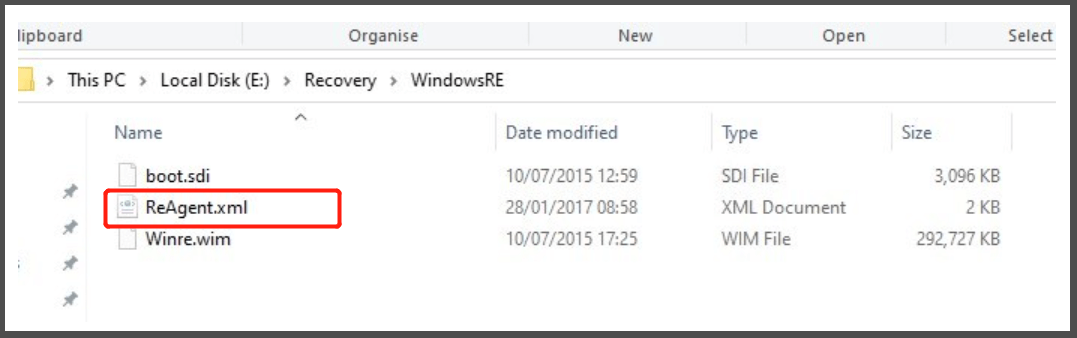
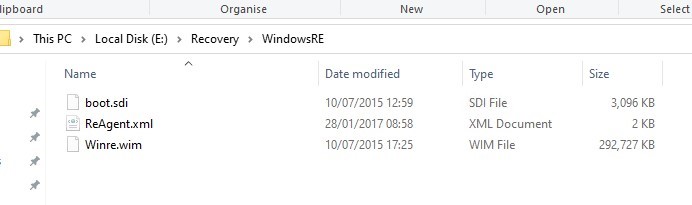
The WinRE contains 3 types of files: Winre.win, boot.sdi, and ReAgent.xml, which are stored in a hidden system Reserved Partition. The ReAgent.xml is a WinRE configuration file. If the file gets corrupted or missing, you may encounter the ReAgentc is not recognized error or some other issues.
Best Alternative to Convert MBR to GPT
As discussed above, the MBR2GPT tool doesn’t always work perfectly. Sometimes, you mat encounter some annoying errors like failed to update ReAgent xml. Under this circumstance, you can consider using a professional disk conversion tool like MiniTool Partition Wizard. It can help you convert MBR to GPT without data loss effectively.
Moreover, the MiniTool software boasts many other powerful features like rebuild MBR, convert NTFS to FAT32, convert dynamic disk to basic disk without data loss, etc. More importantly, it even can convert MBR to GPT in WinRE as well. To do so, you can use the MiniTool Partition Wizard Bootable Edition. Here’s a full guide for you.
Step 2. Insert the MiniTool bootable media into your computer, and then enter BIOS just as we explain above, set the media as the first boot order, and press F10 and Enter to save and exit the change. Then your computer will reboot with the media.
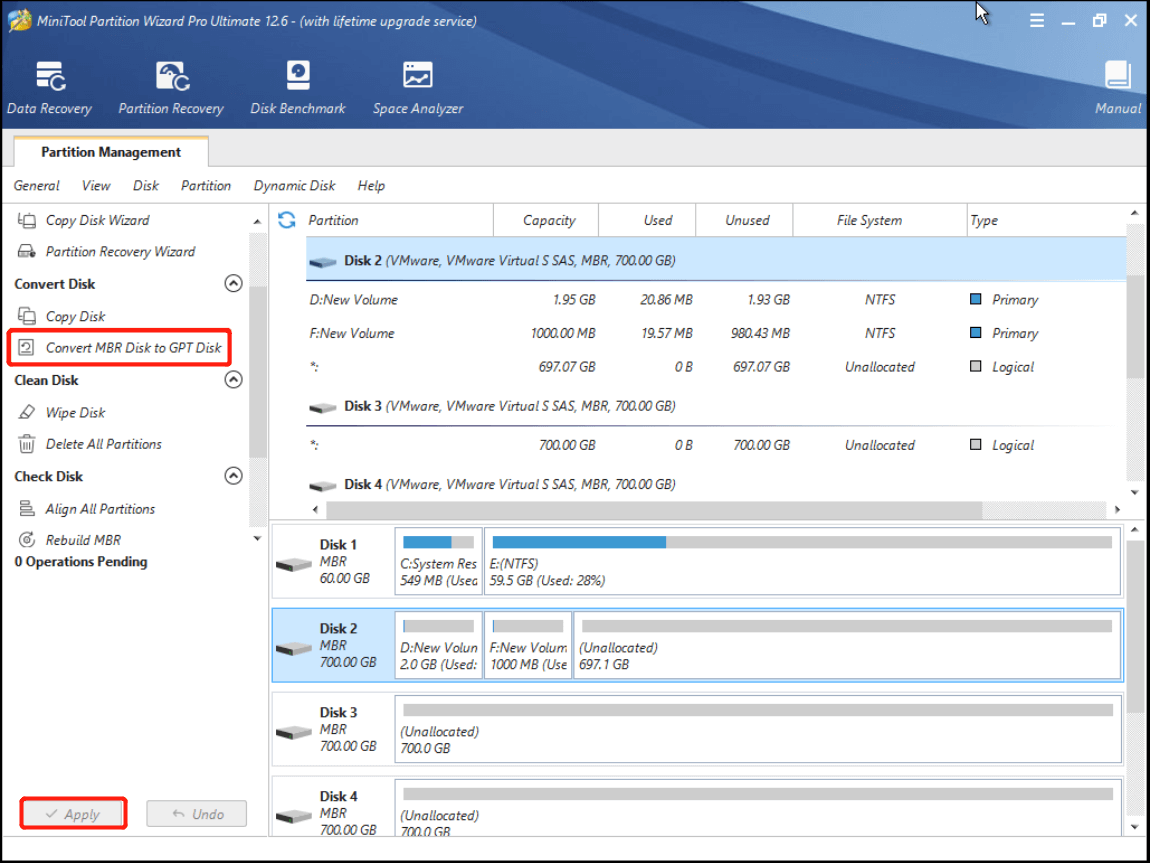
Step 3. In the main interface, select the disk that you want to convert from the disk map and click on Convert MBR Disk to GPT Disk from the left action panel.
Step 4. Click on Apply to execute the pending operation.
Step 5. Exit the MiniTool software, and then restart your system and press the F2 or Delete key at the startup screen to enter BIOS again, set your hard drive to the first boot order, and press F10 and Enter to save the change. Then your computer will restart from the selected disk.
How to Fix the Failed to Update ReAgent.xml Error on Windows 10
At present, there is still no exact reason found for the MBR2GPT failed to update ReAgent.xml error. But we summarize several proven ways to troubleshoot the problem after investigating extensive user reports from different forums and communities. Let’s start trying.
# 1. Manually Disable and Enable WinRE
As the error message suggest, you can try to manually disable and enable WinRE. This method has been proven by many users to be useful. You may have a try.
Step 1. Type cmd in the search bar, right click the Command Prompt app and select Run as administrator.
If your computer can’t boot normally due to the error, you can access Advanced Start Options window first and run Command Prompt from WinRE.
Step 2. In the elevated Command Prompt window, type the following commands in order and hit Enter after typing each one.
- reagentc /disable
- reagentc /enable
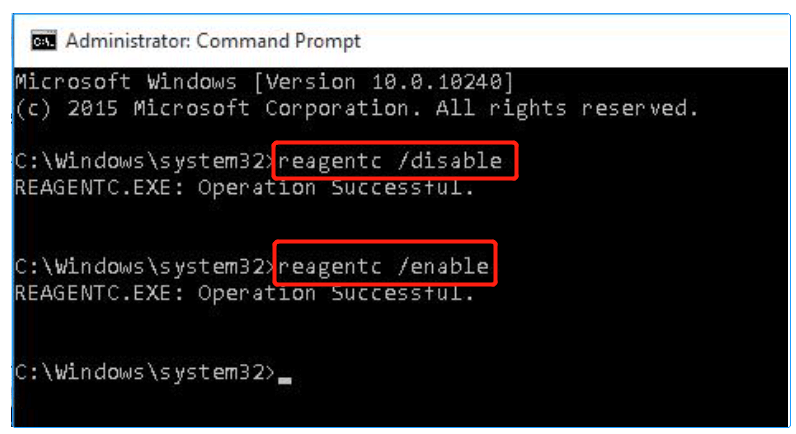
This method should fix the failed to update ReAgent.xml error. However, many users encounter new errors when enabling the WinRE. Under this situation, move down to the #2 or #3 section depending on the error you received.
# 2. Repair the Windows 10 Bootloader
If you get the REAGENTC.EXE: unable to update boot configuration data error when enabling WinRE, then it may indicated the problem with the Windows bootloader. In this case, you need to repair bootloader first and see if it works. To know more details, you can read this post “Windows 10 Bootloader Repair: Get 4 Ways from This Post Now”.
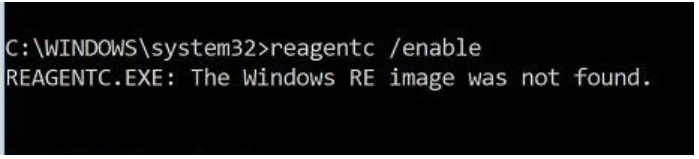
# 3. Recover the WinRE.win/ReAgent.xml File or System Recovery Partition
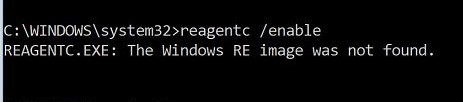
If you receive the REAGENT.EXE: The Windows RE image was not found error, the the Winre.wim/ReAgent.xml file or System Recovery partition may have been deleted mistakenly. In this case, you need to restore the file or partition.

How to recover lost file or partition on Windows 10? MiniTool Partition Wizard can do that easily. It can recover lost files from hard drive/USB/SD card/TF card but also recover the entire partition. Here’s how to use it to recover the WinRE wim file.
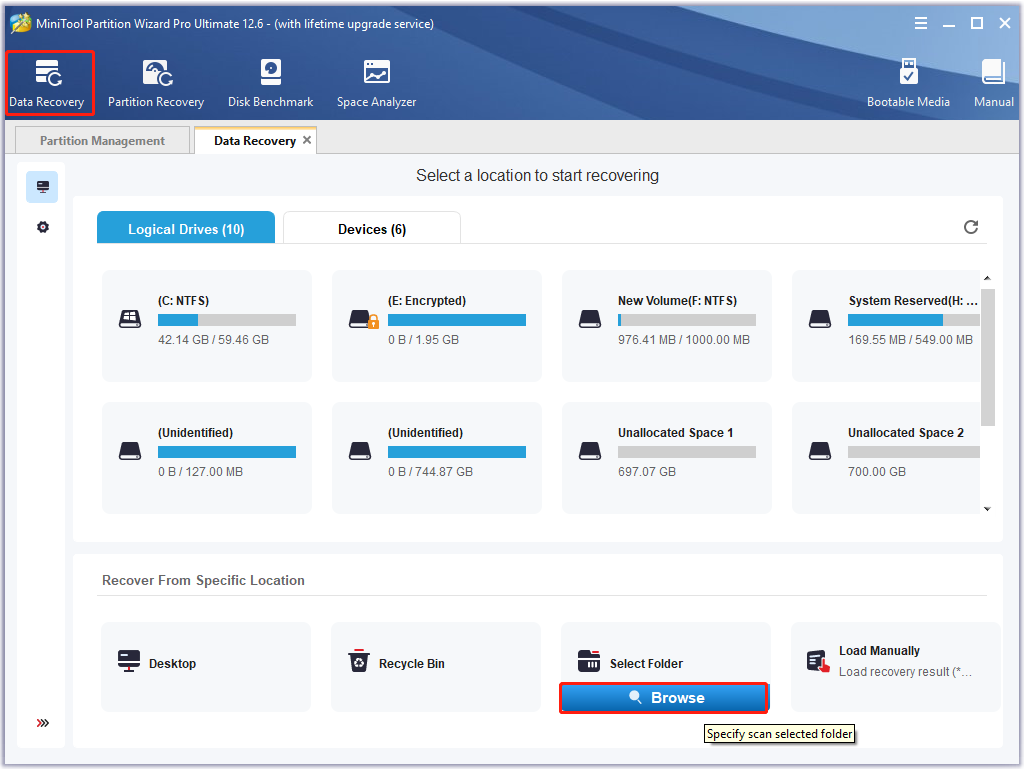
Step 1. Launch the MiniTool software to enter its main interface and click on Data Recovery from the top toolbar.
Step 2. Navigate to the “ Recover From Specific Location” tab, then click on Browse under the Select Folder section, and locate the WindowsRE folder (As we explained above, the Winre.wim/ReAgent.xml file is located in the WindowsRE folder).
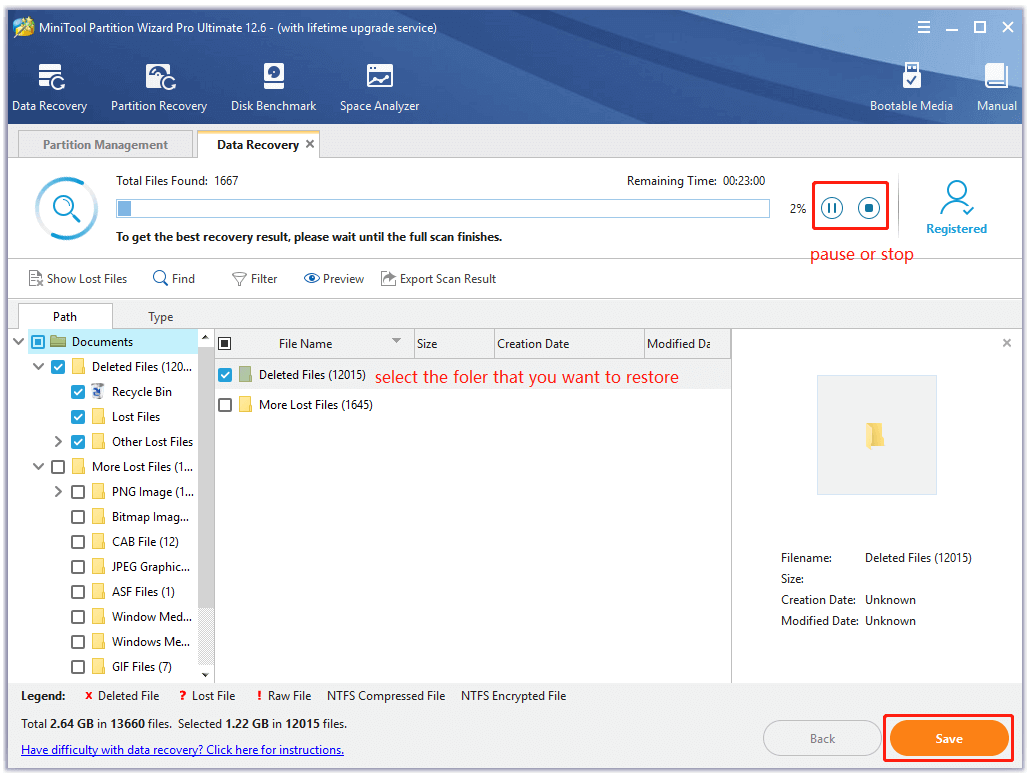
Step 3. Then wait for the scan to complete. Also, you can click on Pause or Stop to suspend the scanning process if you find the lost file.
Step 4. Make sure to tick the checkbox of the deleted folder/file and click on Save>.
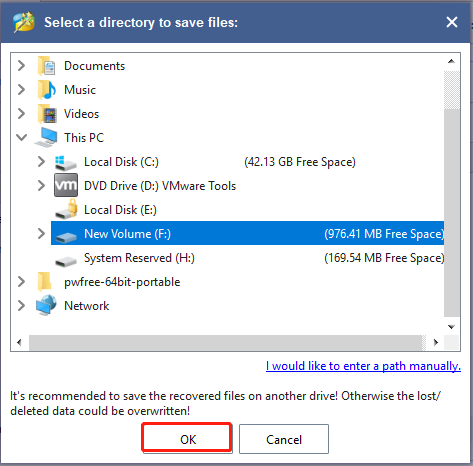
Step 5. In the pop-up window, select a location to save the selected files/folders and click on OK to confirm this operation.
It is recommended to save the recovered files on another drive. Otherwise, the lost/deleted data could be overwritten.
To recover the deleted recovery partition, you can refer to this guide.
![[Fixed] The Boot Configuration Data Store Could Not Be Opened](https://www.partitionwizard.com/images/uploads/articles/2022/07/the-boot-configuration-data-store-could-not-be-opened/the-boot-configuration-data-store-could-not-be-opened-thumbnail.png)
Have you come across the boot configuration data store could not be opened error? Don’t worry. This post summarizes several effective troubleshooting methods.
# 4. Check the BCD Entries in WinRE
Boot Configuration Data (BCD) store is a vital important Windows component where the Windows boot options are stored based on BIOS or UEFI boot mode computers. If the BCD doesn’t contain entries to boot in the WinRE, you may encounter the ReAgentc is not recognized issue. Here you can follow the steps below set an entry point in BCD.
Step 1. Open the elevated Command Prompt window again like Step 1 in # 1.
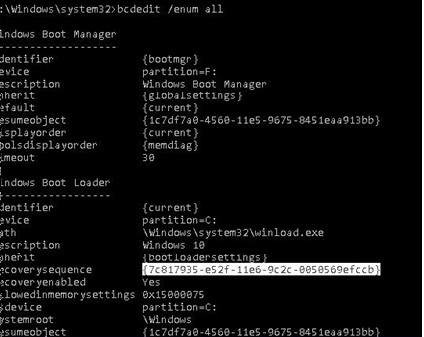
Step 2. Type the following command and hit Enter to display the current BCD entries in your PC. Then locate the Windows Boot Loader section with the identifier= from the listed options.
bcdedit /enum all
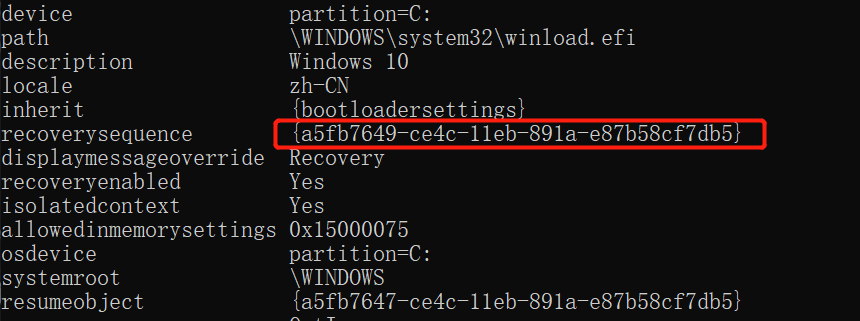
Step 3. Find and write down the GUID value of the recoverysequence attribute under the Windows Boot Loader section. In my case, the value is .
Step 4. Scroll down to the next Windows Boot Loader section, you should find the value of identifier is equal to the GUID value you just got from the recoverysequence section. And the description section should display Windows Recovery Environment. The entry should look like this:
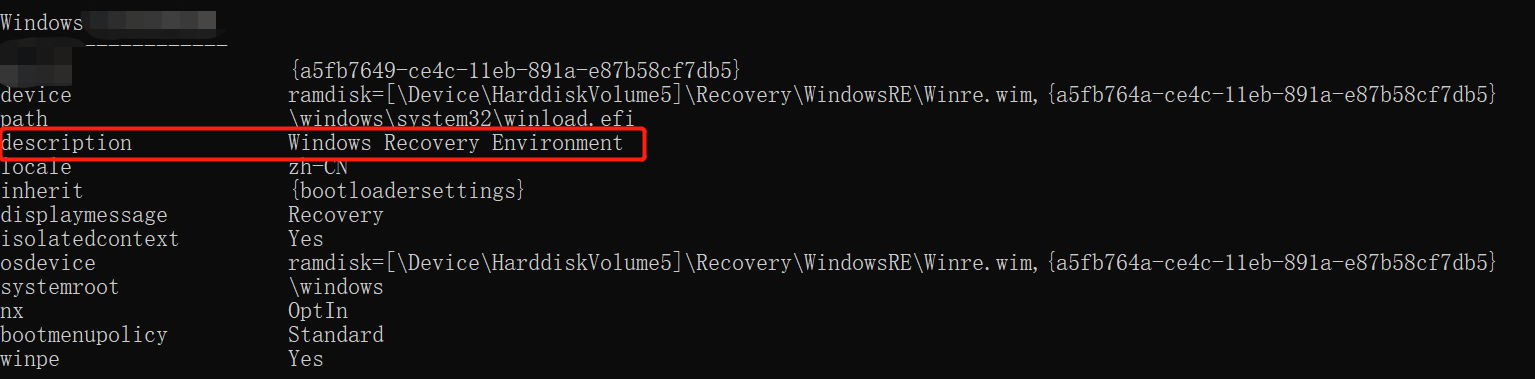
Note: If you can’t find the entry we showed above, you can look for another BCD record with another GUID as an identifier and Windows Recovery Environment in the description section, which contains the path to Winre.wim in the device and osdevice values.
Step 5. You can link the entry to boot WinRE as the recovery environment for the current OS. Type the following command and hit Enter. In my example, it should be bcdedit /set
bcdedit /set
If you are using a computer with multiboot systems, note that each OS adds its own WinRE entry to the Microsoft Boot Manager. So, it’s important to keep them intact.
# 5. Check the Path of the Winre.wim File
Make sure that the Winre.wim file should be located in one of the following locations. If not, you may encounter the ReAgent unable to update boot configuration data and MBR2GPT conversion errors.
- C:\Windows\System32\Recovery\WindowsRE
- Separate hidden system reserved partition
- Factory OEM recovery partition
In addition, check if the Winre.wim file specified in ReAgent.xml is also located in the C:\Windows\System32\Recovery\WindowsRE path. Then right click the file and select Open with notepad or other text editor to check the value of <ImageLocation path= attribute. If it doesn’t exist, you can change the path to <ImageLocation path=”\Recovery\WindowsRE”in the editor, and create the folder C:\Recovery\WindowsRE and move the winre.wim file to it. Then you can disable and enable WinRE again like #1.
# 6. Reset the WinRE Settings
If none above the methods can fix the MBR2GPT failed to update ReAgent.xml error, you can try resetting the WinRE settings in the ReAgent.xml file. Here’s how:
Step 1. Make sure to back up the ReAgent.xml file beforehand to avoid any unexpected errors.
Step 2. On Windows 10, press Win + E keys to open the File Explorer and delete the ReAgent.xml file.
Step 3. Open the elevated Command Prompt again, run the reagentc /enable” command and the ReAgent.xml file will be created automatically.
Have a Try Now
Here comes the end of this post. If you have any better solutions to the “ failed to update ReAgent xml” error, please share us in the following comment area. Also, you can contact us via [email protected] if you have difficulty using MiniTool Partition Wizard.
About The Author
Ariel is an enthusiastic IT columnist focusing on partition management, data recovery, and Windows issues. She has helped users fix various problems like PS4 corrupted disk, unexpected store exception error, the green screen of death error, etc. If you are searching for methods to optimize your storage device and restore lost data from different storage devices, then Ariel can provide reliable solutions for these issues.
Невозможно найти среду восстановления Windows 10 — что делать?

Обычно с сообщением «Невозможно найти среду восстановления» пользователи сталкиваются при попытке выполнить сброс системы на заводские настройки (автоматическое восстановление Windows 10): обычно это говорит о том, что был удален или поврежден раздел с Windows RE либо среда восстановления отключена. Также, при отсутствующей среде восстановления, вы не увидите ряда пунктов, связанных с устранением неполадок в особых вариантах загрузки.
В этой инструкции о том, как исправить проблему несколькими способами и восстановить среду восстановления Windows 10 (Windows Recovery Environment), а также дополнительная информация о запуске среды восстановления с загрузочного диска или флешки.
Восстанавливаем среду восстановления
Если по той или иной причине Windows 10 сообщает о том, что не удается найти среду восстановления, мы можем попробовать: включить её или восстановить.
Если вы не удаляли раздел восстановления с жесткого диска, вполне возможно достаточным окажется простое включение Windows RE:

-
.
- Введите команду reagentc /enable и нажмите Enter (учтите, что иногда выполнение команды «подвисает» на некоторое время).
- В результате вы получите либо сообщение «Операция выполнена успешно», либо сообщение о том, что «Образ среды восстановления не найден».
Если вам повезло, и итогом стал первый результат, делать что-либо ещё обычно не требуется. Если же образ среды восстановления не найден, приступим к его поиску и восстановлению:
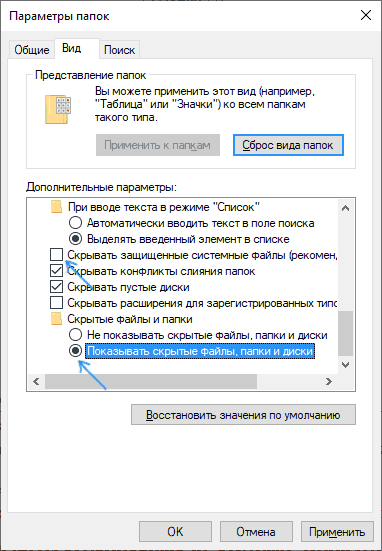
- Откройте проводник, включите показ скрытых файлов и отключите скрытие защищенных системных файлов: это можно сделать в меню «Вид» — «Параметры» — «Изменить параметры папок и поиска» — вкладка «Вид», снять отметку «Скрывать защищенные системные файлы», установить отметку «Показывать скрытые файлы, папки и диски».
- Зайдите в папку C:\Windows\System32\Recovery и проверьте, присутствует ли в ней файл Winre.wim. Если да — перейдите к 6-му шагу.
- При отсутствии файла, смонтируйте в системе образ ISO с Windows 10 (при отсутствии, вы можете скачать ISO Windows 10 с официального сайта Майкрософт), либо подключите флешку/диск с Windows 10.
- На смонтированном диске или подключённой флешке в папке «sources» найдите файл install.wim или install.esd, откройте его с помощью архиватора. Например, такие файлы умеет открывать бесплатный архиватор 7-Zip.
- Внутри этого файла перейдите к папке Windows\System32\Recovery (или 1\Windows\System32\Recovery\) и извлеките из него файл Winre.wim. Скопируйте его в C:\Windows\System32\Recovery на вашем компьютере.
- Запустите командную строку от имени администратора и по порядку введите следующие две команды:
В этот раз, вероятнее всего всё пройдет успешно, а сообщений о том, что невозможно найти среду восстановления Windows 10 вы больше не получите. При необходимости, снова отключите показ скрытых и системных файлов в параметрах проводники.
Это не единственный способ восстановления, но, возможно, самый быстрый и работающий в большинстве случаев.
Еще один способ исправить среду восстановления Windows 10, если она не была удалена с компьютера или ноутбука
Дополнительный метод, который может оказаться работоспособным в случае повреждений BCD или файловой системы на скрытом разделе со средой восстановления (при условии, что вы не удаляли этот раздел) состоит из следующих этапов:
- Запустите командную строку от имени администратора и введите команду bcdedit /enum all
- В выдаче команды найдите пункт recoverysequence, нам требуется его буквенно-цифровой идентификатор GUID.

- Найдите раздел, где в поле description указано «Windows Recovery Environment» (именно так, а не просто «Windows Recovery» и сравните его идентификатор с GUID из 2-го шага.
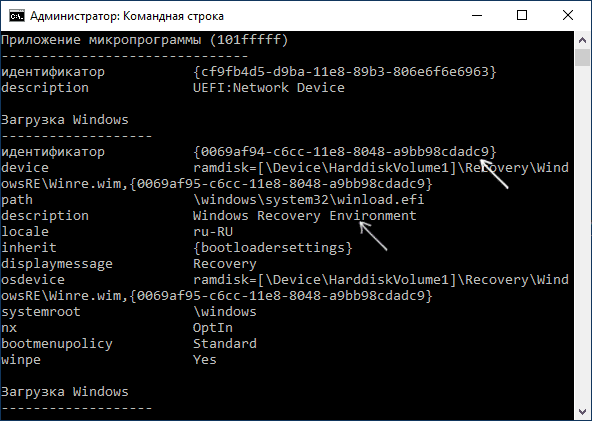
- Если они не совпадают, введите две команды (фигурные скобки в первой обязательны):Если вторая команда завершилась успехом, среда восстановления снова работает.
- Если они совпадают, то в разделе из 3-го шага обратите внимание на пункт «device» в разделе из 3-го шага. Он может строго указывать букву диска и путь к файлу Winre.wim, либо иметь путь вида \Device\HarddiskVolume1\ (номер раздела или Volume может отличаться). В первом случае перейдите к шагу 8 и используйте букву раздела (в примере будет использоваться Z).
- Зайдите в управление дисками Windows (Win+R, ввести diskmgmt.msc) и убедитесь, что раздел с указанным номером присутствует и не имеет буквы.
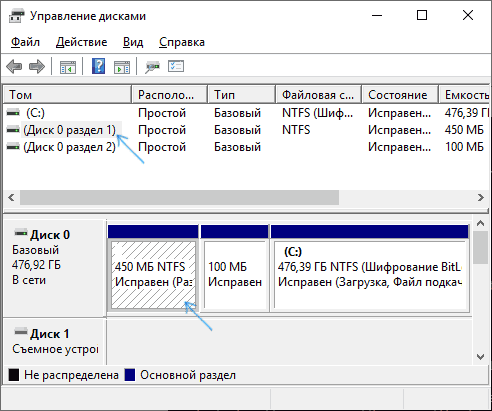
- При пути вида \Device\HardidskVolume_номер\ назначьте разделу диска с этим номером букву с помощью Diskpart (пример приводится для раздела с номером 1, у вас он может быть другим, присваивается буква Z, может быть любая другая, свободная в системе):
- Выполните проверку файловой системы раздела со средой восстановления, используя команду (букву диска замените на свою, в примере — Z): chkdsk Z: /f /r /x
- Если в результате выполнения оказалось, что ошибки на диске были найдены и исправлены: переместите файл ReAgent.xml из папки C:\Windows\System32\Recovery в другое расположение (на всякий случай не удаляйте его: он должен снова создаться автоматически, но в случае проблем, просто восстановите его из расположения, куда он был перемещен), а затем используйте команду reagentc /enable в командной строке от имени администратора для включения среды восстановления. Если она была выполнена успешно, среда восстановления должна работать.
После попытки исправления, если вы присваивали букву скрытому разделу со средой восстановления, её можно удалить используя команды из 7-го шага, но вместо последней команды — remove letter=Z (со своей буквой).
Использование среды восстановления с загрузочного накопителя
Существует способ запустить среду восстановления при её отсутствии на компьютере — использовать загрузочную флешку Windows 10 или диск восстановления Windows 10, причем их можно создать и на другом компьютере с такой же ОС (разрядность должна совпадать).
Далее — пример запуска среды восстановления и сброса Windows 10 с загрузочной флешки (при использовании диска восстановления вы сразу приступите к 3-му шагу):
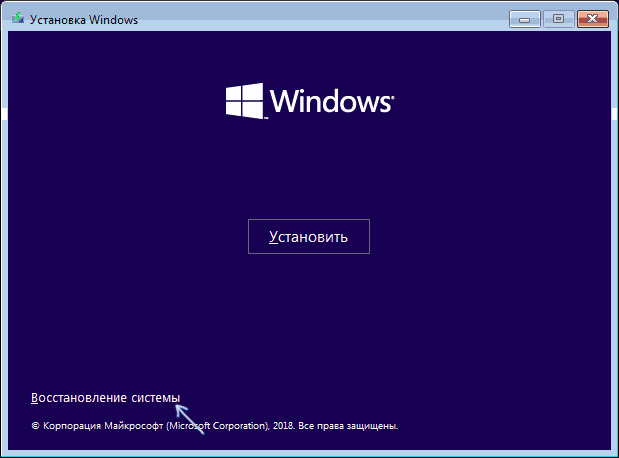
- Загрузитесь с загрузочной флешки Windows 10, на первом экране нажмите «Далее».
- В следующем окне программы установки внизу слева нажмите «Восстановление системы».
Откроется экран среды восстановления. Однако, некоторые пункты (например, «Вернуть компьютер в исходное состояние») в ней может отсутствовать. Дополнительные полезные инструкции на тему в материале: Восстановление Windows 10.
А вдруг и это будет интересно:
18.04.2019 в 13:33
Добрый день, Дмитрий! Всё, что изложено Вами в статье, можно ли использовать к Windows 8.1?
18.04.2019 в 13:36
Здравствуйте.
Перепроверить сейчас не могу, но почти точно — да, системы практически одинаковы в этом плане.
18.04.2019 в 15:23
При вводе reagentc/enable не распознает пишет неизвестная команда
19.04.2019 в 12:18
У вас отсутствует пробел после reagentc
25.04.2019 в 15:29
При вводе команд reagentc выходит ошибка REAGENTC.EXE: сбой операции: 3 REAGENTC.EXE: произошла ошибка.
25.04.2019 в 16:28
Здравствуйте.
Сам не сталкивался, но пишут, что при поврежденных системных файлах такое происходит, либо при поврежденных файлах среды восстановления. Проверьте целостность системных файлов Windows.
21.09.2019 в 10:15
Здравствуйте. При архивации системы пропал раздел восстановления, раньше было: система, раздел восстановления, диск Д. В управлении дисков он имеется. Что можно сделать, будет ли работать восстановление системы?
21.09.2019 в 11:08
Здравствуйте. Да, должен работать. По идее он и должен быть скрыт, т.е. то что вы его раньше видели в проводнике — как раз это неправильно.
12.11.2019 в 14:49
reagentc /enable не удалось обновить данные конфигурации загрузки.
26.12.2020 в 13:44
В моем случае помогло восстановление системных файлов:
dism /Online /Cleanup-Image /RestoreHealth — восстанавливает хранилище
sfc /scannow — восстанавливает файлы из хранилища
18.01.2020 в 20:27
Большое спасибо! Мне повезло, и сработал первый вариант
11.02.2020 в 14:51
у меня в место windows recovery environment
Диспетчер загрузки Windows
(копии кода и т.п.)
но при этом на диске есть выделеное место под среду востановления
ноутбук xiaomi с переустановленой виндой home sl(китай) на home sl рус
что можно сделать
11.02.2020 в 17:09
Вообще, я посмотрел ваши следующие комменты (я их потер, чтобы тут не были страницы кода) и выглядит так, как будто вообще всё в порядке и GUID среды восстановления
Другое дело что странно, что она у вас два раза в загрузке указана с разными путями — один относительный (на томе 4), другой конкретный — на диске C.
Так или иначе, посмотрите на системном диске (судя по всему не на скрытом, а на обычном C, он там ищет в вашем случае) есть ли файл Recovery\WindowsRE\Winre.wim (может быть скрытым и системным)
18.03.2020 в 10:17
Windows 10 Pro версии 1909, в конфигурации загрузчика вообще нет записи Windows Recovery Environment, а в основной записи (id=
В папке %windir%\Recovery расположен аналогичный файлы ReAgent.xml, но какой-то более пустой:
И это с магазина (с предпродажной подготовкой, так как заливается образ для организации с набором сторонних приложений), какой-то глючный ПК подсунули и решил вернуть ОС к начальному состоянию, а среда восстановления не работает.
Я сделал следующее.
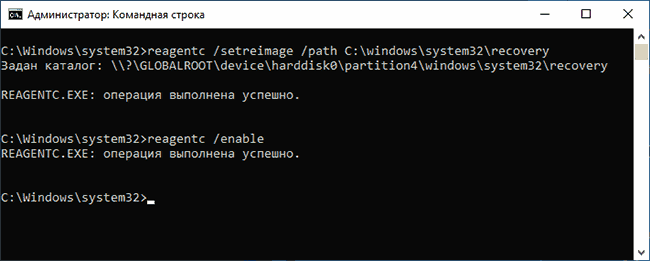
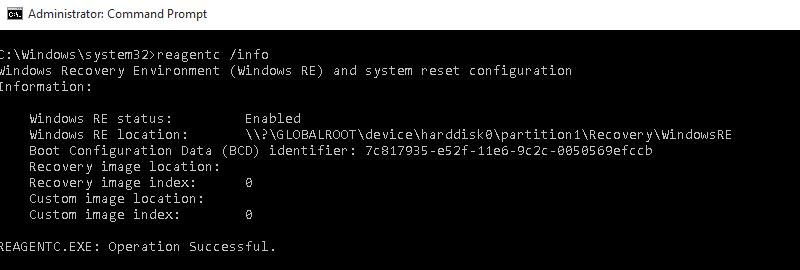
Команда reagentc /info (с административными привилегиями) показала, что среда восстановления отключена, прописан только GUID, но не прописано расположения образа среды восстановление. Команда reagentc /enable не эффективна. На этом этапе я добавил информацию о расположении образа среды восстановления командой reagentc /setreimage /path \Recovery\WindowsRE. Затем я выяснил GUID загрузки ОС (именно основной записи загрузчика, указывающей на загрузку ОС, а не среды восстановления) командой bcdedit /enum /v, и включил среду восстановления с указанием GUID загрузки ОС:
reagentc /enable /osguid
Расположение среды восстановления Windows: \\?\GLOBALROOT\device\harddisk0\partition4\Recovery\WindowsRE
Идентификатор данных конфигурации загрузки: ea301191-1141-11ea-810d-8a483521d9d0
И оба файла ReAgent.xml перезаписались с новыми GUID.
18.03.2020 в 10:19
Учитывая разное расположение образа среды восстановления (видимо, в разных версиях ОС) стоит, наверное, статью актуализовать, ну и можно дополнить возможностями reagentc.
How to Use and Repair Windows Recovery Environment (WinRE) on Windows 10?
Windows Recovery Environment (WinRE) is the minimal OS based on Windows Preinstallation Environment (WinPE) which includes a number of tools to repair, reset and diagnose Windows. If the main host OS doesn’t boot for any reason, the computer tries to start WinRE, which may help to resolve the issues manually or automatically. In WinRE, you can automatically fix the bootloader, restore the OS from an image backup, roll back to a system restore point, run a command prompt, etc.
Windows RE consists of three files, which are located in a hidden System Reserved partition:
- winre.wim – WIM image with WinPE and several additional recovery tools;
- boot.sdi – used to create a RAM disk in memory;
- ReAgent.xml — WindowsRE configuration file.
In this article, we’ll show you how to boot your computer into WinRE, and how to repair the Windows 10 recovery environment if it doesn’t work.
How to Boot Windows into the Recovery Environment?
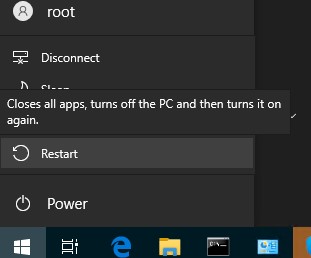
In order to boot your computer into the recovery environment the next time you restart Windows, you need to press the Restart button in the Start menu while holding down the Shift key.
You can also reboot the computer in WinRE mode from the command prompt using the new -o parameter of the shutdown command:
shutdown /f /r /o /t 0

There is also another command to force the entry into the recovery environment at the next computer boot:
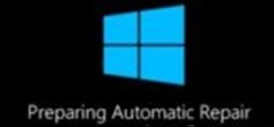
The computer automatically boots into the Windows Recovery Environment if three previous attempts to boot Windows normally have failed. In order to boot your computer into WinRE, it is enough to interrupt the normal Windows boot with the power button 3 times in a row.
WinRE Repair and Troubleshooting Tools
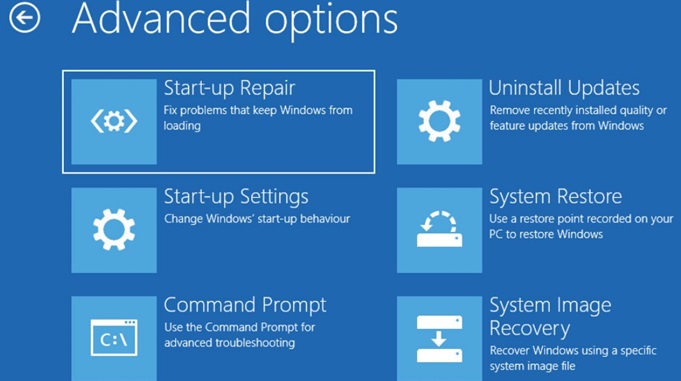
There are several recovery and troubleshooting tools available in WinRE recovery environment to help you fix various Windows problems. WinRE on Windows 10 includes the following tools:
- Reset this PC – allows you to reset your Windows to factory settings (personal data and files will be deleted);
- System Restore – allows you to restore the state of Windows using a previously created restore point;
- System Image Recovery – allows to restore Windows from a full image backup on external media;
- Automatic Repair/Start-up Repair – Windows tries to automatically find and fix possible problems (the wizard can independently repair the bootloader, BCD configuration and MBR (Master Boot Record);
- Windows Startup Settings – allows you to select various Windows boot scenarios: Safe Mode, disable driver digital signature enforcement, disable automatic restart on system failure (this is the only way to see the BSOD error code on the Windows boot screen),etc.;
- Uninstall Updates – allows to remove the recently installed updates (useful if Windows doesn’t boot after installing updates);
- Go back to the previous version – allows you to roll back to the previous Windows 10 build;
- Command Prompt – run command line to manually run diagnostic and repair commands.
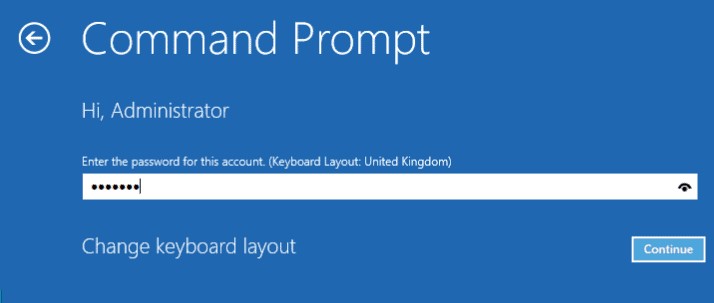
If you want to run a command prompt or other error fixing tool, WinRE will ask you for the password of the local administrator account (the password will be compared with the data in the local SAM database).
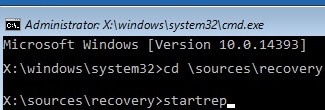
You should see a command prompt window X:\Windows\System32>.
From the command line, you can check the disk with the chkdsk tool, check and repair the Windows image using sfc.exe or DISM, run regedit.exe , bootrec.exe , startrep.exe (this tools allows you to find and fix problems with the registry, drivers, partitions, etc.) and other commands (there are quite a few articles on the site where we show how to fix various Windows problems in the recovery environment or WinPE).
To close the WinRE command prompt and return to the boot mode selection, run the command:
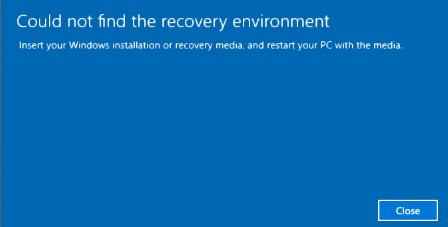
Could not Find the Recovery Environment in Windows 10
In some cases, the computer can’t boot into the Windows Recovery Environment. If you try to reset the Windows, or boot into recovery mode, you may see errors like “ Could not find the recovery environment ”. This means that the partition with the WinRE or the .wim file of the recovery environment has been deleted/damaged; either ReAgent or BCD is not configured correctly.
The reasons why the WinRE environment stops booting or does not work correctly can be different:
- The WinRE is disabled in Windows settings;
- The Boot Configuration Data Store (BCD) doesn’t contain entries to boot in recovery mode;
- The file winre.wim (WinRE environment image) is missing or moved;
- The WinRE configuration file ReAgent.xml is missing or contains incorrect settings.
Next, we will look at the main ways to restore the WinRE environment in Windows 10 (for Windows 7 and Windows 8.1, the procedure is the same).
Repairing WinRE (Windows Recovery Environment) with ReAgentc Tool
How to Manually Enable or Disable Windows Recovery Environment in Windows 10?
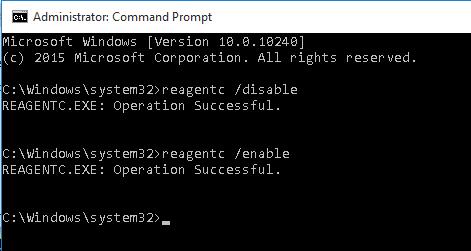
Try to disable and enable WinRE on your computer by running the following commands in the elevated command prompt:
reagentc /disable
reagentc /enable
To fix, you need to reboot and manually disable and enable WinRE.
If the error “ REAGENTC.EXE: Unable to update Boot Configuration Data ” appears, first fix the problem with the Windows bootloader (instructions for UEFI and BIOS computers).
If you receive the error message “ REAGENT.EXE: The Windows RE image was not found ”, the winre.wim file or the System Recovery partition has probably been deleted.
Check BCD Entries for WinRE
Make sure that the Boot Configuration Data (BCD) contains the correct entries to boot the WinRE environment.
Display the current BCD entries:
bcdedit /enum all
In the list of boot options, find the Windows Boot Loader section with identifier=
Find and remember the GUID value of recoverysequence attribute. In our example, it is <7c817935-e52f-11e6-9c2c-0050569efccb>.
Then you need to find the boot configuration section having the identifier value equal to the GUID value obtained earlier and having Windows Recovery Environment in the description field. This entry can look like this:
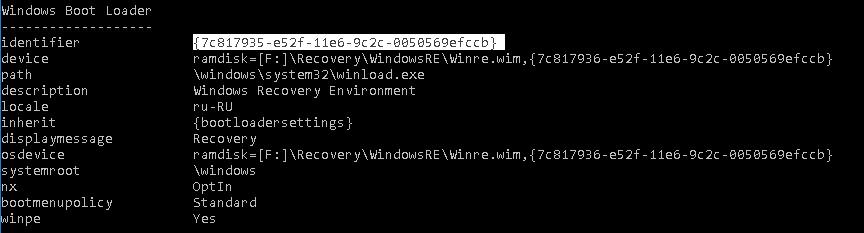
If you cannot find this entry, look for another BCD record with another GUID as an identifier and the text “Windows Recovery Environment” in the description field, which contains the path to Winre.wim in the device and osdevice values .
The path to WIM file can point to another drive (for example, [\Device\HarddiskVolume2]). If such section has been found, you can link this entry to boot WinRE as the recovery environment for the current OS. Copy the GUID of the found entry and replace it using the command:
bcdedit /set
The Location of the Winre.wim File
Make sure that Winre.wim is present in the specified location. Typically, it is stored in one of the following locations:
- Folder C:\Windows\System32\Recovery folder;
- Separate hidden System Reserved partition;
- Factory made OEM recovery partition (make sure you didn’t delete it).
In our example, it should be located on the F:\ drive (F:\Recovery\WindowsRE \Winre.wim).
Also check the path to the wim file specified in ReAgent.xml (located in C:\Windows\System32\Recovery folder or in Recovery folder on the recovery partition). Open this file in any text editor and check the value of <ImageLocation path= attribute. If the path specified doesn’t exist (the original partition has been deleted), you can change the path to <ImageLocation path=”\Recovery\WindowsRE”), create the folder C:\Recovery\WindowsRE and copy the Winre.wim to it. Disable and enable WinRE again:
reagentc /disable
reagentc /enable
Reset WinRE Settings in ReAgent.xml file
If the methods described above didn’t help you to recover WinRE, you can try to reset the recovery environment settings in ReAgent.xml file(backup this file in advance).
On Windows 10, just delete the ReAgent.xml file and it will be automatically created the next time you enable WinRE with the command:
In Windows 7/Vista, open ReAgent.xml in a text editor (it’s better to use Notepad++) and clear the values of the following parameters: WinreBCD, WinreLocation, ImageLocation, InstallState, WinREStaged:
Save the changes. Make sure that Winre.wim is present in the %windir%\System32\Recovery folder. Enable WinRE with the command:
Find and Copy the Winre.wim File Manually
If you cannot find the Winre.wim file in any of the standard folders, try locating it using your file manager or with the following command:
dir /a /s c:\winre.wim
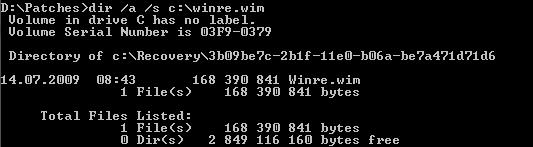
If you have found the file, copy it in to a default location using the commands: