Как установить и использовать Thonny Python IDE в Linux
Thonny — это интегрированная среда разработки (IDE) для начинающих Python. Он создан на Python и выпущен под лицензией MIT. Он кроссплатформенный и может работать в Linux, macOS, Windows.
Если вы новичок в программировании или кто-то переходит с другого языка, я предлагаю использовать thonny. Интерфейс чистый и не отвлекает. Новички могут сосредоточиться на языке, а не на настройке среды.
Некоторые из ключевых особенностей Thonny включают:
- Python 3.7 устанавливается по умолчанию вместе с программой установки Thonny.
- Встроенный отладчик и пошаговая оценка.
- Обозреватель переменных.
- Куча, Стек, Помощник, Инспектор объектов.
- Встроенная оболочка Python (Python 3.7).
- Простой графический интерфейс PIP для установки сторонних пакетов.
- Поддержка автозавершения кода.
- Подчеркивает синтаксические ошибки и объясняет области применения.
В этой статье вы узнаете, как установить и использовать Thonny Python IDE в среде Linux, а также познакомитесь с функциями thonny.
Настройка Thonny Python IDE в Linux
Последняя версия Thonny — 3.3.0, и вы можете установить thonny в Linux тремя способами.
- Используйте диспетчер пакетов Python — PIP
- Загрузите и запустите сценарий установки.
- Используйте для его установки менеджер пакетов по умолчанию.
В демонстрационных целях я использую Ubuntu 20.04 и запускаю скрипт установщика с командой wget, как показано выше, для установки thonny. В конце установки вы узнаете, где установлен thonny. В моем случае он установлен в моем домашнем каталоге.

Чтобы запустить thonny, перейдите в установленный каталог и введите «./thonny» или абсолютный путь к thonny. Thonny попросит вас установить язык и начальные настройки.

Как показано в разделе установки, Thonny устанавливается в домашний каталог. Если вы посмотрите на папку thonny, в ней есть скрипт установки, необходимые библиотеки Python для работы thonny, двоичные файлы. Внутри каталога bin находятся python 3.7 и PIP 3, которые поставляются с двоичными файлами thonny и thonny.

Как использовать Thonny IDE в Linux
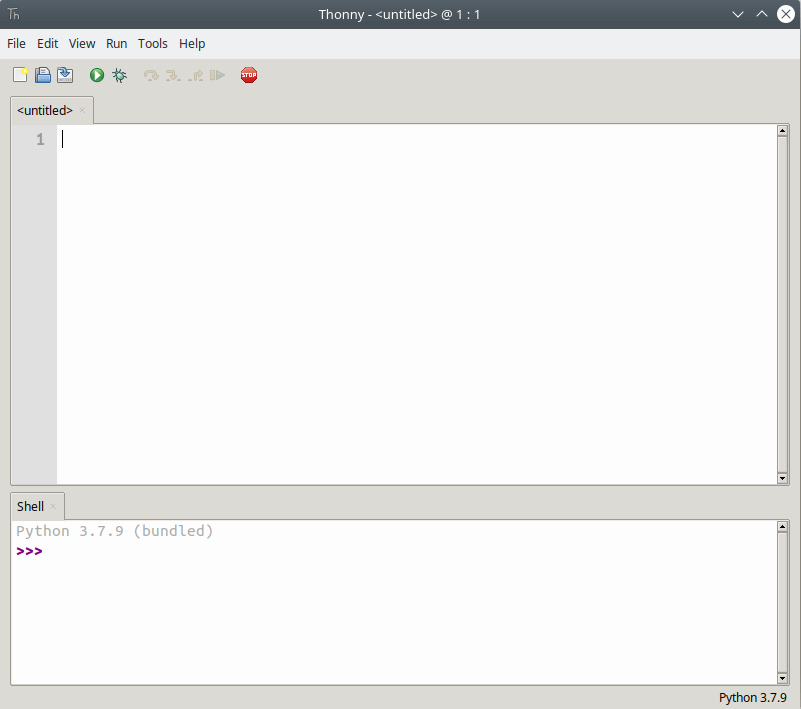
Когда вы запустите Thonny, вы получите удобный графический интерфейс. У вас будет область редактора, где вы можете кодировать и оболочку для интерактивного запуска скрипта или тестовых кодов.

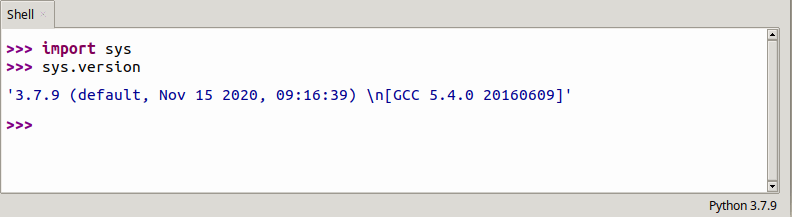
Дистрибутивы Linux по умолчанию поставляются с питоном. Более старая версия поставляется с Python2 *, а последние версии поставляются с Python3 *. Мы уже видели, что Python 3.7 установлен по умолчанию, а thonny устанавливает 3.7 в качестве интерпретатора по умолчанию.

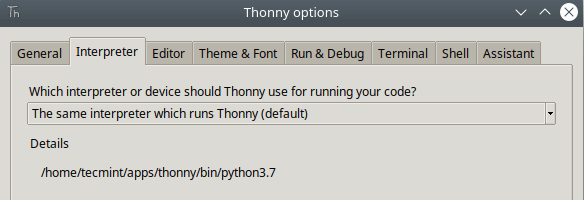
Вы можете использовать интерпретатор по умолчанию (Python 3.7) или выбрать другие интерпретаторы, доступные в системе. Перейдите в «Строка меню → Инструменты → Параметры → Интерпретатор → Установить путь» или «Строка меню → Выполнить → Выбрать переводчика → Установить путь».

Я предлагаю придерживаться установки Python по умолчанию, если вы не знаете, как это исправить, если что-то сломается при переключении интерпретатора.
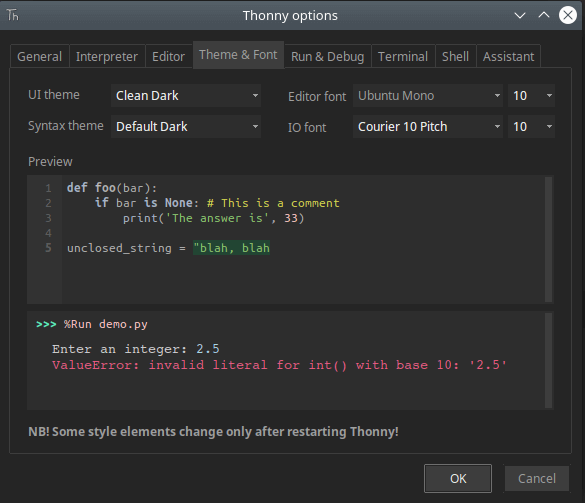
В Thonny есть светлая и темная темы. Вы можете изменить темы для редактора, а также тему пользовательского интерфейса. Чтобы изменить тему и шрифты, перейдите в «Строка меню → Инструменты → Параметры → Тема и шрифт».

Есть 3 способа запустить созданный код. Во-первых, ваш код должен быть сохранен в файл для выполнения Тонни.
- Нажмите F5 или значок «Выполнить», как показано на изображении.
- Перейдите в «Строка меню → Нажмите« Выполнить »→« Выполнить текущий сценарий »».
- Нажмите «CTRL + T» или перейдите к «Выполнить → Нажмите« Выполнить текущий скрипт в терминале »».
Первые два метода переключат каталог туда, где находится ваш код, и вызовут файл программы во встроенном терминале.

Третий вариант позволяет запускать код во внешнем терминале.

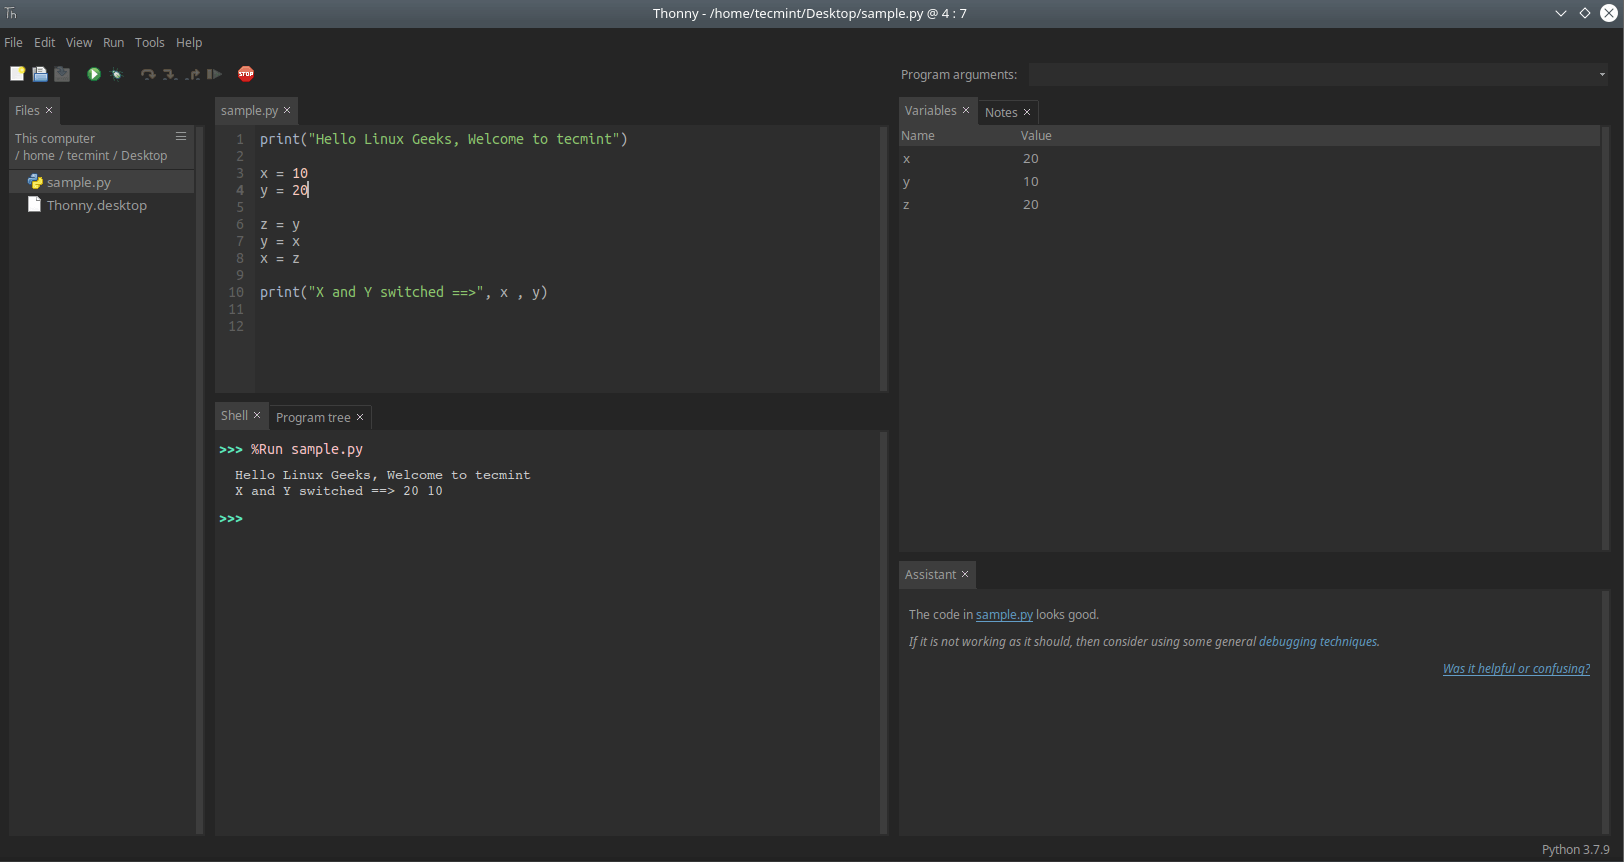
Настоящая мощь thonny заключается в встроенных функциях, таких как проводник, обозреватель переменных, оболочка, помощник, заметки, куча, структура, стек. Чтобы включить или выключить эти функции Перейдите в «Просмотр → Переключить функцию ВКЛ./ВЫКЛ.».

Известно, что все пакеты python размещены на PyPI. Обычно мы будем использовать PIP (диспетчер пакетов Python) для установки желаемых пакетов из PyPI. Но с Thonny доступен графический интерфейс для управления пакетами.
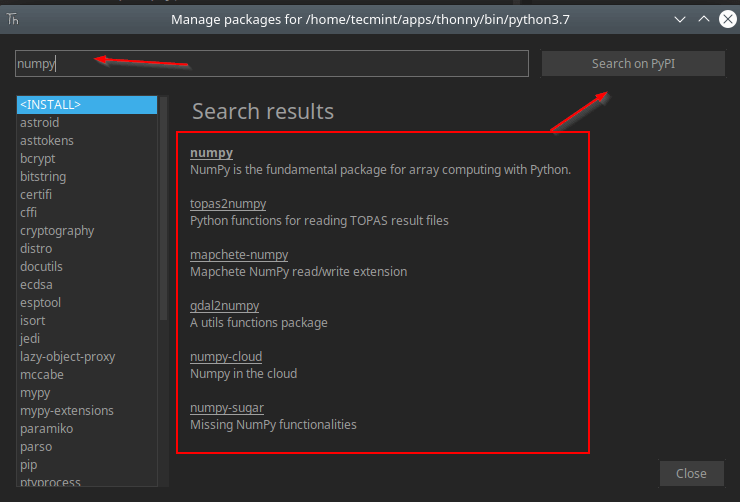
Перейдите в «Строка меню → Инструменты → Пакеты». В строке поиска вы можете ввести имя пакета и нажать поиск. Он выполнит поиск в индексе PyPI и отобразит список пакетов, соответствующих названию.
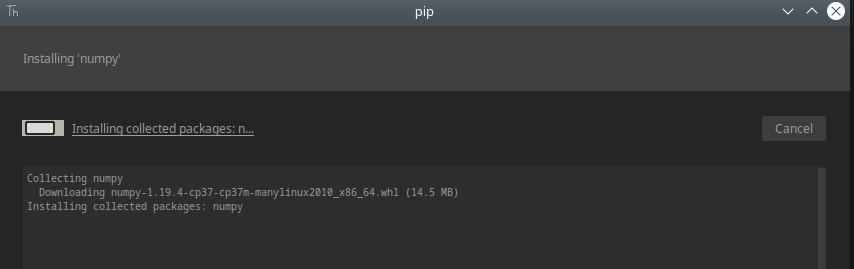
В моем случае я пытаюсь установить вызов пакета numpy.

Когда вы выберете пакет из списка, вы попадете на страницу установки. Вы можете установить последнюю версию или выбрать другие версии, как показано на изображении. Зависимости устанавливаются автоматически.

Как только вы нажмете «Установить», он установит пакет.

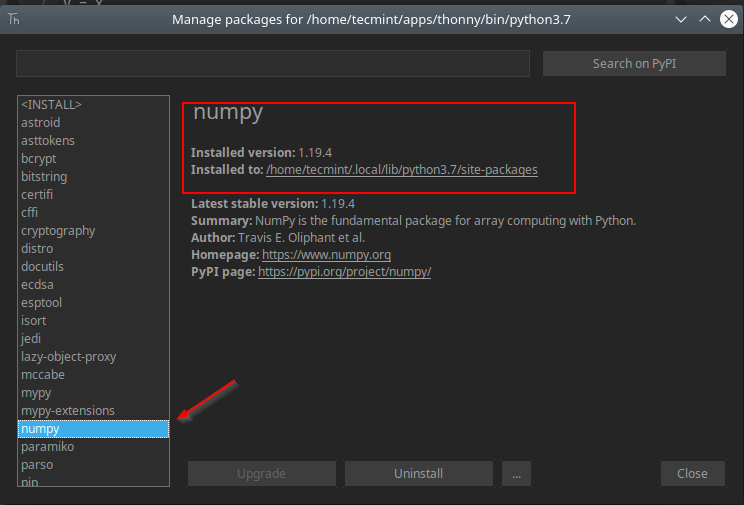
Вы можете получить подробную информацию, такую как версия пакета, расположение библиотеки после установки пакета. В случае, если вы хотите удалить пакет, это просто, нажмите кнопку «удалить» в нижней части пакета, как показано на изображении.

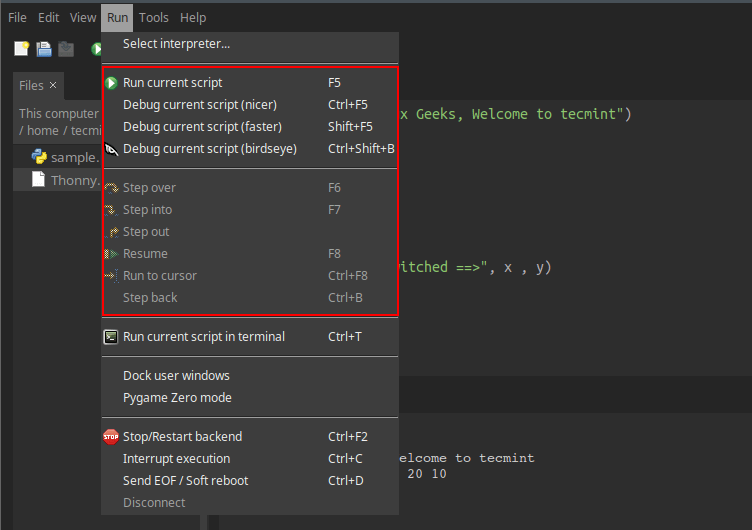
Thonny поставляется со встроенным отладчиком. Нажмите Ctrl + F5, чтобы запустить программу шаг за шагом, точки останова не требуются. Нажмите F7 для маленького шага и F6 для большего шага. Вы также можете получить доступ к этим параметрам из «Строка меню → Выполнить → Параметры отладки».

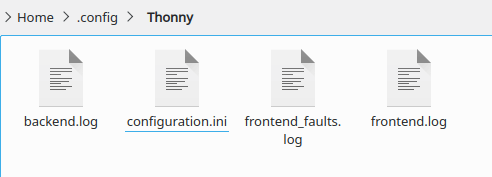
Все конфигурации хранятся в файле «configuration.ini». Любые изменения, которые вы вносите в свой thonny-сеанс, записываются в этот файл. Вы также можете вручную отредактировать этот файл, чтобы установить различные параметры.
Чтобы открыть файл, перейдите в «Строка меню → Инструменты → Открыть папку данных Thonny».

Как удалить Thonny IDE в Linux
Если вы хотите удалить thonny, в каталоге установки thonny есть сценарий удаления.
Это все для этой статьи. В Тонни есть что исследовать, помимо того, что мы обсуждали здесь. Thonny отлично подходит для новичков, но текстовый редактор всегда остается личным выбором программистов. Установите Thonny play with it, поделитесь с нами своими отзывами.
Linux
The Thonny and Python bundle should work on these Linuxes or newer:
- Mint 18 Sylvia
- Debian 9 Stretch
- Ubuntu 16.04 precise
- Opensuse 42.2
- Fedora 22
- CentOS 8.5
It may run on other distros/versions, but the requirement is that the distro should be with glibc-2.21 or newer.
If you want to install the latest bundle with default settings, then execute the following command in the terminal:
This script downloads and unpacks the installer suitable for your platform and then executes it.
Alternative installation method
If you want more control, then you can do the installation steps separately.
Download the file with tar.gz extension. If you have 64-bit x86 Linux, then use file with x86_64 suffix, otherwise use the one with i686 suffix. (Run uname -m in the terminal if you are not sure which you have). NB! Since Thonny 4.0 we only provide only 64-bit bundles for x84 Linux!.
Unpack the file and run the installation script. For example, in the Ubuntu command line you could execute the following commands:
This will install Thonny under the apps directory in your home directory. If you would like to install to a specific location, then you can specify the parent folder for the Thonny folder eg:
Execute the uninstall command shown by the installer, eg.
Installing with pip
See the Linux section in «Separate Install» (and pay attention to the tkinter part!).
Thonny’s main developers are not native English speakers. Feel free to create an issue if you spot a grammar or style error in the wiki.
Thonny
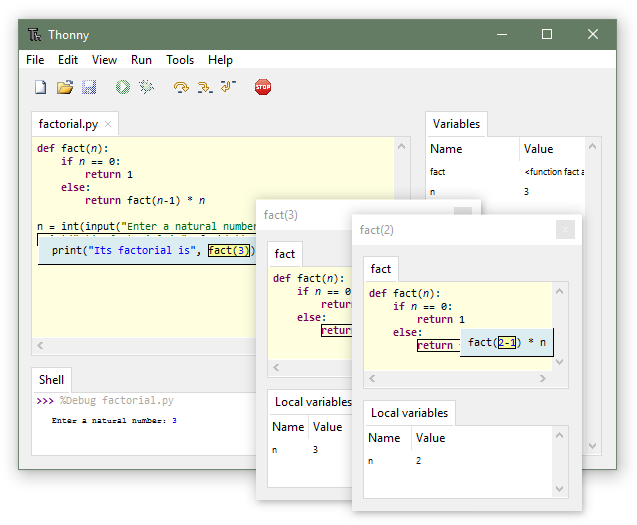
Easy to get started. Thonny comes with Python 3.10 built in, so just one simple installer is needed and you’re ready to learn programming. (You can also use a separate Python installation, if necessary.) The initial user interface is stripped of all features that may distract beginners.
No-hassle variables. Once you’re done with hello-worlds, select View → Variables and see how your programs and shell commands affect Python variables.
Simple debugger. Just press Ctrl+F5 instead of F5 and you can run your programs step-by-step, no breakpoints needed. Press F6 for a big step and F7 for a small step. Steps follow program structure, not just code lines.
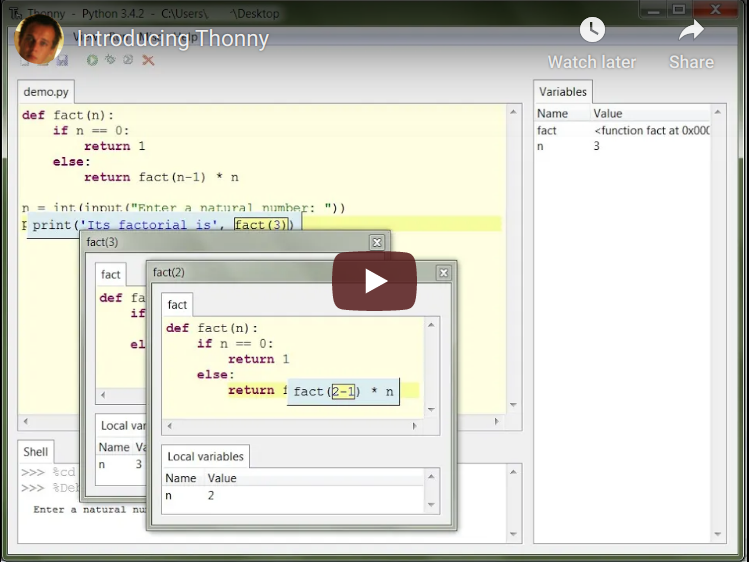
Step through expression evaluation. If you use small steps, then you can even see how Python evaluates your expressions. You can think of this light-blue box as a piece of paper where Python replaces subexpressions with their values, piece-by-piece.
Faithful representation of function calls. Stepping into a function call opens a new window with separate local variables table and code pointer. Good understanding of how function calls work is especially important for understanding recursion.
Highlights syntax errors. Unclosed quotes and parentheses are the most common beginners’ syntax errors. Thonny’s editor makes these easy to spot.
Explains scopes. Highlighting variable occurrences reminds you that the same name doesn’t always mean the same variable and helps spotting typos. Local variables are visually distinguished from globals.
Mode for explaining references. Variables are initially presented according to simplified model (name → value) but you can switch to more realistic model (name → address/id → value).
Code completion. Students can explore APIs with the help of code completion.
Beginner friendly system shell. Select Tools → Open system shell to install extra packages or learn handling Python on command line. PATH and conflicts with other Python interpreters are taken care of by Thonny.
Simple and clean pip GUI. Select Tools → Manage packages for even easier installation of 3rd party packages.
Credits

From 2014 to 2018 the main development of Thonny took place in Institute of Computer Science of University of Tartu, Estonia.
Since September 2018 development of Thonny is partially supported by Cybernetica AS.

Development of several features in Thonny 3.0 and 3.3 was proposed and supported by Raspberry Pi Foundation.
How to Install and Use Thonny Python IDE on Linux
Thonny is an Integrated Development Environment (IDE) for Python beginners. It is created with Python and released under MIT License. It is cross-platform and can run in Linux, macOS, Windows.
Why Thonny IDE
If you are new to programming or someone switching from a different language I suggest using thonny. The interface is clean and distraction-free. Newbies can concentrate on language instead of focusing on setting up the environment.
Some of the key features of thonny include
- Python 3.7 is installed by default with Thonny setup.
- Built-in Debugger and Step through evaluation.
- Variable Explorer.
- Heap, Stack, Assistant, Object Inspector.
- Built-in Python shell (Python 3.7).
- Simple PIP GUI Interface to install 3rd party packages.
- Support code completion.
- Highlights syntax errors and explain scopes.
In this article, you will learn how to install and use Thonny Python IDE in a Linux environment and exploring the features of thonny.
Setting Up Thonny Python IDE on Linux
The latest version of Thonny is 3.3.0 and there are three ways you can install thonny in Linux.
- Use Python package manager – PIP
- Download and run the install script
- Use default package manager to install it
Install Thonny IDE Using Pip
Install Thonny IDE Using Installer Script
Install Thonny IDE Using Package Manager
For demonstration purposes, I am using Ubuntu 20.04 and running the installer script with wget command as shown above to install thonny. At the end of the installation, you will come to know where is thonny installed. In my case, it is installed in my home directory.

To launch thonny, go to the installed directory and type “./thonny” or absolute path to thonny. Thonny will ask you to set up Language and Initial settings.
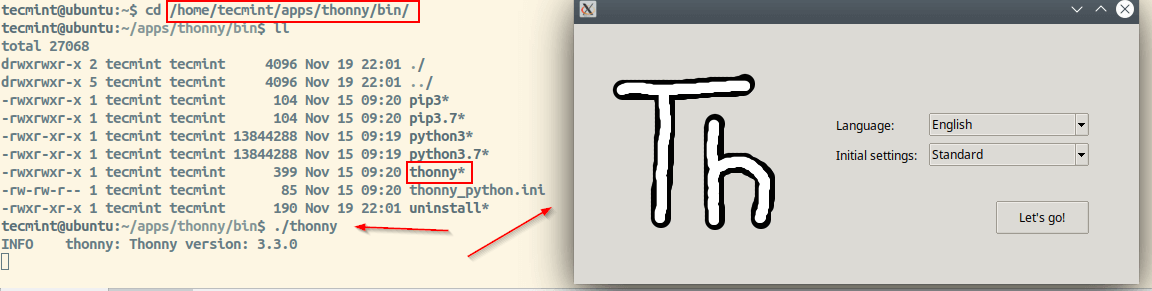
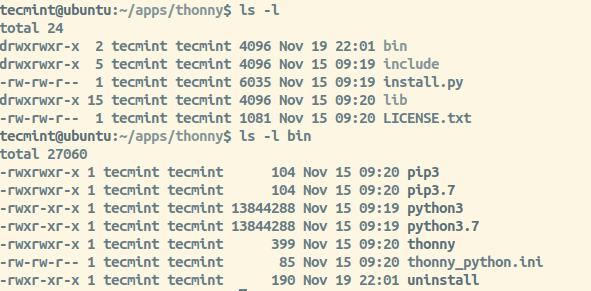
As shown in the installation section, Thonny is installed in the home directory. If you look at the thonny folder it has install script, necessary python libraries for thonny to work, binaries. Inside the bin directory, there is python 3.7 and PIP 3 that comes with thonny and thonny launch binary.
How to Use Thonny IDE in Linux
When you launch Thonny you will get a distraction-free GUI interface. You will have an editor area where you can code and shell to run the script or test codes interactively.
Linux distributions by default ships with python. Older version ships with Python2* and the latest versions ship with Python3*. We have already seen Python 3.7 is installed by default and thonny sets 3.7 as the default interpreter.
You can stick with the default interpreter (Python 3.7) or choose different interpreters available on the system. Go to “Menu Bar → Tools → Options → Interpreter → Set the path” or “Menu Bar → Run → Select Interpreter → Set the path”.
I suggest sticking with the default python installation unless you know how to fix it if something breaks when switching the interpreter.
Thonny comes with Light and Dark themes. You can change themes for Editor as well as UI theme. To change Theme and Fonts Go to “Menu Bar → Tools → Options → Theme & Font”.
There are 3 ways you can run the code you created. First, your code should be saved to a file for Thonny to execute.
- Press F5 or Execute Icon as shown in Image.
- Go to “Menu Bar → Press Run → Run Current Script”.
- Press “CTRL+T” or Go to “Run → Press Run current script in terminal”.
The first two methods will switch the directory to wherever your code is and invoke the program file in the Built-in terminal.
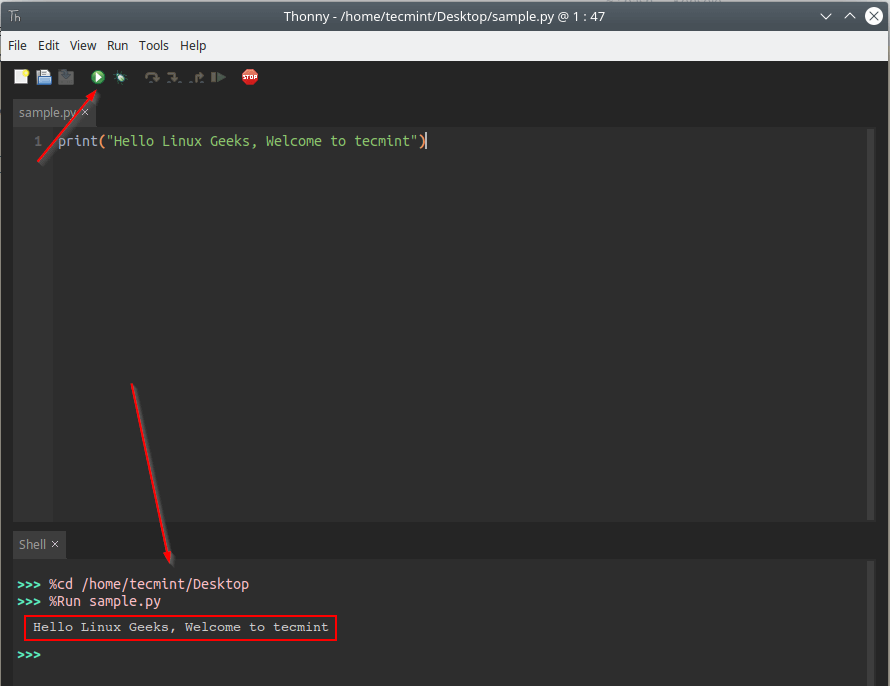
The third option allows you to run your code in an external terminal.

The real power of thonny comes with built-in features like File Explorer, Variable Explorer, Shell, Assistant, Notes, Heap, Outline, Stack. To Toggle on-off these features Go to “View → toggle Feature ON/OFF”.
Thonny Package Manager
It is known that all the python packages are hosted at PyPI. We will normally use PIP (Python Package Manager) to install desired packages from PyPI. But with Thonny, a GUI interface is available to manage packages.
Go to “Menu Bar → Tools → Packages”. In the search bar, you can type a package name and press search. It will search the PyPI index and displays the list of package matching the name.
In my case, I am trying to install a package call numpy.
When you select the package from the list, It will take you to the installation page. You can install the latest version or choose different versions as shown in the image. Dependencies are automatically installed.
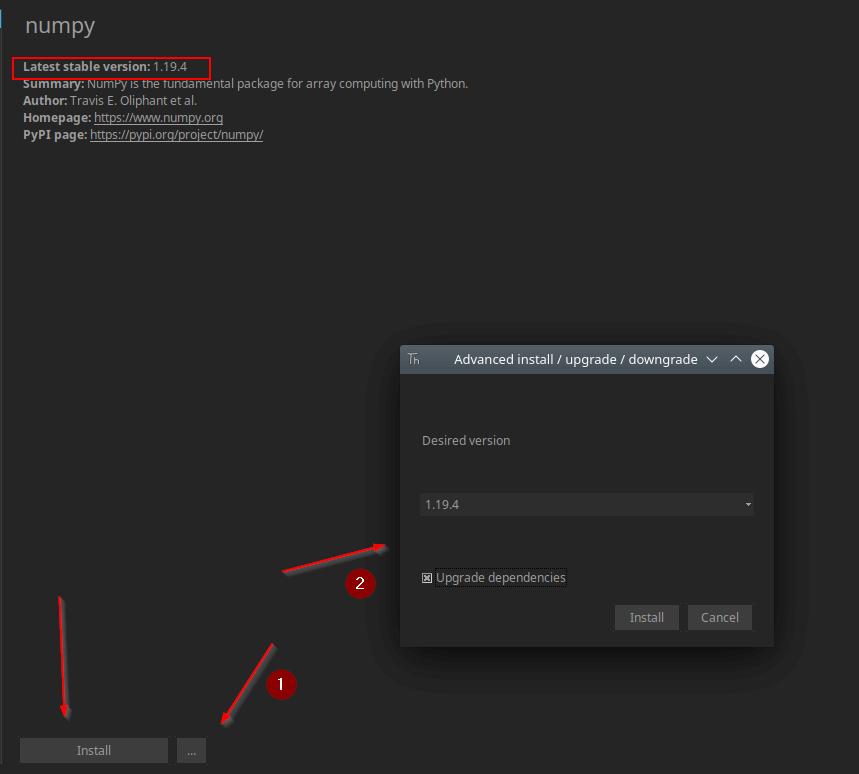
Once you press Install, it will install the package.
You can get the details like package version, library location once the package is installed. In case if you wish to uninstall the package, it is simple, go ahead and click the “uninstall” button at the bottom of the package as shown in the image.
Thonny Debugging
Thonny comes with a built-in debugger. Press Ctrl+F5 to run your program step-by-step, no breakpoints needed. Press F7 for a small step and F6 for a bigger step. You can also access these option from “Menu Bar → Run → Debugging options”.
Thonny Configuration
All the configurations are stored in the “configuration.ini” file. Any changes you make with your thonny session is written to this file. You can also manually edit this file to set different parameters.
To open the file go to “Menu Bar → Tools → Open Thonny data folder”.
How to Uninstall Thonny IDE in Linux
If you wish to uninstall thonny, there is an uninstall script available under the thonny installation directory.
That’s it for this article. There is a lot more to explore in Thonny than what we discussed here. Thonny is great for beginners but it is always a personal choice of programmers to choose which IDE or Text editor to work with. Install Thonny play with it, share your feedback with us.
Tutorial Feedback.
If You Appreciate What We Do Here On TecMint, You Should Consider:
TecMint is the fastest growing and most trusted community site for any kind of Linux Articles, Guides and Books on the web. Millions of people visit TecMint! to search or browse the thousands of published articles available FREELY to all.
If you like what you are reading, please consider buying us a coffee ( or 2 ) as a token of appreciation.