Настройка Kerberos авторизации на сайте IIS
 08.06.2022
 itpro
itpro
 Windows Server 2012 R2
 комментариев 25
Пошаговая инструкция по настройке на веб-сайте IIS на Windows Server 2012 R2 прозрачной авторизации доменных пользователей в режиме SSO (Single Sign-On) по протоколу Kerberos.
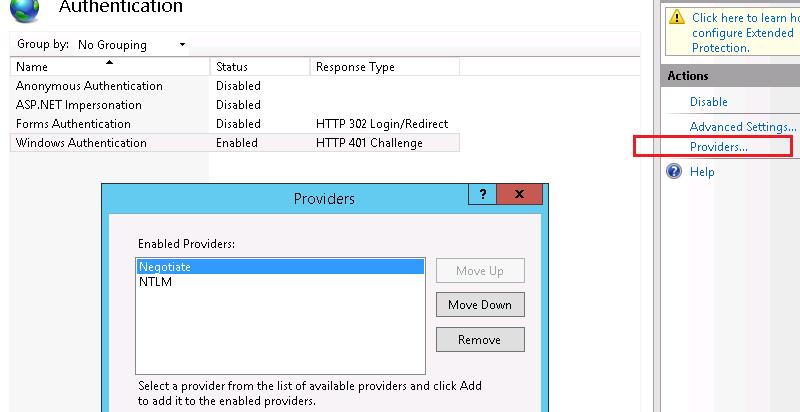
На веб сервере запустите консоль IIS Manager, выберите нужный сайт и откройте раздел Authentication. Как вы видите, по умолчанию разрешена только анонимная аутентификация (Anonymous Authentication). Отключаем ее и включаем Windows Authentication (IIS всегда сначала пытается выполнить анонимную аутентификацию).

Открываем список провайдеров, доступных для Windows аутентификации (Providers). По умолчанию доступны два провайдера: Negotiate и NTLM. Negotiate – это контейнер, который в качестве первого метода проверки подлинности использует Kerberos, если эта аутентификация не удается, используется NTLM. Необходимо, чтобы в списке провайдеров метод Negotiate стоял первым.
Следующий этап – регистрация Service Principal Name (SPN) записей для имени сайта, к которому будут обращаться пользователи. В том случае, если сайт IIS должен быть доступен только по имени сервера, на котором он расположен (http://server-name или http://server-name.contoso.com), создавать дополнительные SPN записи не нужно (SPN записи уже имеются в учетной записи сервера в AD). При использовании адреса сайта, отличного от имени хоста, или при построении веб-фермы с балансировкой, придется привязывать дополнительные записи SPN к учётной записи сервера или пользователя.
Предположим, у нас имеется ферма IIS серверов. В этом случае оптимально создать отдельную учетную запись в AD и привязать SPN записи к ней. Из-под этой же учетной записи будут запускать целевой Application Pool нашего сайта.
Создадим доменную учетную запись iis_service. Убедимся, что SPN записи для этого объекта не назначены (атрибут servicePrincipalName пустой).
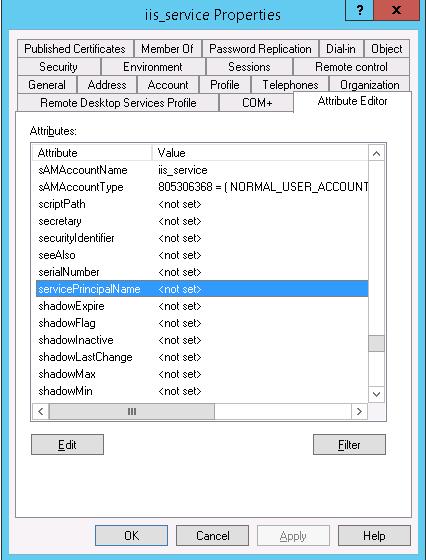
Предположим, что сайт должен отвечать по адресам _http://webportal and _http://webportal.contoso.loc. Мы должны прописать эти адреса в SPN атрибут служебной учетной записи
Setspn /s HTTP/webportal contoso\iis_service
Setspn /s HTTP/webportal.contoso.loc contoso\iis_service

Таким образом, мы разрешим этой учетной записи расшифровывать тикеты Kerberos при обращении пользователей к данным адресам и аутентифицировать сессии.
Проверить настройки SPN у учетной записи можно так:
setspn /l iis_service

Следующий этап – настройка в IIS Application Pool для запуска из-под созданной сервисной учетной записи.
Выберите Application Pool сайта (в нашем примере это DefaultAppPool).

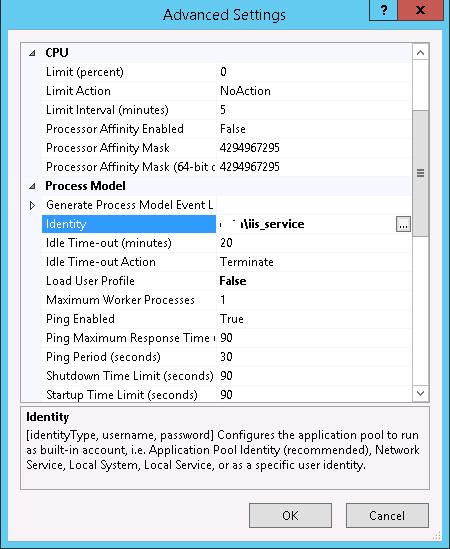
Откройте раздел настроек Advanced Settings и перейдите к параметру Identity.
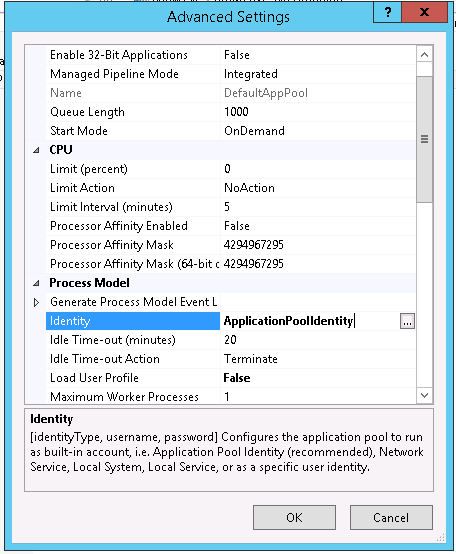
Измените его с ApplicationPoolIdentity на contoso\iis_service.
Затем в консоли IIS Manager перейдите на свой сайт и выберите секцию Configuration Editor.
В выпадающем меню перейдите в раздел system.webServer > security > authentication > windowsAuthentication
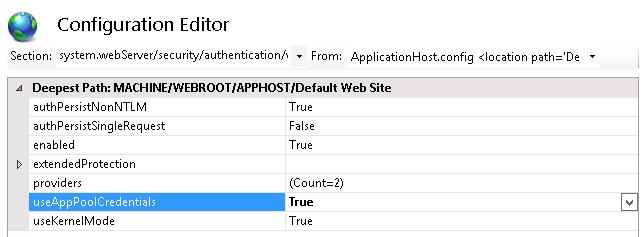
Измените useAppPoolCredentials на True.
Тем самым мы разрешим IIS использовать доменную учетку для расшифровки билетов Kerberos от клиентов.
Перезапустим IIS командой:
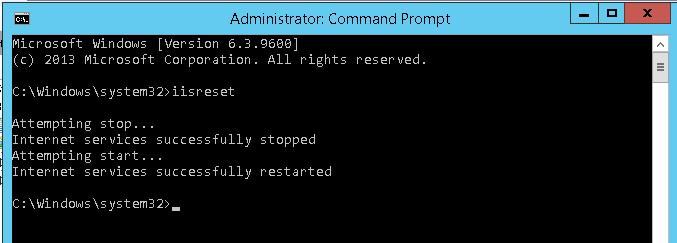
Аналогичную настройку нужно выполнить на всех серверах веб-фермы.
Протестируем работу Kerberos авторизации, открыв в браузере клиента (браузер нужно предварительно настроить для использования Kerberos) адрес _http://webportal.contoso.loc
Примечание. В моем примере, на IE11 сразу авторизоваться не получилось. Пришлось добавить адрес в доверенные и в настройках Trusted Zones Sites выставить значение параметра User Authentication -> Logon на Automatic logon with current user name and password
Убедится, что для авторизации на сайте используется Kerberos можно с помощью инспектирования HTTP трафика утилитой Fiddler.
Запускаем Fiddler, в браузере открываем целевой сайт. В левом окне находим строку обращения к сайте. Справа переходим на вкладку Inspectors. Строка Authorization Header (Negotiate) appears to contain a Kerberos ticket, говорит о том, что для авторизации на IIS сайте использовался протокол Kerberos.
Windows Authentication in Web API
Windows authentication enables users to log in with their Windows credentials, using Kerberos or NTLM. The client sends credentials in the Authorization header. Windows authentication is best suited for an intranet environment. you can use Windows authentication when your IIS 7 or later server runs on a corporate network that is using Microsoft Active Directory service domain identities or other Windows accounts to identify users. Because of this, you can use Windows authentication whether or not your server is a member of an Active Directory domain.
Windows authentication (formerly named NTLM, and also referred to as Windows NT Challenge/Response authentication) is a secure form of authentication because the user name and password are hashed before being sent across the network. When you enable Windows authentication, the client browser sends a strongly hashed version of the password in a cryptographic exchange with your Web server.
Windows authentication supports two authentication protocols, Kerberos and NTLM, which are defined in the
element. When you install and enable Windows authentication on IIS 7, the default protocol is Kerberos.
To use Windows authentication, you must adjust settings in both Microsoft Internet Information Services (IIS) and the ASP.NET application Web.config file.
Enable Windows Authentication In Web API
Let’s first discuss, what do we want to achieve. Suppose, there is an organization, currently, has 200 employees, the organization wants anyone who can create an HTTP Service for them with the following functionalities:
• The Service should expose employees’ data and allow creating new employees on the server.
• It must be secured with windows authentication.
• Anyone inside the same network should be able to make get requests but only those who are in the role of Manager, Editor, or Admin should be able to create employees.
Step 1.Create a database and name it EmployeeService and run the below script to generate the required tables.
It will generate 4 tables like below.
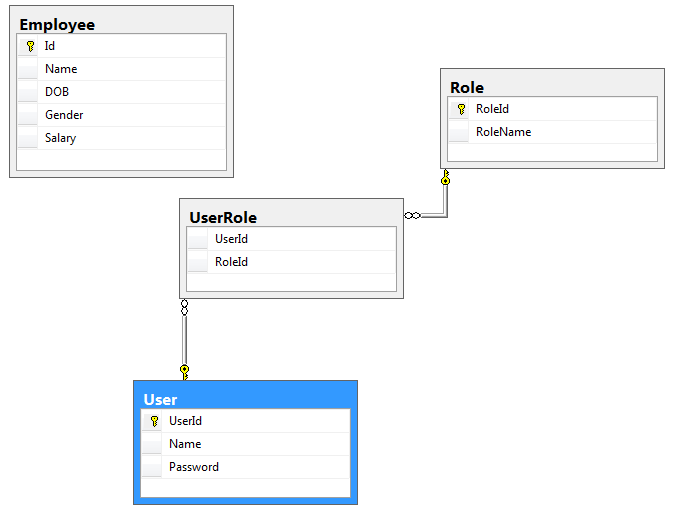 Employee service tables
Step 2.Create a web api empty project and name it EmployeeService. and Create a web api 2 empty controller and name it employeecontroller.
• Go to file and select new and then select project . 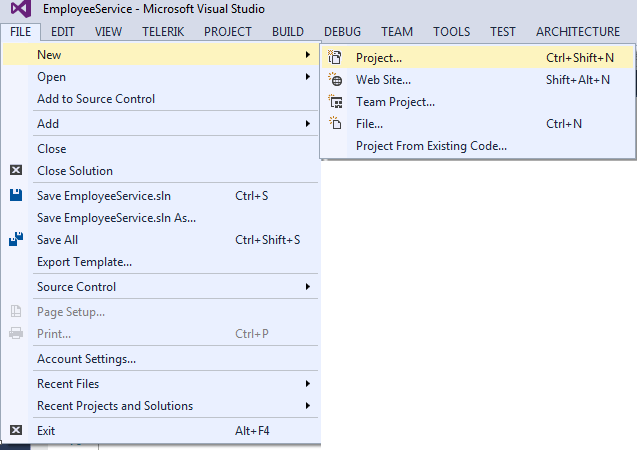 Create new project • In the next window select Asp.net web application and give the solution a meaningful name like EmployeeService.
 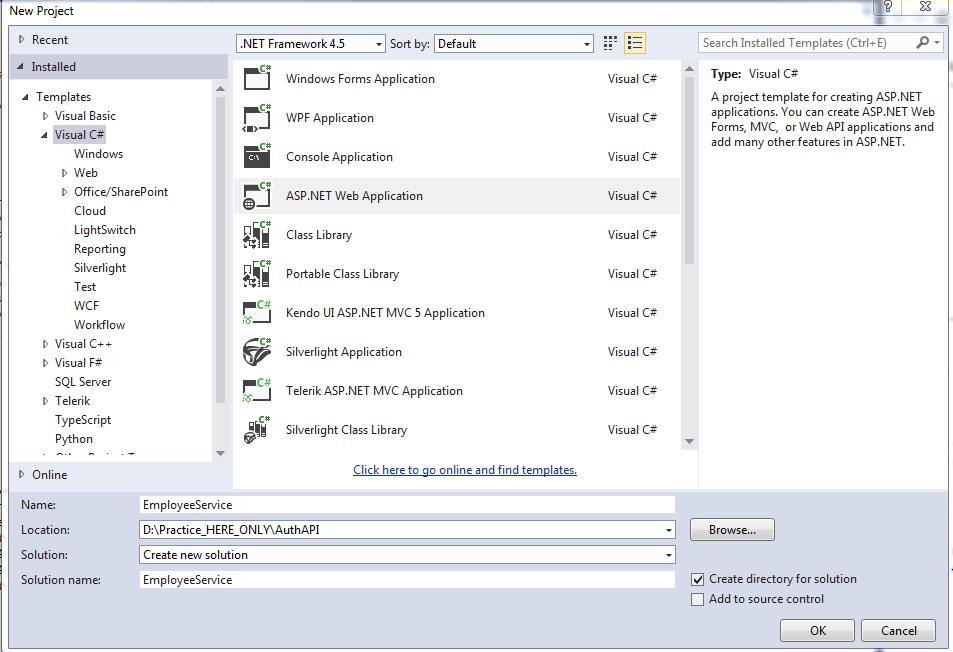 Create new project step 2 • Select Empty template and check the web api checkbox.
 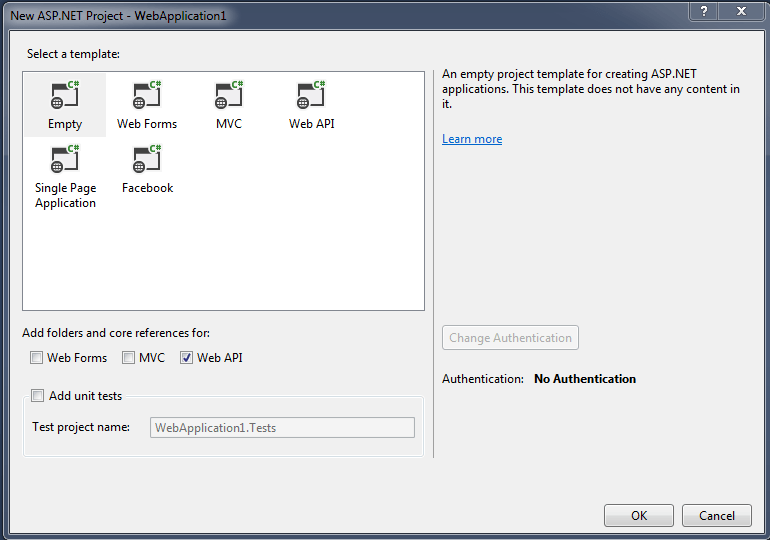 Empty Web API template • Create a web api 2 controller and name it Employee.
 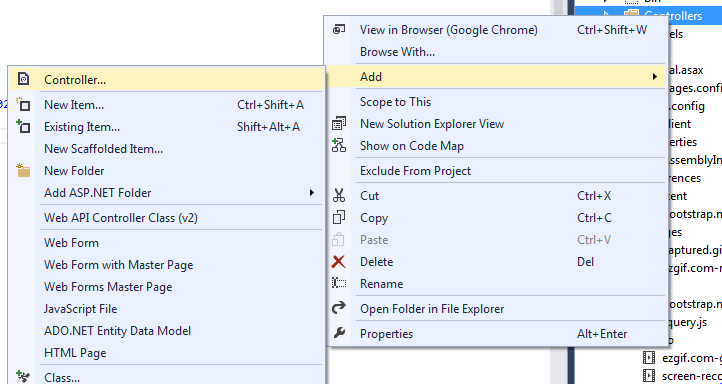 Add a controller to the controller folder
 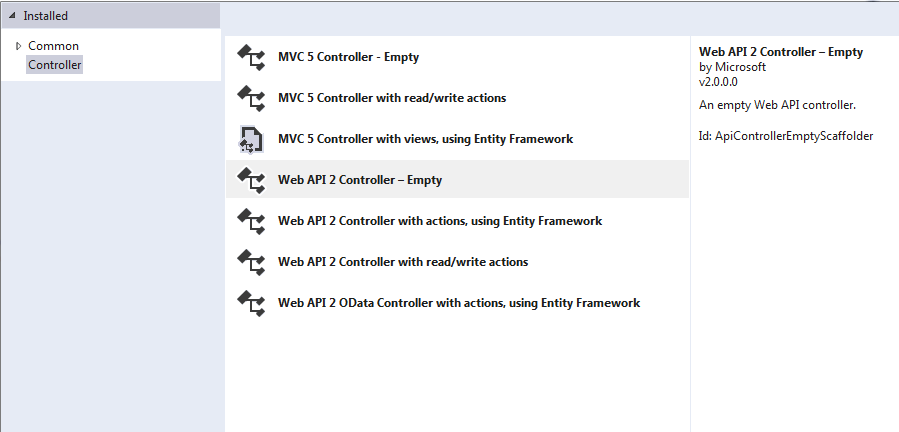 Empty web API 2 controller
Step 3.Generate entity model from database in the models folder of the project as shown below.
• Right click on the models folder and select add then select new item. 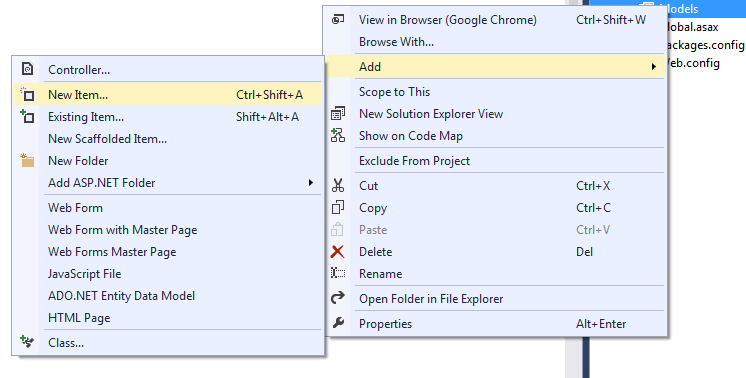 Add new item • Select Data tab and then select Ado.Net Entity data model , name the model as EmployeeServiceModel and click add.
 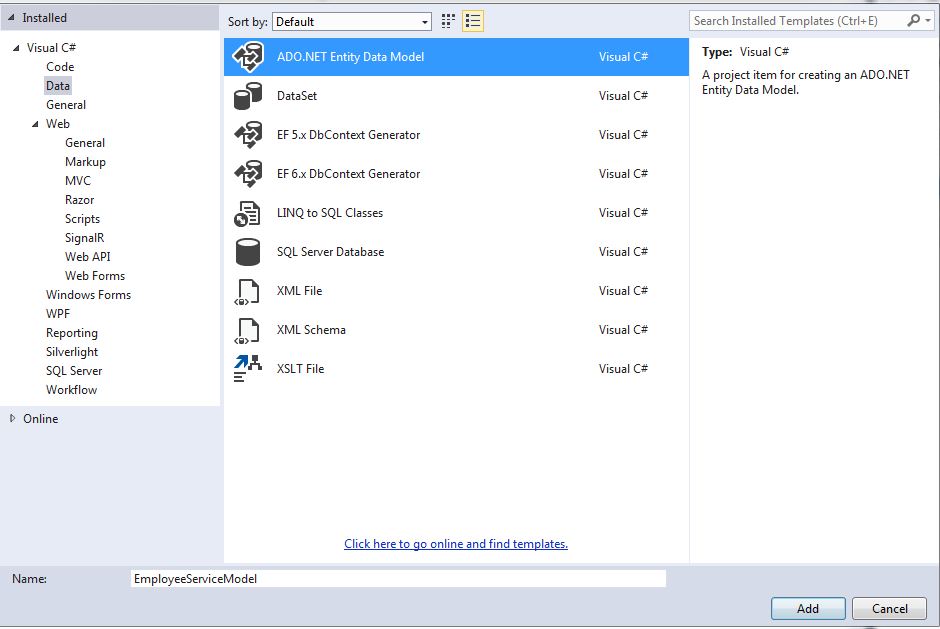 Ado.Net Entity Data Model • In the next window select EF Designer from database and click next
 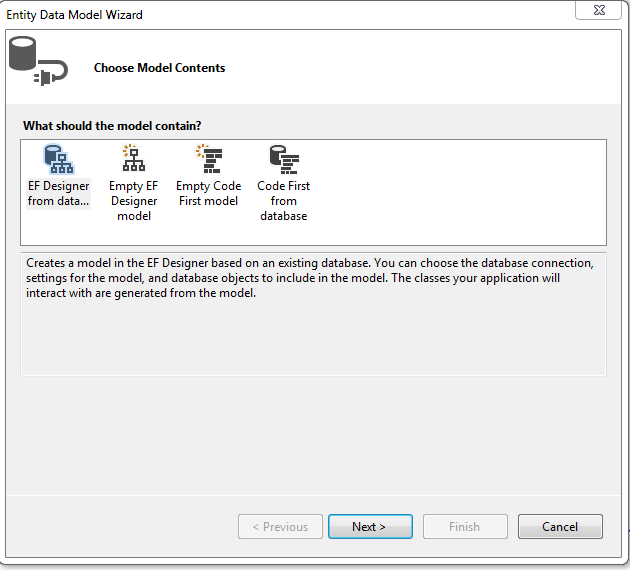 EF designer • In the next window select or add a new connection, fill the server name, and select employee service database. • In the next window save the connection setting in web.config as EmployeeServiceDbContext.
 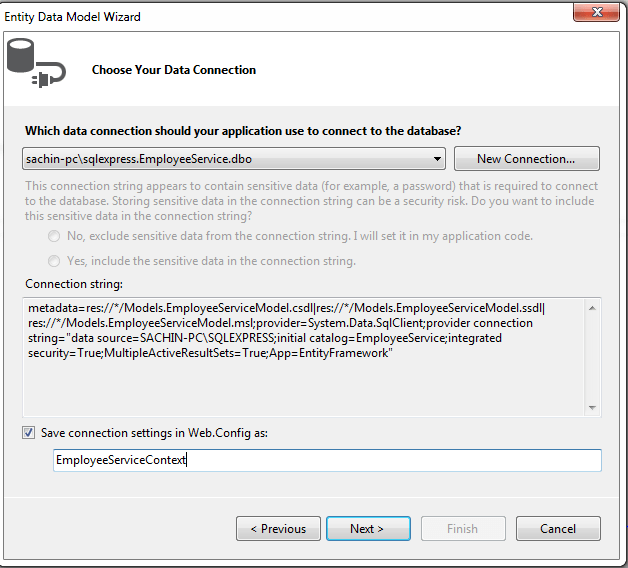 Data Connection • In the next window select EF version as EF v6.0
 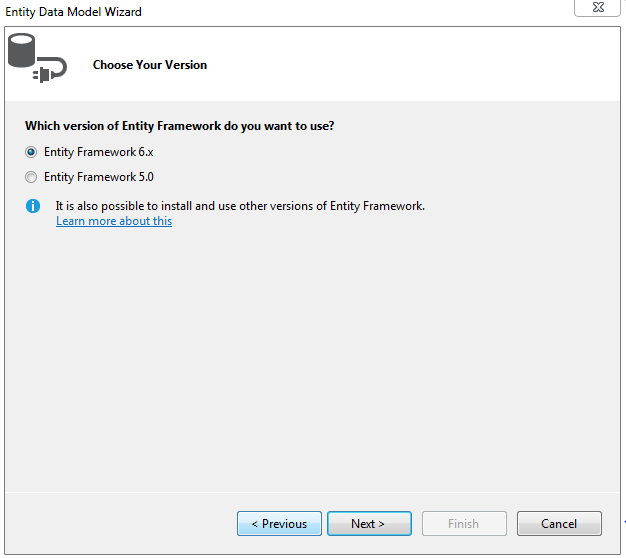 EF version • In the next window select the database object (table) and name the model namespace as EmployeeServiceModel
 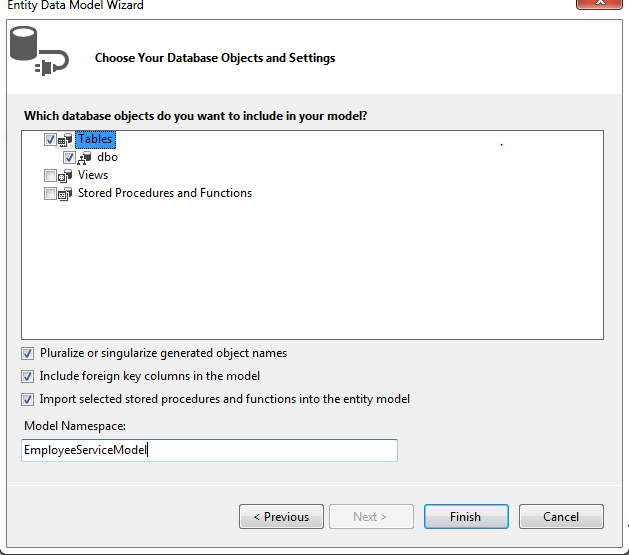 Database Object • And Click finish.
Step 4.Create three methods in the Employee Controller as shown below.
Step 5.Open web.config file and set Authentication mode to windows under System.web section.
At this moment, the Employee service is ready to be deployed on IIS. Let’s deploy the web API to IIS, and configure it to use windows Authentication.
Deploy Web API to IIS
The steps to deploy web API to IIS are as follow:
• Right click on the EmployeeService project and select Publish. 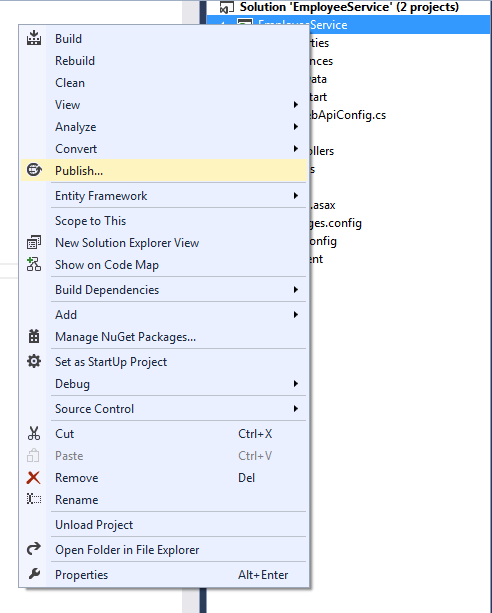 Publish web API to IIS step 1
• Create a new publish profile. 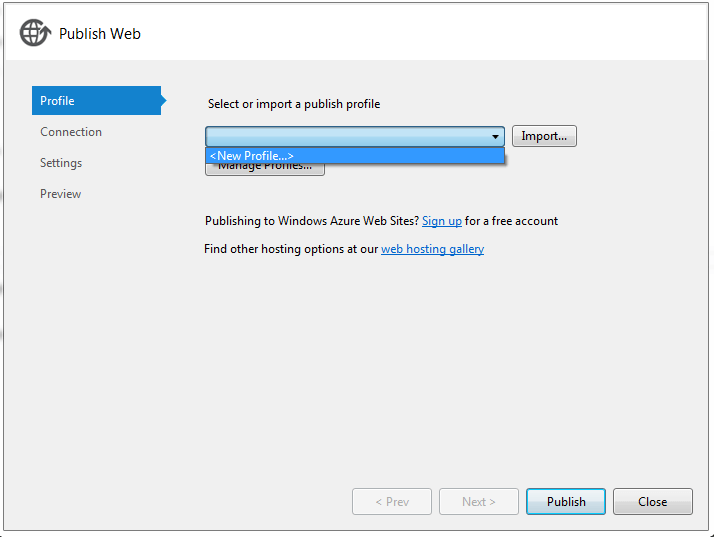 create new publish profile
• Give the profile a Name like IISHosting and click ok. 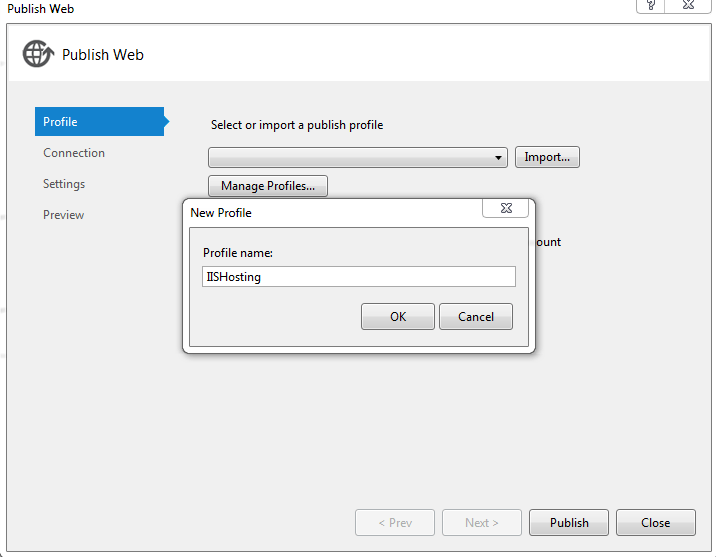 Publish profile Name
• In the connection tab Select File System as Publish Method and Select the location on your computer where you want to publish the project and click on next. 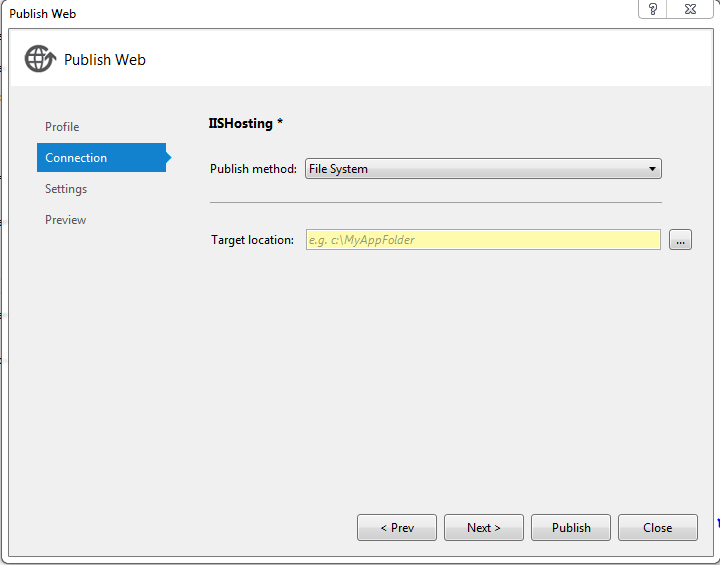 Publish with File System
• In the settings tab select Release mode as configuration and click publish. 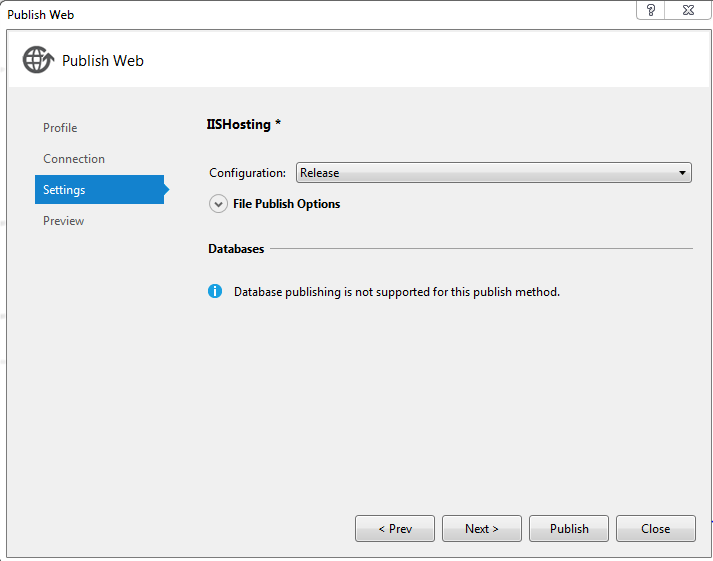 Release Mode Configuration
• Open IIS Manager ( press window+R and type inetmgr and click open) 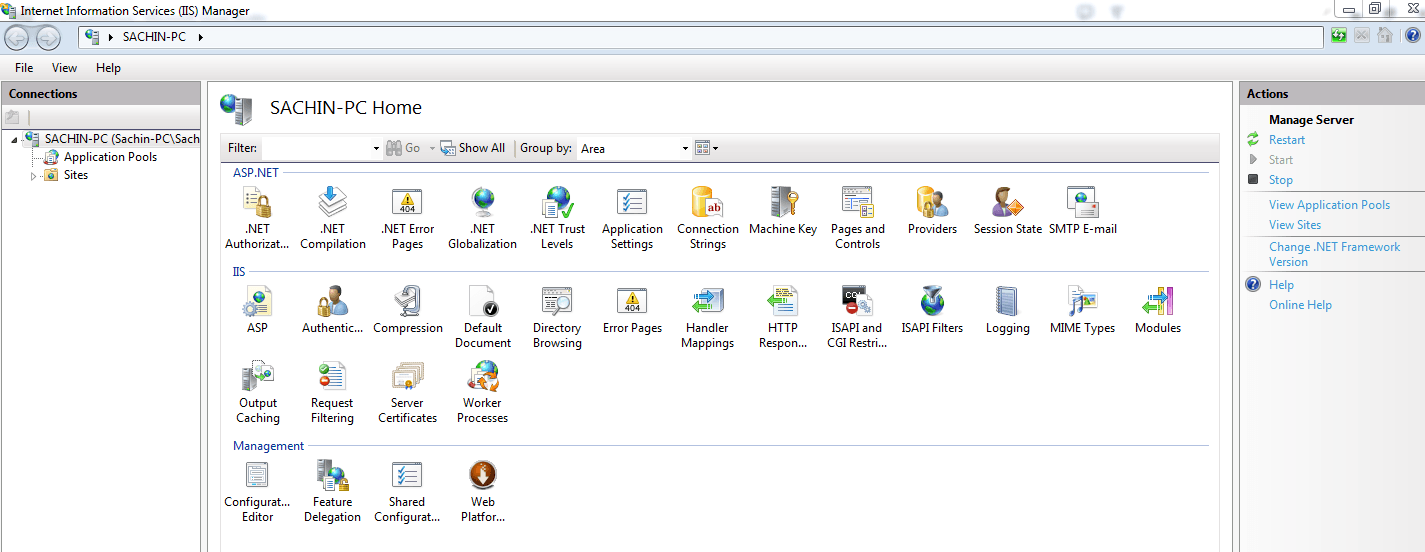 IIS Manager
If inetmgr command is not working ,means Run window is unable to find any program with this name then it simply means IIS is not installed on your machine, in that case go to Control Panel—>Programs—>Programs and Features—-> Turn windows feature On or Off and Select Internet information services and click ok. 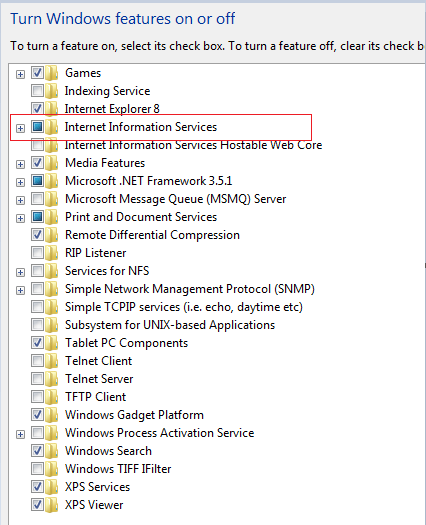 Install IIS
• Right Click on the Application Pool tab and select add application pool. 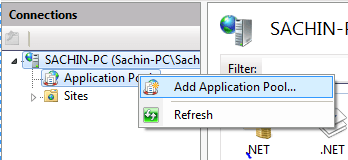 Add Application Pool
• Give the application pool a name and select .net framework version as .net 4.0 and Managed Pipeline mode as integrated and click ok. 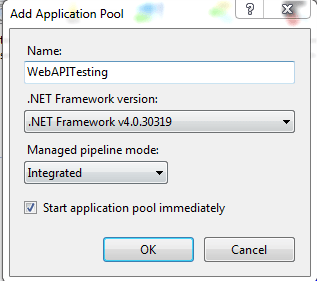 Configure App Pool
• Right-click on the Sites tab and select add new website. Though Web API is not a website ,IIS handles both the same way. 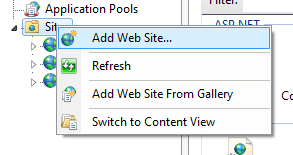 Add new website
• In the Add Website window, you should be careful while filling the fields.
1. Site Name : EmployeeService.
2. Application Pool : Select the application that we had just created (WebAPITesting).
3. Physical Path :The path on your computer where you have published your web API.
4. Bindings : Type(Http), IP Address (Select the last one in the list),Port (Anything other than 80).
This step is mandatory if you want to test your API from any device on the same network without creating a host. 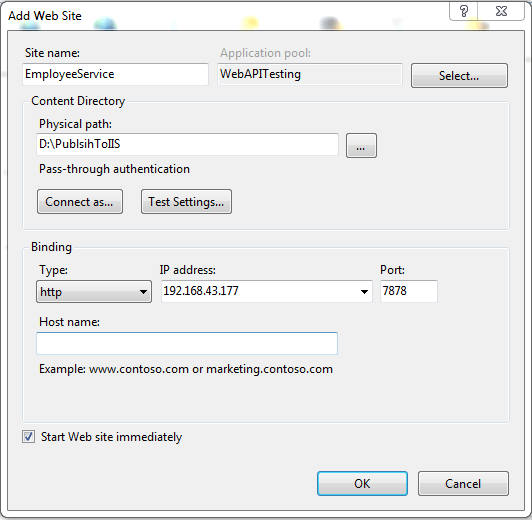 Configure website (Web API) into IIS
• Double Click the application pools tab , it will open application pool window where all your application pools will be listed .Here select the application pool that we had created in the earlier step and Right click on that and go to Advance settings. 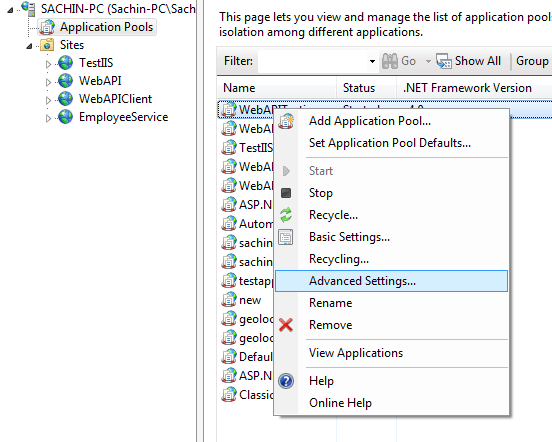 Advance settings of App Pool
• In the Advance Settings window go to process model and click on identity and select Local System as built-in account. 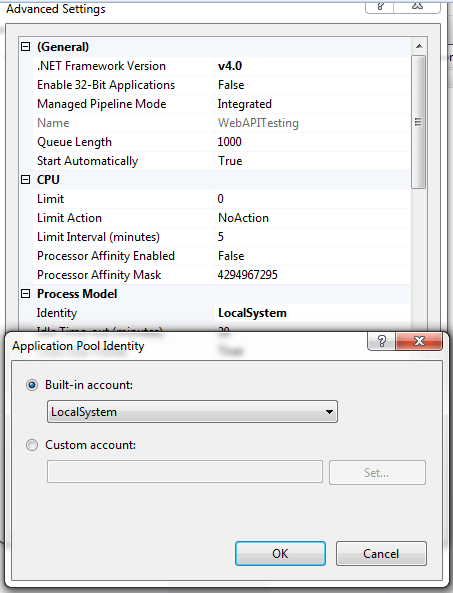 Advance settings of App Pool
Congratulation you have successfully published your web API to IIS , now connect at least 4 devices to the same network , if you are a student and your house owner has not provided you WIFI, connect your laptop with your mobile hotspot in this way you will have at least 2 device on the same network.
Open any browser on any device on the network and type the URL http://192.168.43.177:7878/api/employee , you will get the following result.
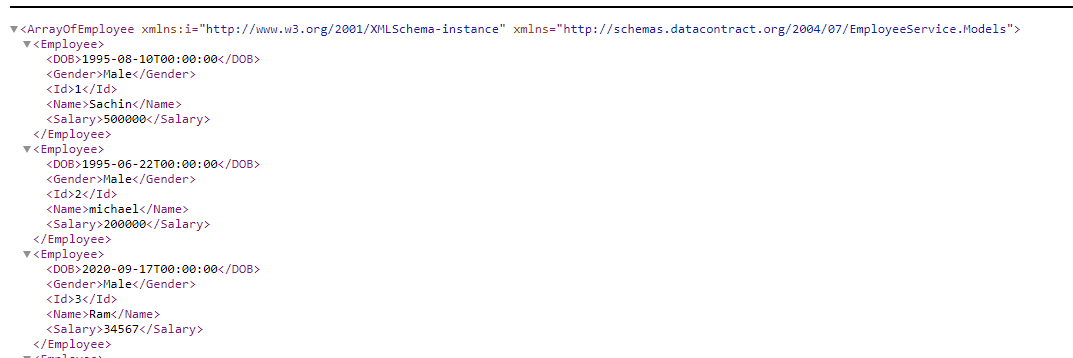 Result on my desktop
 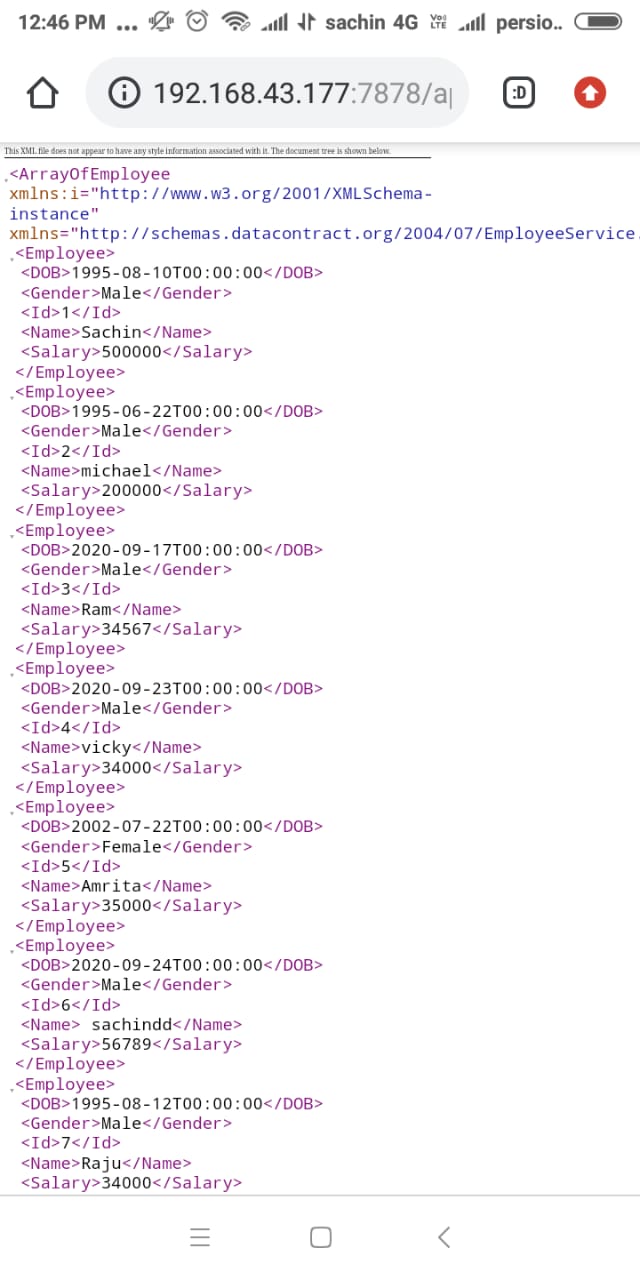 Result on my Phone
All the idea behind creating a local network is to make you familiar with intranet environment.
Enable windows Authentication in IIS
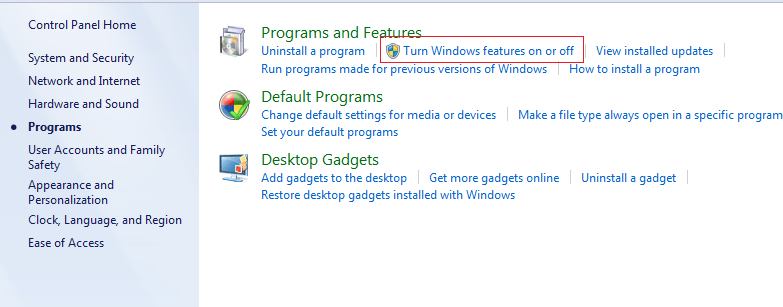 Programs and Features
Under Internet Information Services go to World wide web services and under that go to Security and Check Basic Authentication, Digest Authentication and windows authentication as shown below.
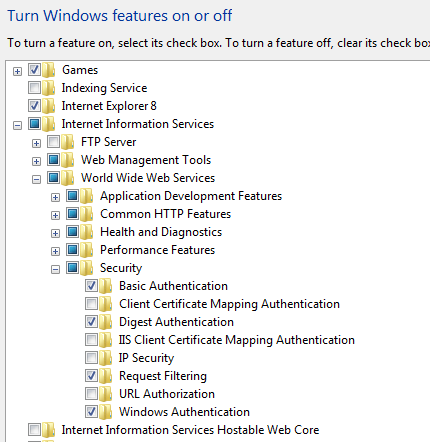 Include Authentication Schemes
Open IIS Manager (in the run window type inetmgr and hit Enter).
• Open Sites and double click on the recently added web API project that is EmployeeService.
• Double click on Authentication under IIS submenu, it will open the authentication schemes window as shown below.
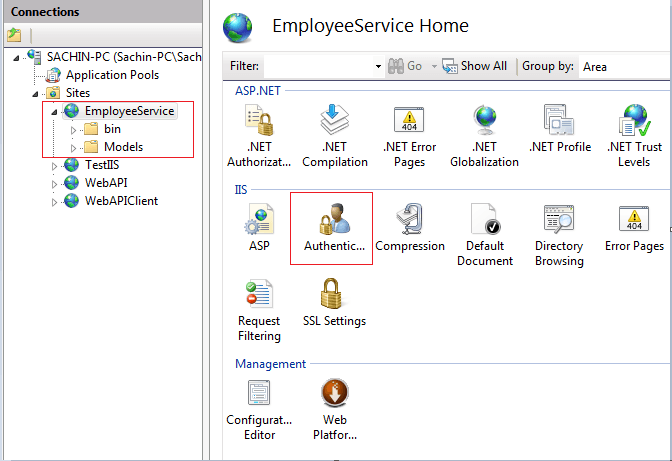 Authentication settings
Check the windows Authentication checkbox.
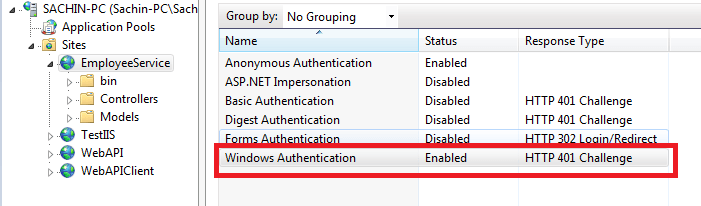 Enable windows Authentication
Create some users on your machine, for testing purpose at least create two user accounts.
• Go to control panel —> User Accounts and Family Safety —>Add or Remove User accounts.
• Add some accounts.
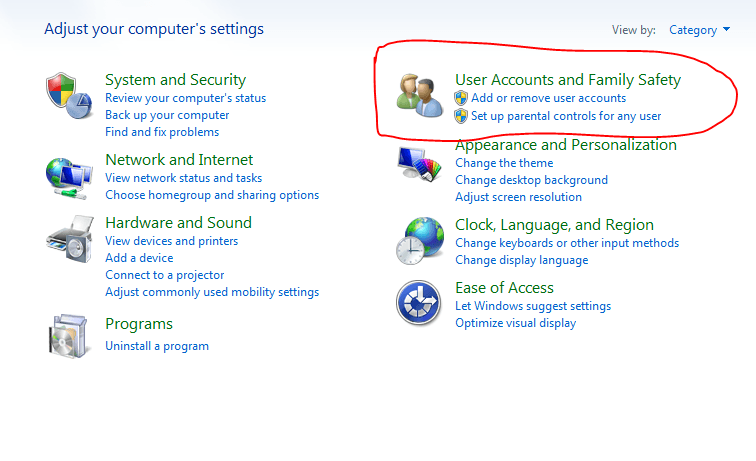 Add user accounts
Step 5. Open EmployeeService web API project , go to controller and mark all the methods as Authorize using Authorize attribute, for post method use overloaded version of Authorize attribute and define roles=’Admin,Editor,Manager’ and Republish the EmployeeService controller, it will publish the modified version.
Create a Client Application (Html Client)
Now Let’s create a Client Application to test the Web API.
Step 1.Add another project in the solution and name it as JqueryClient and click ok. And in the next window just select empty template and do not tick anything for core refrences.
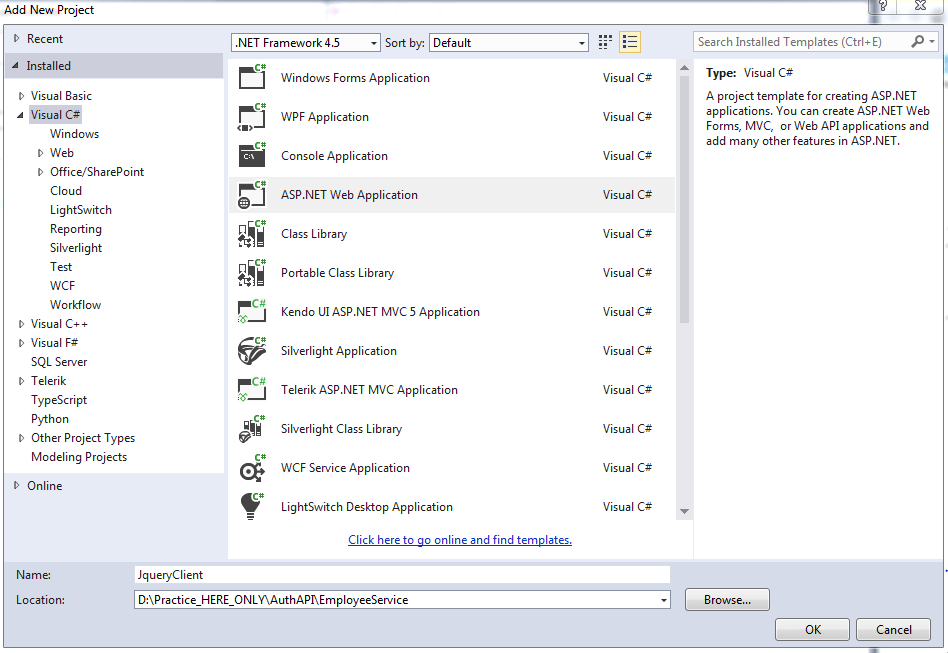 Add new project to the solution
 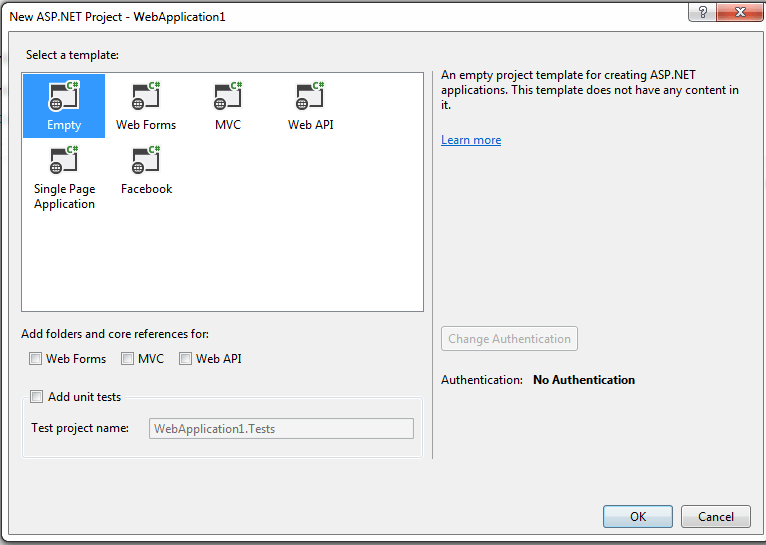 Add Empty template
Step 2.Add an Html page in the JqueryClient Project and Name it ClientOne.
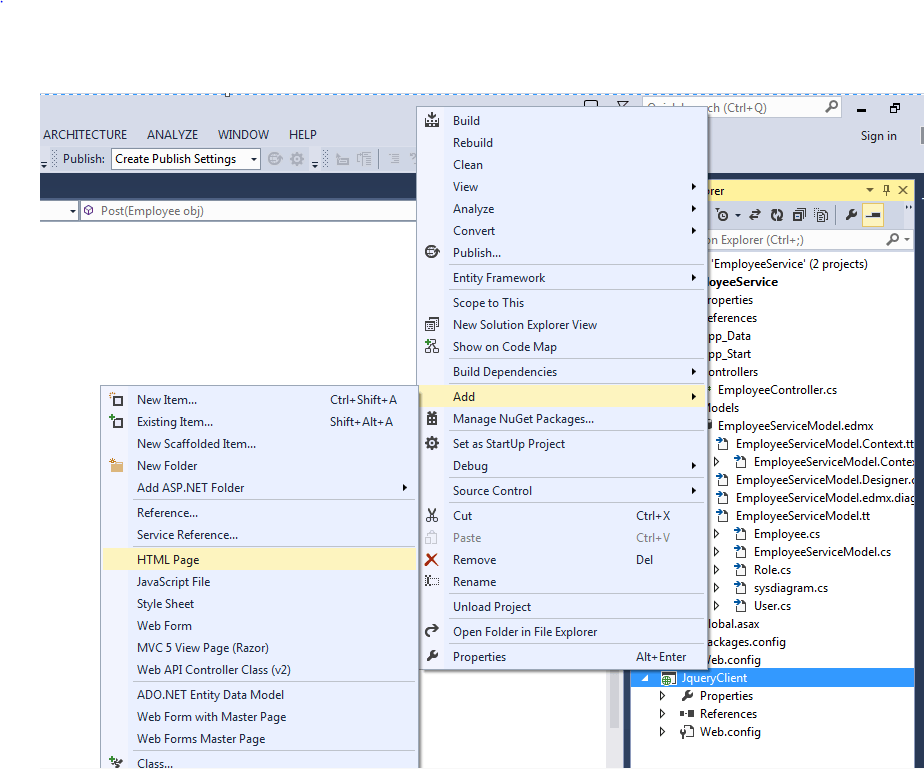 Add a Html page
Step 3.Add the Jquery reference in the Html page and paste the below code.
Step 4. If you want to test this in an intranet environment (Like from your phone on the same network) then deploy the Client App in IIS as well, the steps are exactly the same as you have deployed web API.
Step 5.Run the Client application by pressing ctrl+f5 or start button on the menu bar. You will get the below output.
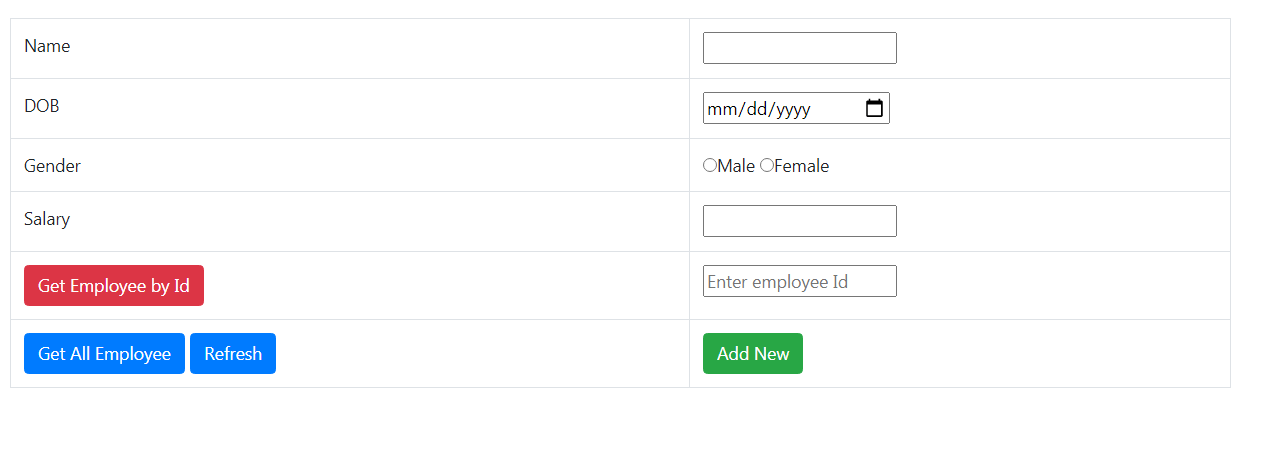 Client App
At this moment issue a get request by clicking GetAllEmployee button you will get Cors related error which is logical and self explanatory , In real time the client app have different origin , here different origin means different domain name or port number or scheme(http or https) that is the reason i have created the client App as a different project so that you can take feel of real time project and face the problems that may occur in a live project.
 Cross origin request error
As you can see from the error , browser is not allowing ClientApp to access the resource (‘http://localhost:1268/api/employee?Id=1) because the clientApp has the origin http://localhost:1274/ClientOne.html , both have different port number , which is violation of same origin policy.
In order to overcome this problem and to allow the clientApp to access resources on our server , we have to Enable cross-origin requests in ASP.NET Web API 2.
Now , i am considering that you have gone through the article how to enable cross origin request in web api 2 , now it is time to uncomment the Cors attribute on Employee controller and re publish the web API. This time when you will click publish button from visual studio, the web API will be published within few seconds, only the first publish takes time , any successive publish doesn’t take time.
At this moment run the client App from anywhere on the same network, and you will successfully be able to Get All Employees and Get a particular Employee by Id but you will not be able to Create Employee because of the Role Constraint.
Note: I am setting withCredentials property of the request object to true, that causes existing authentication headers/cookies to be passed along in the AJAX request
Custom Role Providers for Windows Authentication
We are going to leverage the RoleProvider class to make our own custom role provider so that we can have our own application-specific roles without moving users into AD groups. This method can be applied to other forms of authentication other than just Windows.
The Custom role provider is pretty straightforward to create. First, we need to create a new class that inherits from the System.Web.Security.RoleProvider. Next, implement the methods you wish to override and leave the rest throwing a NotImplementedException. In the example below, I override the IsUserInRole and GetRoleForUsers to get user role(s) from the database.
Step 1.Open Employee Service web API project and create a folder with name Repository. Under Repository Folder create a class and name it as UserRepository, obviously in the real-time project you should create another layer for it .
In the user repository we are going to create an in-memory user object with user name as windows account name and password as windows password and assign roles to them, you can save your windows user name and password in the database as well but saving windows user accounts in the database is not making sense to me, so I am creating in-memory objects. Remember we had generated our entities in the model folder and we have all Entities that we need right now.
Step 2.Add some users and Roles to the EmployeeService database. The user name should be windows user accounts name, which should be your
Step 2.Open Employee Service web API project and Create a folder with name RoleProviders. Inside that create a class and name it CustomRoleProvider and paste the below code. The Code is self explanatory.
Note : Inherit CustomRoleProvider from RoleProvider (Namespace:- System.Web.Security😉
Step 3.Open Web.config and under System.web section paste below code.
Note : type=
Step 4. Obviously we have added some new folders and classes to EmployeeService (web API) project , so republish the project. Don’t worry it will not take time , only the first publish takes time.
we have successfully implemented windows authentication with role based Authorization.
If the server runs on a corporate network that is using Microsoft Active Directory service domain identities or other Windows accounts to identify users.You can specify which users or groups are permitted to have access to what resources by adding Authorization settings in the Web.config file as follows:
• To permit all users of an NT Group named Managers to have access to your resources, use the following code:
•To permit only specific users to have access, use the following code:
Note: You can specify multiple roles or users by using a comma separated list. Verify that you use the correct case when you specify the configuration file element and the associated attribute values. This code is case sensitive.
Does windows Authentication not work without deploying the Application into IIS
When we run or debug the application from Visual Studio it is not hosted in IIS, instead it hosts in IISExpress which is part of the Visual Studio and stores the minimum required configuration or default configuration to run any application. It means even after following each step religiously , windows Authentication will not work until you don’t host your web API into IIS, but we are developers we do want to check whether our Application is working properly or not before deploying it to IIS. Don’t worry windows Authentication works even you don’t deploy it on IIS.
To enable windows authentication set ( ) in “applicationhost.config”file which resides at Project root directory “.vs\config”, this folder is hidden you must enable the show all hidden files and folder option.
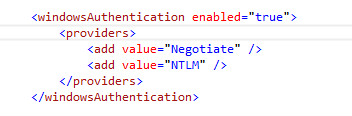 applicationhost.config
About integrated windows authentication and how to implement it in ASP.NET core running on IIS.
In this post, I share what I have learned about integrated windows authentication and how to enable it in a web application which consists of an angular front-end and ASP.NET core 3 backend.
What is integrated windows authentication?
Let me explain by giving an example. At work, my computer is joined to a domain controller, which is basically a server that runs active directory. Joining a domain controller means the domain controller manages my credentials, not my computer. When I login using my windows credentials, my computer communicates with the domain controller to validate my credentials and allow access. We have .NET applications running on IIS on a set of servers that are joined to the domain controller. IIS can check against the domain controller to ensure I have authenticated before granting access. Furthermore, it can work with the browser do so seamlessly without requiring me to enter my credentials because it has built in integrated windows authentication. This is possible because both the server on which IIS runs and the browser on my machine are joined to a same domain controller, and the browser supports the Negotiate authentication scheme. From the document, this is an advantage of integrated windows authentication.
Built into IIS. – Does not send the user credentials in the request. – If the client computer belongs to the domain (for example, intranet application), the user does not need to enter credentials
Integrated Windows Authentication
Hopefully, you now have some ideas about integrated windows authentication. Next, let’s look at how it works.
How does integrated windows authentication work?
Per the document, integrated windows authentication
works with any browser that supports the Negotiate authentication scheme, which includes most major browsers.
Integrated Windows Authentication
The Negotiate authentication scheme is Microsoft’s authentication mechanism which uses Kerberos which is a system that validates a user’s identity based on shared secrets and provides access by issuing tickets.
Here is how it works.
To access a protected resource, the client must present a valid ticket to the server. To obtain the ticket, the client sends a request to a Key Distribution Center (KDC). The client encrypts the request using the user’s credentials. Upon receiving the encrypted request, the KDC retrieves the user’s password from active directory given the username, and uses the password to decrypt the request. By way of encrypting and decrypting the request using the user’s password which the KDC can get from the database, the KDC can verify the user’s identity without having the client sending over the password. Once the client receives the ticket, which the KDC encrypts using a key that it shares with the resource server, the client sends over the ticket to the resource server, which in turn validates the ticket against the KDC using the shared key. Once all the validations are done, the server returns the resource to the client.
The above is just a high level summary. If you want to learn more about Kerberos and see examples, I suggest you watch this short video, read this blog and IETF article.
Hopefully, you now have some ideas about how integrated windows authentication works, let’s discuss when should you use it.
When should you use integrated windows authentication
As a summarize, you should consider using integrated windows authentication if:
- Both the server and the client machine use Windows and are joined to the same domain controllers.
- The application is for internal use only. Obviously, if it is accessible by the public, it will not work because the client computers may not use Windows and joined to the domain controllers.
- The browser supports Negotiate mechanism (most major browsers supports it).
- The server supports integrated windows authentication. As mentioned in the document, IIS has built in support for integrated windows authentication.
The document mentions integrated windows authentication is susceptible to cross-site request forgery, so just keep this in mind.
Now that you know about integrated windows authentication and how it works, let’s look at how you can implement it in your ASP.NET core application.
In my case, it turns out to be not difficult to configure my application and IIS to use integrated windows authentication. I just have to make a few changes in the app, and enable Windows authentication in IIS.
Changes in applicationhost.config
Set < WindowsAuthentication > to true in applicationhost.config, which is under .vs ->
See this link for instructions on how to view hidden folder in Windows 10.
Changes in launchSettings.json
In launchSettings.json, which is under Properties folder of the ASP.NET core project, enable WindowsAuthentication under iisSettings:
Changes in Startup.cs file
- In Configure(. ) method, add these middlewares:
Since the app is an ASP.NET core 3 app, per the document, I put the above middlewares between app.UseRouting() and app.UseEndpoints() .
If the app uses authentication/authorization features such as AuthorizePage or [Authorize] , place the call to UseAuthentication and UseAuthorization : after, UseRouting and UseCors , but before UseEndpoints :
Migrate from ASP.NET Core 2.2 to 3.0
If you want to learn more, checkout this post on StackOverflow.
In ConfigureServices() method, I added the following:
Changes on IIS site on remote server
- In IIS Manager, under Features View of the site, double-click on Authentication feature.
- Select Windows Authentication and set Status to Enabled.
Changes in angular app
Technically, you don’t need to make any changes in angular for integrated windows authentication to work. Some tutorials online I looked at suggest to add to the header the key and value: withCredentials: true . However, I realized that this is not necessary, and the authentication still work even after I removed the codes.It appears the browser automatically handles the process by the Negotiate authentication scheme.
Optional: Get windows user’s info in angular
It seems as if there is not a way to get info about the windows user from the client app. Therefore, to get the username and status of the windows user, I make the call to the backend.
Enable Windows Authentication
The server running the application must be configured to enable windows authentication and disable anonymous authentication. If anonymous authentication is enabled, then it will be used by default and no user information is collected or required.
Hosting Options
- IIS + Kestrel: Windows authentication is configured in IIS (or Properties\launchSettings.json when debugging with Visual Studio and IIS Express).
- WebListener: Windows authentication is configured in web host builder programmatically.
At the time of writing, windows authentication only works when the server is hosted on the Windows platform (IIS and WebListener are Windows-only).
Take a look at ASP.NET Core Hosting for setting up either hosting option.
WebListener
When using WebListener, you need to set up the authentication scheme in WebListener options in Program.cs :
Note: installing package Microsoft.Net.Http.Server from NuGet is required for accessing the AuthenticationSchemes class.
IIS Integration
When using IIS Integration (Express or not), there are some configuration options that you can tweak. Add configuration in Startup.cs in the ConfigureServices method:
All three options default to true at least when running on IIS Express through Visual Studio.
IIS Express (when Debugging from Visual Studio)
In visual studio, right-click into the project properties and select the Debug tab. Check “Enable Windows Authentication” and uncheck “Enable Anonymous Authentication”
The values are stored in Properties\launchSettings.json :
Making this change also forces forwardWindowsAuthToken to true in web.config ( aspNetCore -element under system.webServer ) each time you start the app in debug mode.
Enable windows authentication in IIS application host configuration file which can be found in the system32\inetsrv directory.
NOTE: IIS Express application configuration file lives in $(solutionDir)\.vs\config\applicationhost.config source when using Visual Studio 2015 (or %userprofile%\documents\iisexpress\config\applicationhost.config or somewhere else when using an earlier version). TODO not verified using IIS Express directly. The configuration does not affect the behaviour of IIS Express when debugging through Visual Studio.
The correct section can be found in configuration -> system.webServer -> security -> authentication -> windowsAuthentication.
The configuration should look as follows.
Windows authentication can also be enabled using the Internet Information Services Manager: Go to the site’s Authentication settings, enable Windows Authentication and disable Anonymous Authentication.
Make sure that the forwardWindowsAuthToken is set to true in web.config ( aspNetCore -element under system.webServer ).
Identity Impersonation
TODO For accessing further resources such as an SQL DB or other APIs with windows authentication.
Accessing User Information
CSHtml
You can access user identity in .cshtml files by using, for example:
If you need to access the HttpContext, you need to add the HttpContextAccessor service in Startup.cs :
In MCV or WebAPI Controllers
Requires package Microsoft.AspNetCore.Identity
JavaScript
There is no way that I came across to get at the windows user information directly in JavaScript, except by injecting through script tags and cshtml.
Calling API Methods from JavaScript
Make sure you include credentials in calls, e.g. with fetch :
Authorization By Group Membership
- Local groups are written without the domain part or prefixed with the host name: <group> or <hostname>\<group> .
- Built-in local groups (e.g. BUILTIN\Administrators ) are not recognized by name. You have to write the corresponding SID instead.
- You can find out the SIDs by using the PsGetSid tool: https://technet.microsoft.com/en-us/sysinternals/bb897417.
- The BUILTIN\Administrators group is not recognized even when using the correct SID.
Group membership shows as role membership in ASP.NET Core. You can enforce group membership directly with the Authorize attribute, with an authorization policy, or programmatically in the controller methods.
Authorize Attribute
Add [Authorize(Roles = @»<domain>\<group>»)] attribute (or [Authorize(Roles = @»<domain>\<group1>,<domain>\<group2>»)] for multiple allowed roles) to the controller or method.
Authorization Policy
Add a new policy to service configuration in ConfigureServices method in Startup.cs :
To get the required group name from settings, add the group name into appsettings.json (note the double backslashes):
Then read it in when configuring authorization:
Use a comma-separated string for multiple allowed roles: <domain>\<group1>,<domain>\<group2> .
Finally, add the authorize-attribute on the controller or method: [Authorize(Policy = «RequireWindowsGroupMembership»)]
The policy syntax allows for more elaborate authorization scenarios with custom requirements, such as activity/permission-based authentication
Programmatically
Check for role membership in controller method and return 403 Forbidden status code if not authorized.
Note that the return type of the method must be IActionResult .
Browser Settings
If you need automatic windows authentication, then you may have to enable it specifically in the client browser
- IE (TODO verify same works in EDGE)
- Advanced -> Enable Integrated Windows Authentication in Internet Options
- Security -> Local intranet -> Custom level -> User Authentication -> Automatic logon / Prompt for user name and password
- Chrome uses settings in Windows’ internet options so the IE options should sufficesource
- about:config -> network.automatic-ntlm-auth.trusted-uris -> add url of application
Different Domain or No Domain Binding
TODO I did not get this to work from a remote site, with or without VPN connection (flashes a new console window and dies instantly, unable to capture error message)
If you are developing on a computer that is not bound to a domain, or is bound to a different domain that the app should authenticate against, you can run the server like so:
runas /netonly /user:<user> «<command> <args. >»
where <user> is domain\username or username@domain .
IIS: you must establish trust between the two domains to be able to run app pools under a user in different domain than the server.